How To Reduce Photo File Sizes On Your iPhone

No matter how much you might love your Apple products, even the most dedicated fans can be frustrated with its storage space. Unlike some Android phones, whose storage space you can expand with an SD card, an iPhone can't change its internal device storage as easily.
Apple has been introducing iPhone models with more storage space for the past few years, which has been a welcomed change. The company's also made iPhones work well with cloud storage, and it's even introduced compatibility with external storage devices with its Files app.
Still, some people feel like there's never enough space. One reason is that many of us often take and share thousands of photos. Add in the iPhone's increasingly advanced cameras possibly pushing file sizes up too, and you can see where this is going.
Because of the nature of how we use our iPhones, you're bound to invest in cloud storage solutions, like iCloud+, at some point. Or, you might even be one of those rare people who buy external hard drives just to store vacation pictures. Regardless, this doesn't mean you shouldn't try to free some space on your phone.
So, if you're ready to get back some storage space and maybe a few extra dollars worth of storage solutions, here are some quick and easy ways for photos to take up less space on your iPhone.
Reduce image quality on iPhone

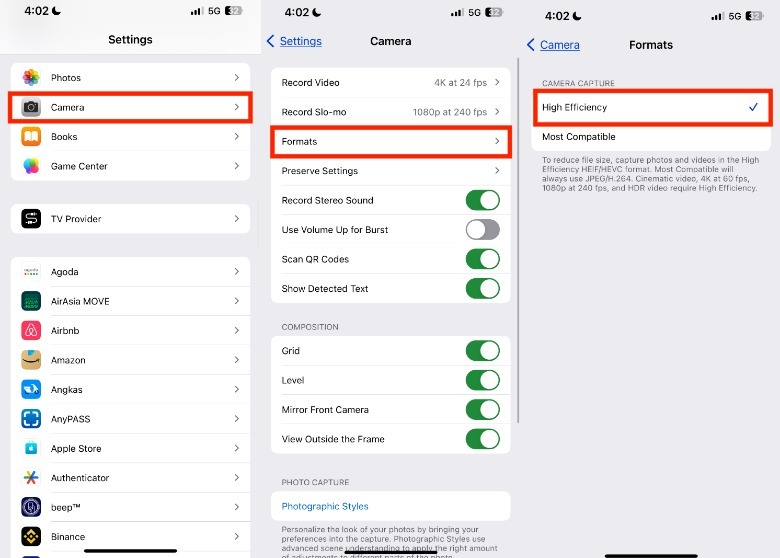
For a long time, keeping photo quality high was important because it would help translate photos better on print. However, these days, it's not as critical if you only ever keep your photos in digital form. So, if you're looking to cut back on your photo file sizes, cutting back on quality is a good way to start. To reduce the overall file size of your iPhone photos, you can use the High Efficiency setting on your iPhone camera. To do this, go to your Settings > Camera > Formats. Next, under Camera Capture, tap High Efficiency. Afterward, your photos will be saved as an HEIF (High-Efficiency Image File) file type.
 Quina Baterna/SlashGear
Compared to JPEG, the HEIF is known to use less storage without compromising image quality. However, keep in mind that aside from Apple and newer machines, HEIF images are not as compatible with older devices. Because of this, it is possible to encounter problems with opening HEIF files on some platforms like Windows or Android.
If you're worried about HEIF compatibility, Apple has introduced settings to change your iPhone camera from HEIC to JPG, making sure any photo you're planning to transfer is in a compatible format. However, if you're using a device that doesn't have this option, you can also use one of the many HEIF to JPEG converters available online, like FreeConvert.
Clear recently deleted in the Photos app

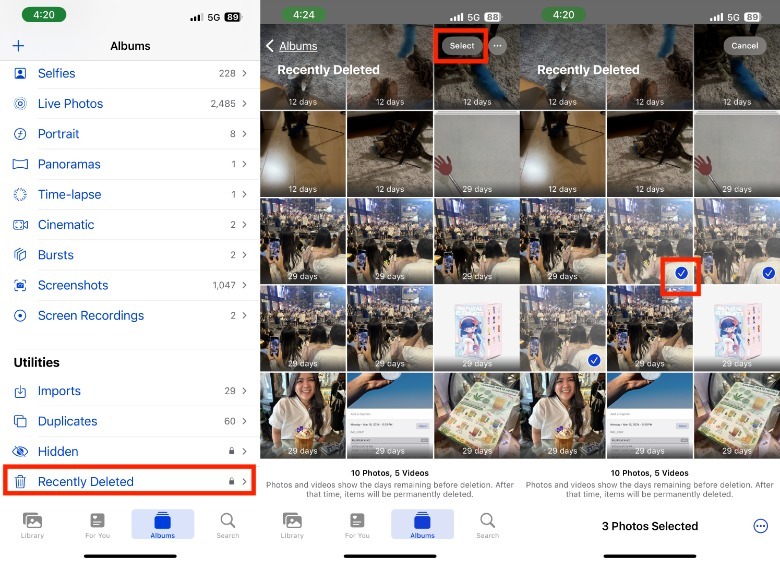
Many people don't realize that when they delete a photo on their Photos app, those images aren't removed from their iPhones immediately. Typically, the iPhone keeps newly deleted photos and videos in a "Recently Deleted" folder for up to 30 days. The Recently Deleted folder is perfect if you tend to rage-delete entire albums of your partner's face after every fight, for example. However, for people who need storage urgently, this folder can be why your iPhone's used storage isn't changing after a photo deletion spree. To get rid of your photos in the Recently Deleted album permanently, here's how:
 Quina Baterna/SlashGear
- On your iPhone, launch the Photos app.
- In the lower section of the screen, tap Albums.
- Under Utilities, tap Recently Deleted.
- In the upper-right corner, tap Select.
- Select what photos you want to delete.
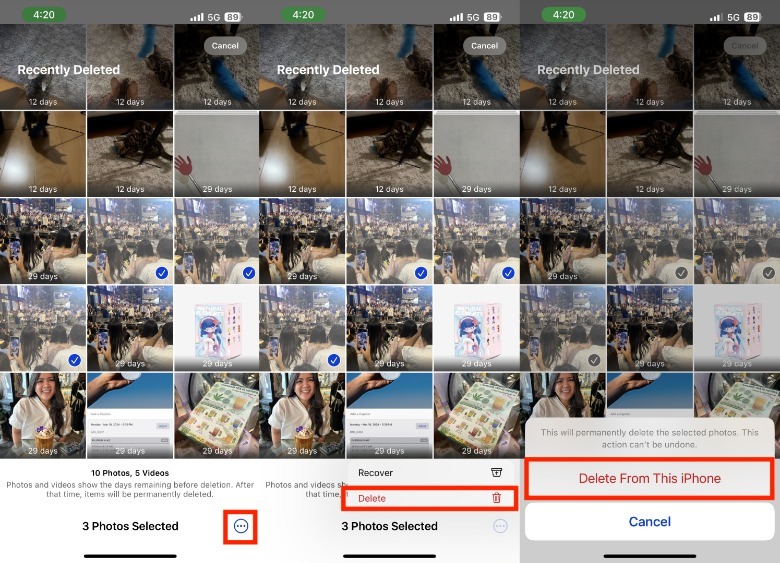
Quina Baterna/SlashGear - Tap the more or three dots icon in the lower-right corner of the screen > Delete.
- (Optional) To delete all the photos at once, tap the more or three dots icon in the lower-right corner of the screen > Delete All.
- On the pop-up, tap Delete From This iPhone to confirm your decision.
If you're hesitant to delete some photos forever, you can leave them in the folder, and the Photos app will hold onto them until the 30-day limit is up.
Compress photos using messaging apps
Lots of stored photos are one of the reasons why apps are draining your data. Because of this, many messaging apps have built-in tools to compress photos people have shared, making their file sizes smaller mostly without compromising the viewing experience. For example, here's how to do it on WhatsApp:
 Quina Baterna/SlashGear
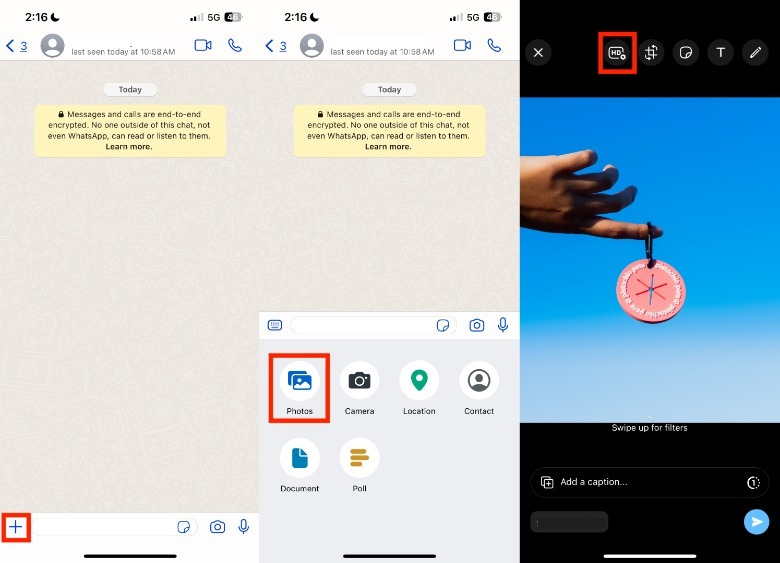
- On your mobile phone, launch WhatsApp and open a chat with a friend.
- In the lower-left corner of the screen, tap the + icon.
- Tap Photos > select the photo that you want to compress.
- In the upper portion of the screen, tap HD.

Quina Baterna/SlashGear - Select Standard quality.
- In the lower-right corner of the screen, tap the Send icon.
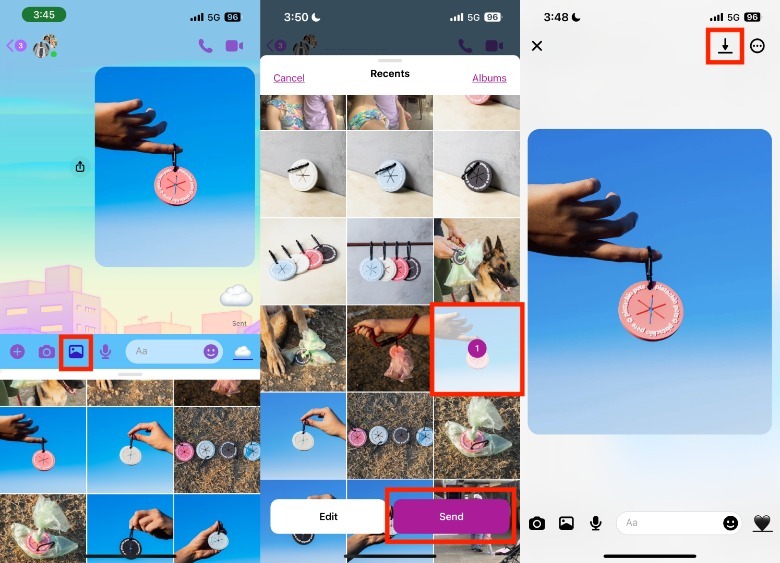
- Download the new photo and delete the old one.
In the example comparison, the original photo in the sample was 6 MB, while the compressed from WhatsApp is 45 KB.
If you use Messenger, here's how to compress your photos:
 Quina Baterna/SlashGear
- On your Messenger app, open a chat with a trusted friend.
- In the lower-left corner of the screen, tap the image icon.
- Select the photo that you want to compress and press Send.
- Tap the photo. In the upper-right corner of the screen, tap the download or downward arrow icon.
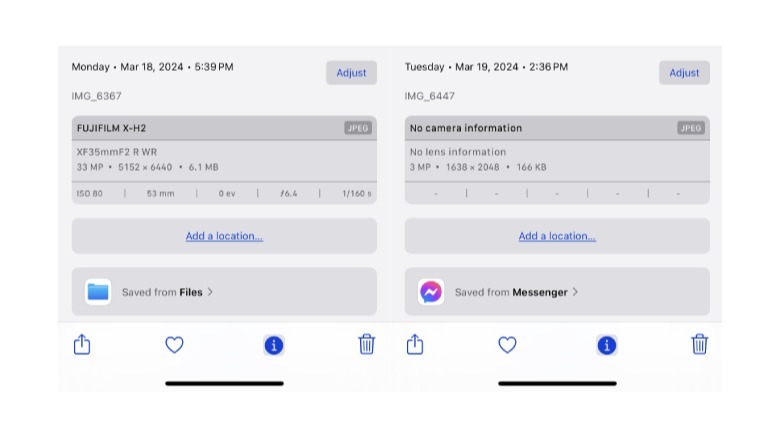
Take note, compressing the same photo on Messenger results in a file of 166 KB, which is more than triple the size of the WhatsApp version.
 Quina Baterna/SlashGear
Turn Live Photos into still photos

Sometimes, we can get so carried away with taking photos that we miss the moments we're capturing themselves. Thankfully, Apple's Live Photos is designed to help us relive that moment with a short recorded video and sound that plays when you tap and hold on the photo. There's a tradeoff though, in that the extra video and audio attached to the photos can clog up your iPhone. Here's how to keep your favorite Live Photo shot, while getting rid of the audio and video that don't pass the vibe check:
 Quina Baterna/SlashGear
-
On your iPhone, open the Photos app.
-
In the lower portion of the screen, tap Albums.
-
Under Media Types, tap Live Photos.
-
Select what Live Photo you'd like to delete photos from.
-
In the upper-right corner, tap the more or three dots icon.
-
Tap Duplicate.
-
In the pop-up provided, tap Duplicate as Still Photo.
-
Once the duplicate of the Still Photo appears in your album, you can delete the original Live Photos.
Because Live Photos is on by default, you might want to consider turning the Live Photo feature off to prevent your iPhone from racking up more storage space in the future.
Remove duplicate photos from Burst Mode
For people who have trouble getting the perfect shot, Burst Mode is the gift that keeps on giving. Burst Mode lets you take dozens of photos in succession, making it a great tool for high speed action shots like jumping into the water during a holiday, or documenting a sports match. If you've disabled the Live Photo feature like in the instructions above, your iPhone camera will also use the Burst Mode to take 10 shots when using the timer feature for photos. As you can imagine, Burst Mode images can clog up your storage. So, here's how to keep the photos that matter and ditch the rest.
 Quina Baterna/SlashGear
-
On your iPhone, open the Photos app.
-
In the lower portion of the screen, tap Albums.
-
Under Media Types, tap Bursts.
-
Select the key image of the burst photos you would like to view. In the upper-left corner of the screen, you'll be able to see how many photos are in this specific burst shot.
-
In the lower-right corner of the screen, tap Select.

Quina Baterna/SlashGear -
Choose what photos from the photo set that you would like to keep.
-
In the upper-right corner, tap Done.
-
On the pop-up, select Keep Only X Favorite.
Merge duplicate photos

In the pre-smartphone era, many of us treated every camera click as sacred. But these days, you can be as trigger-happy as you like, and just delete photos afterward. Except, it can still be a problem when you forget to delete them. Thankfully, Apple introduced the Merge feature, which can assist in deleting duplicate photos directly from its native Photos app.
To be considered a duplicate, Apple indicates that a photo can either be an exact copy that does not share the same metadata information, or photos it deems are similar in appearance, but could have a different resolution or format. Here's how to use it.
- On your iPhone, launch the Photos app.
- In the lower portion of the screen, tap Albums.
- Under Utilities, tap Duplicates.
- Review the similar-looking photos that the Photos app has presented to you.
- If you want to select the particular photo you want to delete, tap the photo and tap the trash icon in the lower-right corner of the screen.
- If you don't really mind which photo remains after the merge, tap Merge next to the date of the photo.
- In the pop-up, confirm your decision by tapping Merge X Exact Copies.
Afterward, the Photos app will keep one copy and the other photo will be sent to the Recently Deleted folder. However, if the Merge feature doesn't cut it for you, you can download a third-party app to give you more control over the processing of deleting your duplicate photos.
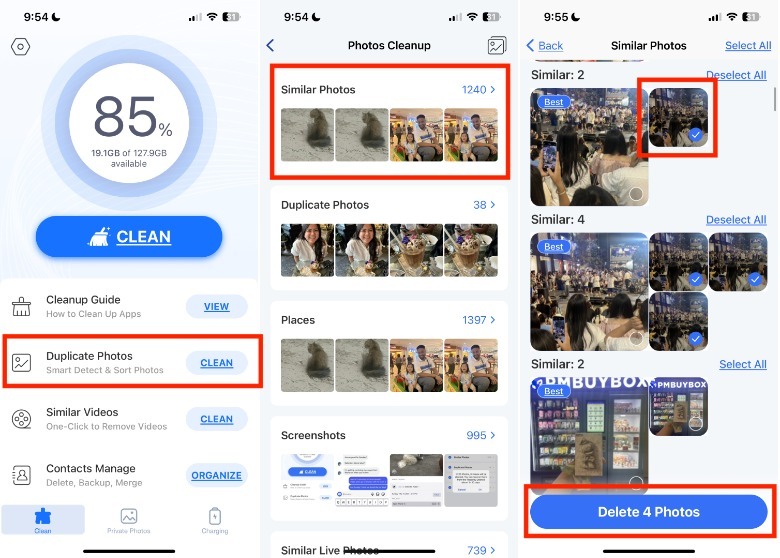
Use an Phone cleaner app
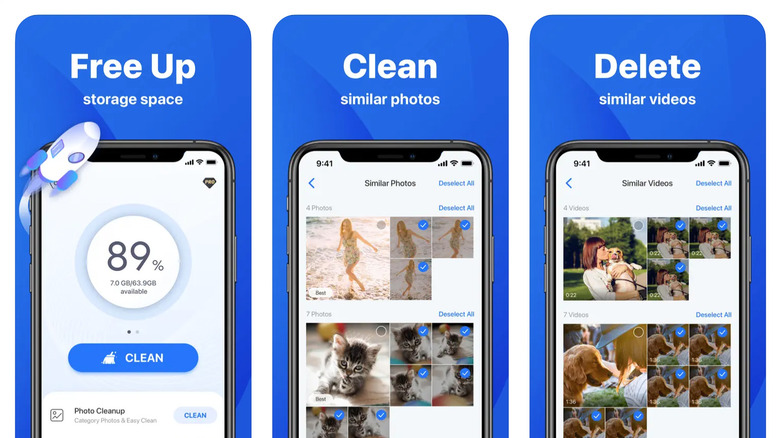
If the built-in Photos app Merge feature isn't enough for you, you can download a third-party app like Phone Cleaner, which has an average rating of 4.6 stars from over 92,500 users on the App Store. Depending on your needs or how frequently you catch yourself running out of storage space on your iPhone, you can get a one-week subscription ($3.99) or a lifetime subscription ($59.99). Here's how it works:
 Quina Baterna/SlashGear
-
In the lower-left portion of the screen, tap Clean.
-
Next to Duplicate Photos, tap Clean.
-
Tap Similar Photos. Select what photos you want to delete from your device and tap Delete X Photos.
-
In the pop-up that will appear, which will mention that you'll still need to manually delete photos from the Recently Deleted album, tap Delete to confirm your decision.
-
Repeat this process for the Duplicate Photos, Similar Live Photos, and Similar Burst Photos sections.
-
Under Photos Cleanup, you will also be able to review and mass delete screenshots and photos that are segregated by location.
 Quina Baterna/SlashGear
Alternatively, for a faster option, you can go to your Clean homepage and tap Clean. Next, wait for the app to analyze your iPhone's photos and tap Clean Up. In the pop-up provided, review the number of photos and videos it plans to delete and tap OK.
Turn off HDR

High dynamic range (HDR) is a feature that's designed to help you take more detailed photos. According to Apple, HDR works by taking several succeeding photos with varying exposures and combining them to optimize the final photo. In addition, Apple turns HDR on automatically when the iPhone cameras detect the feature will be "most effective." Unfortunately, HDR can't be disabled for newer iPhone models. However, for older iPhone models, such as the iPhone 12, 11, XS, and XR, here's how you can turn off the automatic HDR:
-
On your iPhone, go to your Settings app.
-
Scroll down and tap Camera.
-
Turn off Smart HDR.
For iPhone models 12 and onwards, you can also turn off HDR video recording, which can save you a few GB of storage if you're not big on video quality. To do this, here's how:
-
On your iPhone, go to the Settings app.
-
Tap Camera > Record Video.
-
Next to HDR Video, toggle off the button.
Once you do this, you can effectively reduce the video file size by approximately 5 MB to 40 MB per minute of video, depending on the resolution. With HDR off, a minute of 4K at 60 fps is an estimated 400 MB. On the other hand, a minute of 720 HD at 30 fps is 10% of that (40 MB). Alternatively, there are ways you can compress videos on your iPhone that also help reduce your overall storage issues.
Optimize your iPhone storage

By optimizing your iPhone's storage, you can reduce the amount of file space your photos are collectively using up in your device. On your iPhone, you can optimize on-device storage and cloud storage. For iPhone users with devices running on the latest version of Apple's iOS software, the company has a feature called Recommended for You that can assist in identifying data, like image files, that you might want to delete. Here's how to get started:
-
On your iPhone, launch the Settings app.
-
Tap General > iPhone Storage.
-
Next, scroll to Recommendations and tap Show All.
Often, this section will include the option to review your photos or videos, wherein it will list the largest files in descending order. After selecting these images or videos, you can tap the delete button in the lower-right corner of the screen. If you ever catch yourself with that dreaded low storage pop-up and find that even your iCloud account has reached its limit, don't worry. Here's how to optimize storage on your iCloud storage:
-
On your iPhone, launch the Settings app.
-
In the top portion of the screen, tap your name.
-
Tap iCloud > Recommended For You.
In some cases, it will recommend reviewing your media files (photos and videos), regular files, inactive backups, and of course, upgrading your iCloud+ storage.