15 Google Chrome Settings You Need To Change Immediately
Unless you lived through it, it's hard to imagine a time before Google, when Internet Explorer was actually a commonly used browser, people asked Jeeves their internet questions, and if googling was a verb at all, it meant something totally different.
Today, even while Internet Explorer or Edge might come standard on a new computer, one of their most common uses is downloading Chrome. Chrome is easily the most popular web browser on the planet, taking up nearly two thirds of the browser market. There are good reasons for its popularity. It's sleek, it works well, and it does everything we expect a web browser to do. It doesn't hurt that it has Google's search engine built in. Still, while it's doing all the things you want it to do, it might also be doing some stuff you don't want and probably don't even know about.
Here are some settings you should check out and consider changing, for a better, more private, or just a more customized browsing experience.
Run a safety check
Browsing the internet has become such an ordinary part of our everyday lives that most of us don't even think about it. We use the internet to keep in touch with friends and family, to answer questions, or to simply fill the moments between appointments.
Using the internet, however, is an inherently connected activity. Each time we open up the browser we're entering into an interconnected space full of other people, some of whom might have malicious intent. We're especially vulnerable when we're creating accounts with common passwords or sharing payment or other personal information. That information can even fall into the hands of the wrong people months or even years after we entered it into the browser, so it's important to make sure your data remains protected. That's where Chrome's safety check comes in.
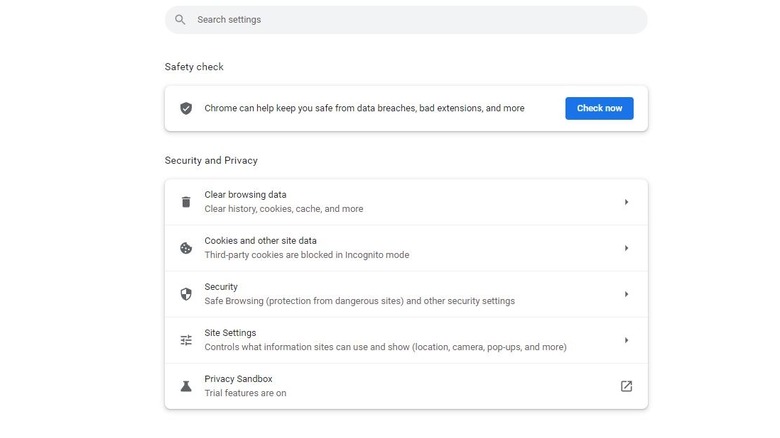
The process is simple. Open up the Chrome control center at the top right of your browser. It's just below the X which closes the browser and looks like three vertical dots. From there, you'll select Settings, and a new tab should open. Click Security and Privacy from the menu on the left and Safety Check should be the first option.
When you click Check Now, Chrome will look for browser updates, compromised or weak passwords, any harmful extensions, and more.
Take safety even further and scan your computer for malware
The Safety Check goes a long way toward identifying any security or safety gaps present in the browser itself, but Chrome can do even more to make sure your computer is operating safely. Using the cleanup tool allows Chrome to search your computer for any harmful software which may have found its way inside.
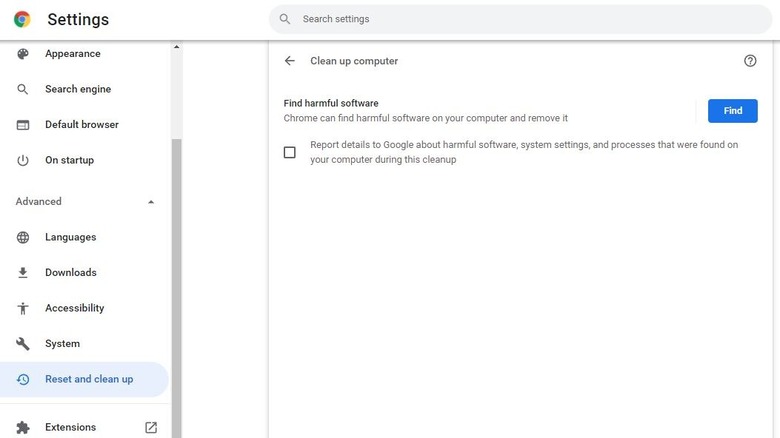
Running the cleanup tool identifies that software on your computer and gives you the option to remove it. The process is pretty simple. First, access the three dots control center from the top right of your screen. Next, click settings and open the Advanced menu from the options on the left. Click reset and clean up, then clean up computer.
From there you can choose whether or not you want to report the findings to Google. After clicking the Find button, you'll see a message indicating that Chrome is searching for harmful software. The cleanup process can take a few minutes to complete but when it's done, you'll know if you have any harmful programs on your computer and have the opportunity to get rid of them.
Give your web history an expiration date
If you're Gen Z or an older Millenial, you're probably grateful that you were allowed to get through your adolescence without having your every move and action recorded in the digital record books for all time.
Still, even now that you're an adult and presumably less reckless, the idea that everything you do today is recorded forever isn't exactly comfortable. We'd all be well served by forgetting anything we did online more than ninety days ago. To that end, we're in luck. Google offers the ability to delete web and location history after a given time.
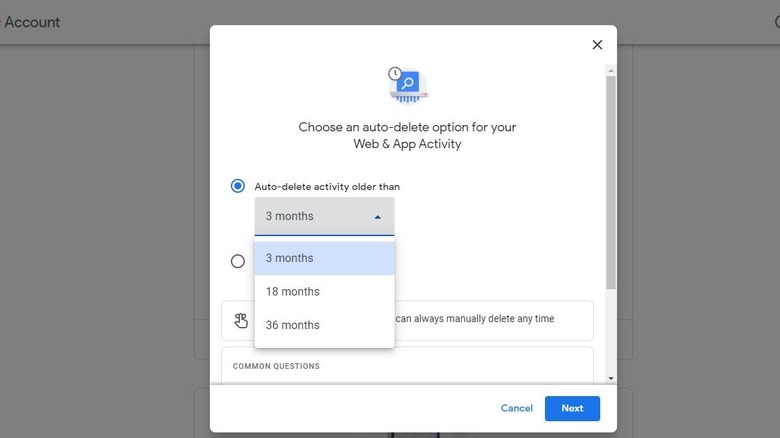
Any Google accounts created in the last couple of years come with the auto-delete function already enabled, but if you created your account prior to 2020 you'll likely need to set this up yourself. The first step is accessing Google's Activity Controls. Then, you'll scroll down and choose an auto-delete option. From there, you can select either 36 months, 18 months, or 3 months. You can also manually delete all prior activity.
Change your search engine
Just because you're using Chrome as your browser, doesn't mean you have to use Google as your search engine. Google has made a name for itself by being the most accurate and convenient search engine on the internet. It's difficult to argue against its accuracy and convenience and if that's all you care about, you can move on and go about your business. But accuracy and convenience do not mean safety and security. Google largely makes money by selling advertising, and it pulls that off by gathering information about the people who use its services.
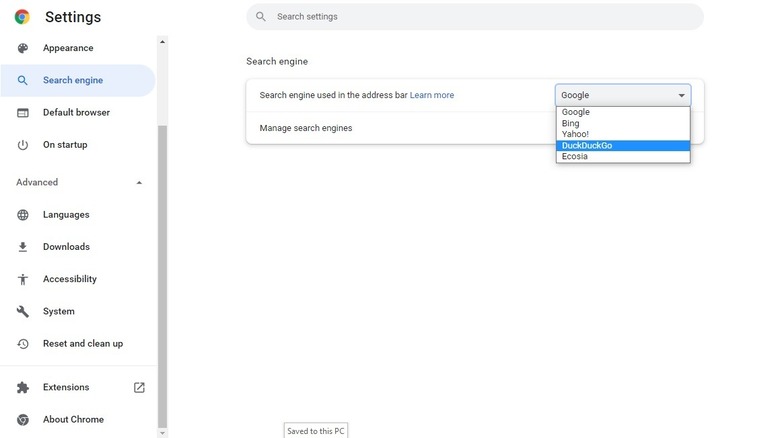
If you're looking for something with a little more built-in privacy, there are better options, like DuckDuckGo, which prioritizes your security over anything else. There are, of course, other search engine options and whichever you choose, you can easily set that to be your default inside Chrome.
To change your search engine, simply open the three dots menu at the top right of the screen and select Search Engine from the menu on the left. From there, you can select a handful of engines from the dropdown or add additional search engines.
Turn off third-party cookies
We all know that as we navigate around the internet, we're asked to accept cookies, not the tasty kind but the kind which stores data for particular sites. What some of you may not know is that you're also pocketing cookies from third parties which you may not even be aware of.
Every time you go to a site, you're asked to accept cookies which improve the functionality of that site, but you're also given cookies from other sites like Facebook which are used to track your movements from website to website and feed you more relevant advertising.
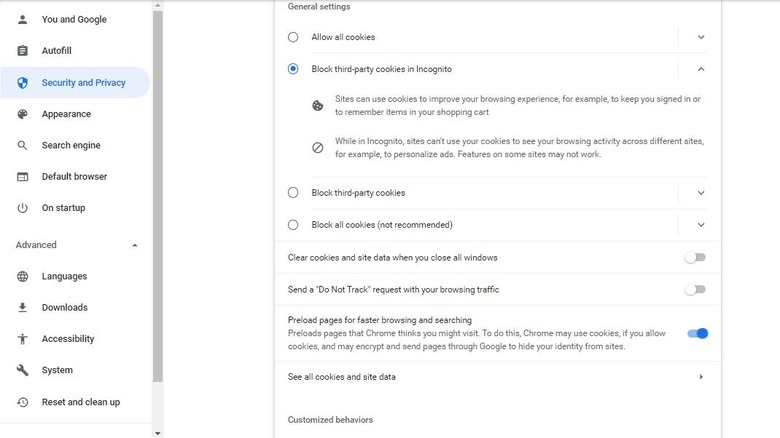
Google has plans to block third party cookies for all users, but those plans won't go into effect until at least 2023. In the meantime, if you want to block third party cookies, you can do so manually.
Click the three-dot menu and select Settings. From there, click Security and Privacy and select Cookies and other site data. From there, you can block all third-party cookies, either while you're in incognito mode, or all the time.
Block pop-ups
Do you remember when the internet use to just show you the things you wanted it to show? Now, you have to wade through a minefield of pop-ups, newsletter signups, and more, just to get to the piece of content you were looking for.
There are a number of solutions which simplify your browsing experience. Sure, you could download a plugin to block all of the extras for you, or you can just change your settings.
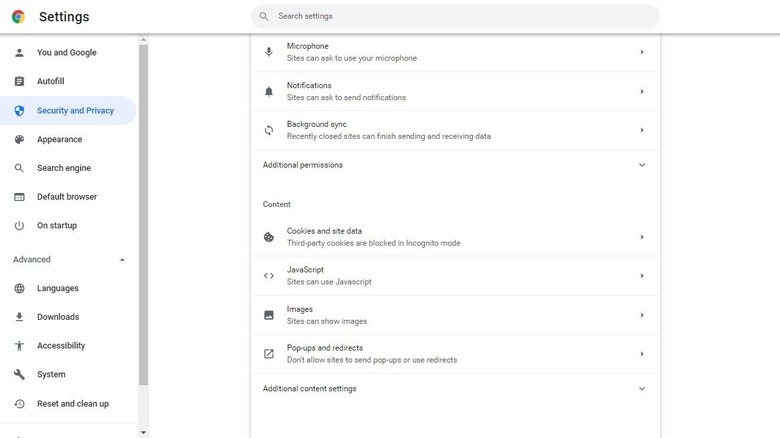
As usual, select the three dots menu from the top right of the screen and click settings. Next, select Security and Privacy, and open Site Settings. Scroll down to the Content section and select Pop-ups and redirects. From there, you can choose whether or not sites can send pop-ups or redirects.
You can also create lists allowing specific sites to send pop-ups or redirects or blocking them from doing so. Now you can customize your browsing experience however you prefer, either blocking all pop-ups, or specifying which ones you're willing to see.
Clean up site permissions
Sometimes, a specific site might ask to send you notifications, or ask for access to your location, your microphone, or your camera. There are countless reasons why a site might temporarily need access to one or all of these functionalities, in order to improve your experience using their services.
Maybe you said yes because you needed to grant that permission for a specific interaction, and now you've collected a long list of sites which have access to your computer in ways you might not want. You're probably not even aware which sites have access to your computer's capabilities.
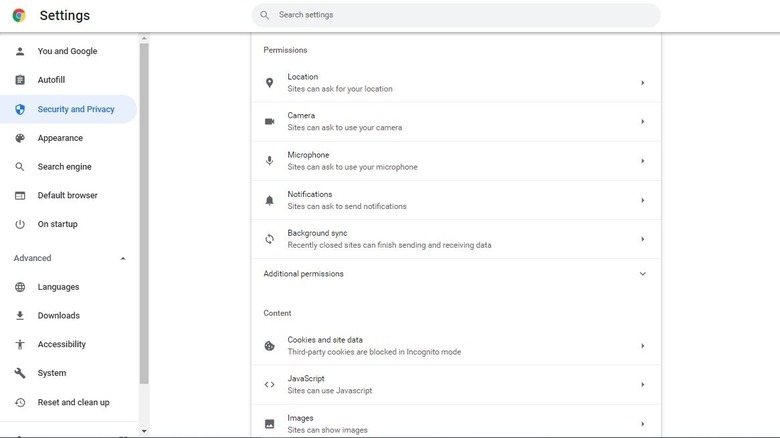
You can see what sites have access to what and revoke any access you no longer want them to have at any time. You'll want to navigate to the same menu you used to control pop-ups by clicking the three-dot menu and selecting Settings.
Next, you'll select Security and Privacy and click Site Settings. Scrolling down to Permissions and Additional Permissions lets you see what sites, if any, have access to your location, camera, microphone, and more.
Turn down the notification volume
There you are, just minding our own business, finding your Zen while you scroll through Instagram. Then, you're ripped out of the moment by a blaring notification chime through your headphones.
Chrome's default setting is such that it notifies you any time a site, app, or extension wants to send you some information. These notifications can start to stack up, especially as almost every site prompts you to add notifications. Over time, the notifications can become overwhelming until they are interrupting your ability to surf the web comfortably.
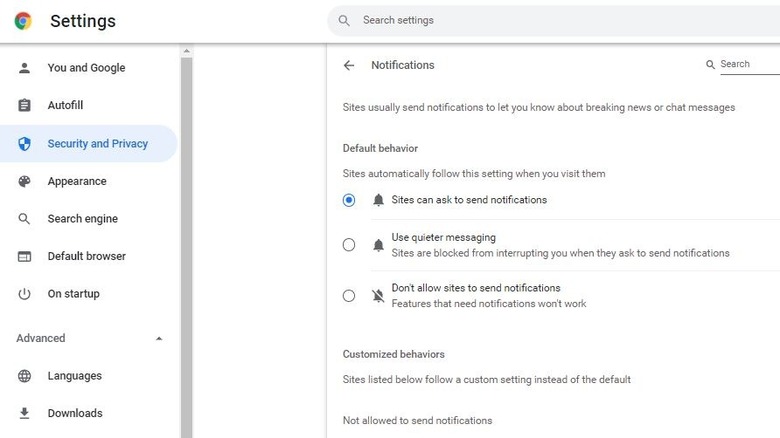
Never fear, you have a couple of options to quiet your browsing experience. Click the three-dot menu and select Settings. Then click into the Security and Privacy menu and click Site Settings. From there, scroll to Permissions and select Notifications.
From this menu, you can see what sites are allowed to send you notifications and which ones aren't. You can also choose to block all sites from interrupting you, or from sending notifications at all. Notifications should be an added convenience, not a distraction from your normal browsing. Making regular checks in the site permissions menu leaves you in control.
Turn off any background apps
In an effort to make your experience on the internet more convenient and more seamless, many apps run through Chrome or other browsers and continue to run even when you don't have your internet browser open.
This isn't necessarily nefarious. Some apps continue running in order to provide you with the latest updates and notifications. If that's something you're looking for from your apps, then scroll on. No action needed.
Still, having your apps running continuously in the background takes up system resources and battery. If the speed and battery life of your computer are more important than continuous updates, you may want to limit or eliminate the apps allowed to run through Chrome in the background.
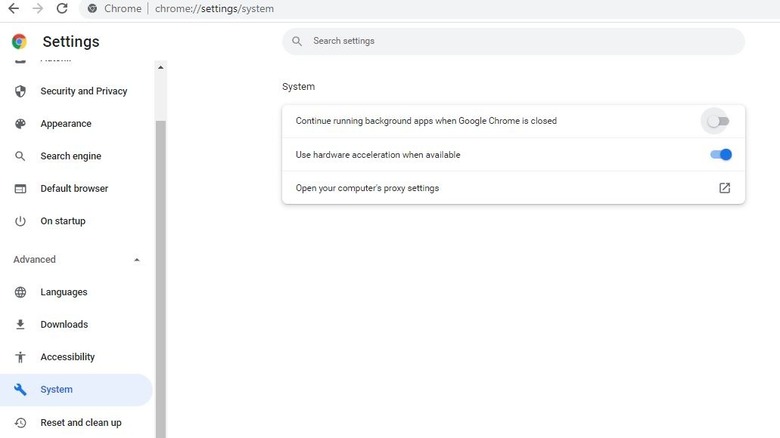
Chrome allows this background activity by default, but you can limit it or turn it off by clicking the three-dot menu at the top right of your browse and selecting Settings. From there, open the Advanced settings from the menu on the left and click System. At the top of the screen, you'll see a toggle switch which allows background apps to continue running when Chrome is closed. Simply click the switch to turn off all background apps.
Reduce what Google knows about you
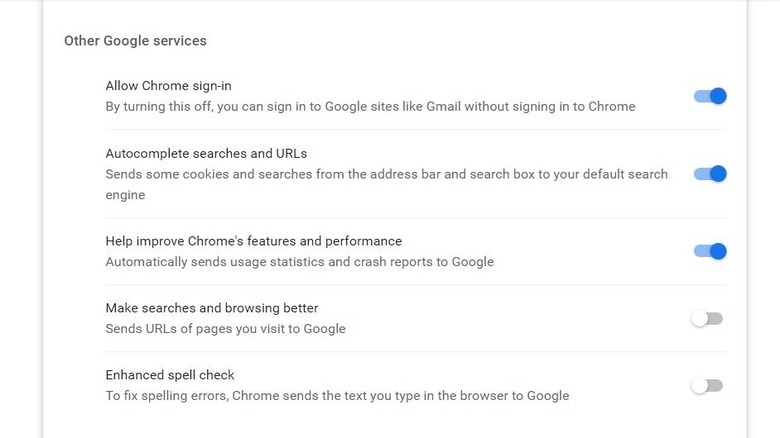
By default, Chrome collects all sorts of information about you, in order to optimize your search engine experience. Specifically, Chrome collects data about any bugs you might encounter in order to catalogue and correct them in order to improve your future interactions in the browser.
Allowing Chrome to collect that data can improve the browser on the whole by letting Google know when crashes occur and how much memory is being used when navigating between pages, but you're under no obligation to provide that information to Google. In fact, you can control what information, if any, Google collects about your browsing activities.
From the three-dot menu, click Settings, then navigate to the You and Google menu. Click through to the Sync and Google services menu. From there, you can control what information is automatically collected or used by Google, including autofill, spell check, and error reports.
You might feel like it's your responsibility to provide information to improve the Google experience, but there are millions of other users providing the same information. You can opt out guilt free.
Shrink your bookmarks
This one isn't strictly a settings change but it will enhance your Chrome experience, especially if you keep a lot of bookmarks in order to visit the same sites over and over.
If you're the sort of person who saves a lot of bookmarks, you've probably noticed the bookmarks bar filling up pretty quickly. Before long, you're forced to create folders to store your bookmarks, making them more difficult to access. Moreover, you might have noticed that a significant portion of your bookmarks bar is taken up by text which you might not necessarily need.
If you have something bookmarked, it's likely that you use it often enough that you recognize the icon, and don't need the associated text to tell you what it is. That might not be true for every bookmark, especially if you have multiple bookmarks with the same icon, but it will be true for some pages.
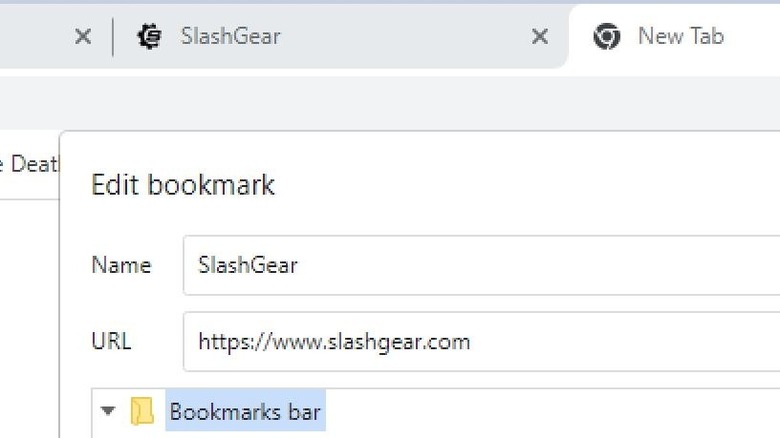
If you recognize the bookmark icon and know where it leads, you can minimize the mount of real estate it takes up on your bookmarks bar. Simply right click on the bookmark in question and select Edit. Now, delete the name and save. Your bookmark will remain where it is but will shrink down to just the icon, without taking up any additional space. Now, you have even more space to save additional bookmarks.
Organize using tab groups
If you're the sort of person who has dozens of tabs open at any given time, and who struggles to find the page they were just on, tab groups might be the solution you've been looking for. Like the above function, there aren't any settings for you to change. Instead, it's a tool for you to utilize which may not be readily apparent. You might think of it as more of an Easter egg than an actual settings change.
Sure, you could close down some of your tabs or even save them in your favorites, but that would be too easy. Instead, you can put them into groups, making them easier to find when you need them.
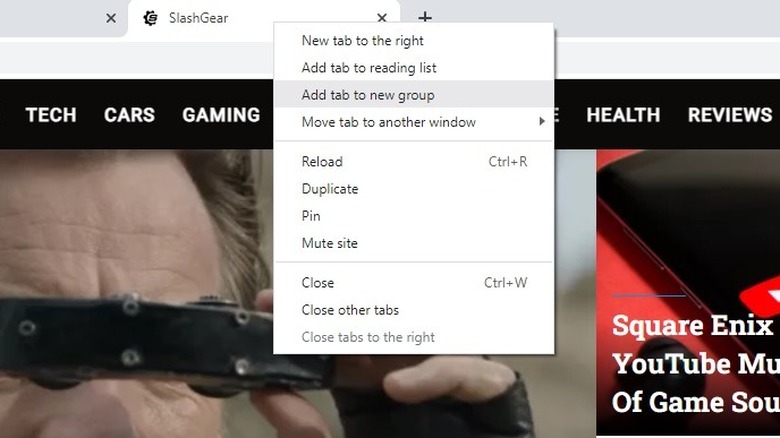
Simply right-click a particular tab and add it to a group. If you don't yet have any groups set up, you can create them as you need them. Maybe email, Slack, and Discord all go into a Messages group. Likewise, Spotify, YouTube, and Netflix can all go into an Entertainment group.
However you choose to break up your tabs, you'll be able to more easily find them once you've sorted them into groups. If you're going to be chaotic, at least introduce a little bit of organization into your life.
Simplify your view with Reader Mode
Usually, when you open a web page, it's because you want to read the article or content on that page, not because you want to look at the advertising or other prompts which might pop up. Getting to the information you want sometimes requires navigating through a veritable minefield of advertisements and pop-ups blocking out the content you're actually looking for.
Some browsers have a reader view built in, which strips away any additional distractions or clutter and reduces the page to a version of the content which is easier to consume. Chrome, however, doesn't have that option, unless you know where to look.
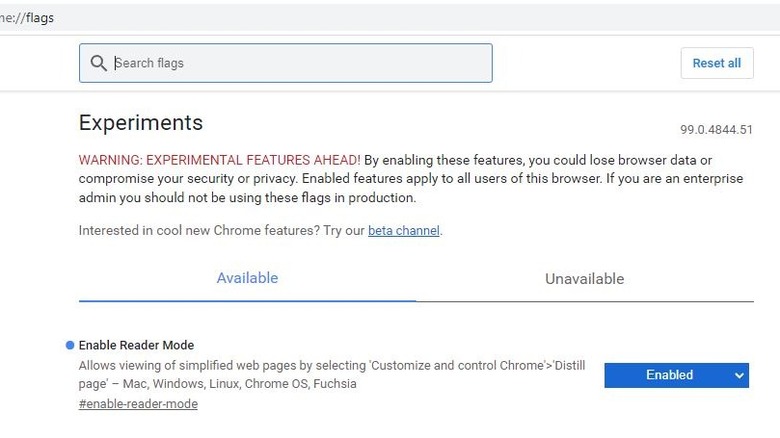
Chrome Flags are a collection of experimental features which come with all of the risks and potential benefits inherent in untested and unverified features. They may not work correctly and may otherwise alter your browser experience. Use at your own risk.
Among the list of experimental features, is a Reader Mode which strips any page down to just the essential text and images.
In order to access the flags, you'll need to enter chrome://flags into the search bar. From there, you'll find a list of experimental features. Look for the one called Enable Reader Mode and click Enabled from the associated dropdown menu. Once you refresh Chrome, you'll see an icon resembling the page of a book in the search bar. Clicking it produces a minimized version of any page, without the bells and whistles.
Add captions to everything
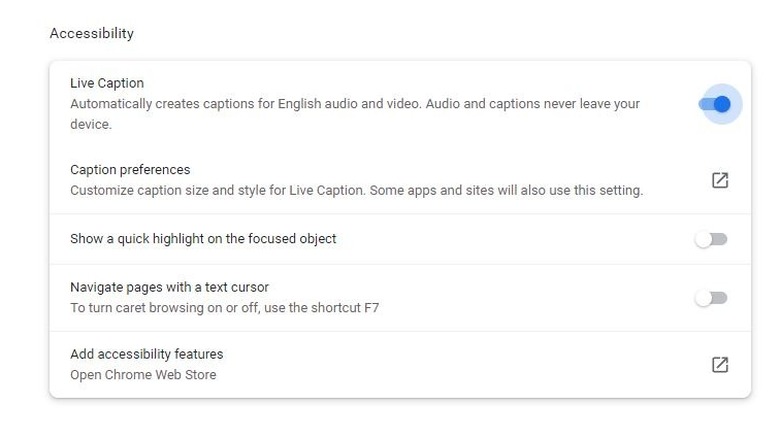
Whether you're hard of hearing, or just a part of the growing group of people who prefer to use captions whenever possible, Chrome has a setting for you. In the accessibility portion of the settings menu, you can turn on captions which will kick in any time there's spoken audio. That means that whether you're scrolling social media, watching YouTube, or listening to Spotify, Chrome will generate captions any time there's audio present.
The captions aren't perfect, but they're pretty accurate, especially considering they are created by software generating text in real time. To enable captions, click on the three dots menu from the top right of the screen, then navigate to the advanced settings menu. From there, select Accessibility and toggle the live captions button on. You can also play with the caption preferences to customize the way your captions look on the screen. Never again will you have to wonder at the lyrics of a song.
Put the whole internet in dark mode
Some of us adopted the dark, others were born in it, molded by it. In either case, for some of us, dark mode is just better. The bright lights of the standard internet, with its white background and neon colors, can be overwhelming, especially if you're staying up past your bedtime and trying to be covert.
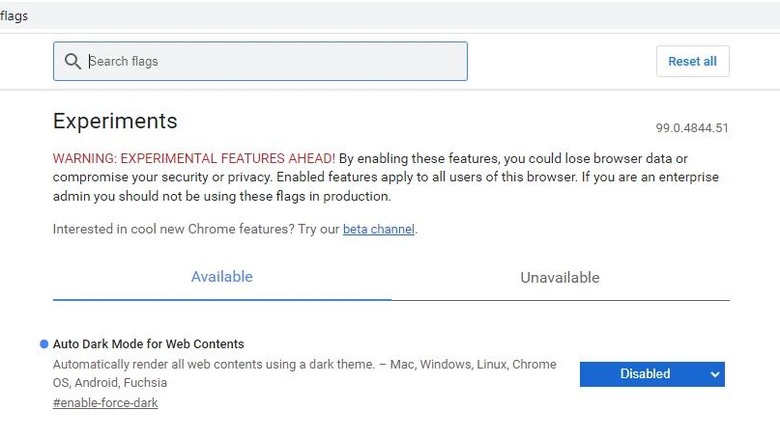
Now, you can put every website into dark mode all the time. This is another experimental feature found in Chrome's flags menu. Enter chrome://flags into the search menu. Now search for the option called Auto Dark Mode for Web Contents. It will automatically render web content in dark mode, if possible, making everything more palatable for midnight scrolling.
Some pages won't render quite right, but that's the sacrifice you make for using experimental settings, and if you're the sort of internet user who likes things dark, the occasional strangely rendered image is a worthwhile sacrifice for having the customized browsing experiences you've always wanted.
