10 Google Home Settings You Should Change Immediately
The Google Home app is your gateway to controlling various smart home devices. Google's Nest speakers — which are among the best smart speaker brands – connect to the Google Home app, along with several other IoT devices like smart bulbs, smart displays, etc. In fact, if you're looking to buy any of the best large smart TVs, they will also link to the Google Home app if they're running on the Google TV OS. With so many gadgets and appliances all over the house connected to Google Home, there are some settings inside the app that users may want to modify either for a better experience or to protect their privacy. After all, these smart devices are connected to the internet and are active most of the time.
This led to a deeper look into the Google Home app, revealing 10 settings that need your immediate attention. Whether you have a single smart speaker at home or a bunch of connected devices around the house, changing these settings will add more functionality to the gadgets, safeguard your privacy, and ensure you give out as little data as possible to Google. Additionally, some settings unlock features that you were probably never aware of. So, connect your smartphone to the same Wi-Fi network as your smart vacuum cleaners or outdoor gadgets, and follow the instructions to perfectly optimize all your devices.
Enable Voice Match
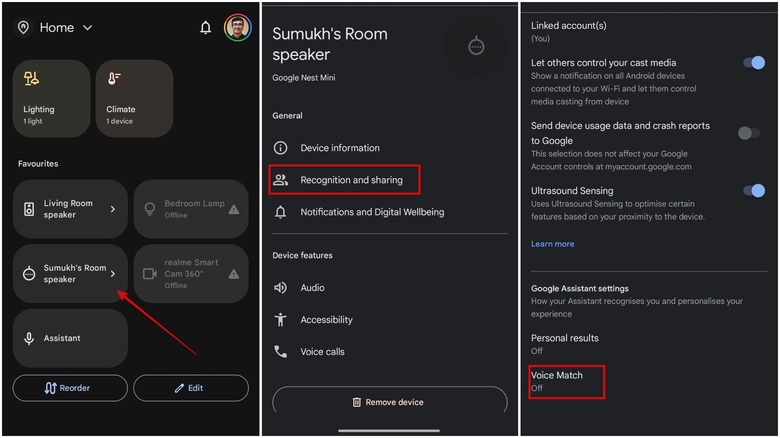
Voice Match is a feature of Google Assistant that detects who is speaking and then displays results accordingly. This is extremely helpful when multiple users have access to smart home devices. For instance, in a household where a Google Nest Hub is in a shared space like the living room, multiple family members might interact with the same device. In such cases, Voice Match ensures that personalized responses are provided. One person's calendar could be completely different from another's, or music preferences among users may vary widely. So, to determine who the query is coming from and cater to them in the best manner, Google uses Voice Match.
With Voice Match enabled, Google Assistant can detect who's speaking and output appropriate results accordingly. If one user asks to play their favorite playlist, the Assistant recognizes the voice and plays the correct one. Similarly, if someone asks about their 10 AM schedule for the next day, Google checks their individual calendar — not anyone else's. If you, too, live with multiple people who use your smart speakers, tap on the speaker inside the Google Home app, head to the Recognition and sharing settings, and enable Voice Match.
Turn on voice calls
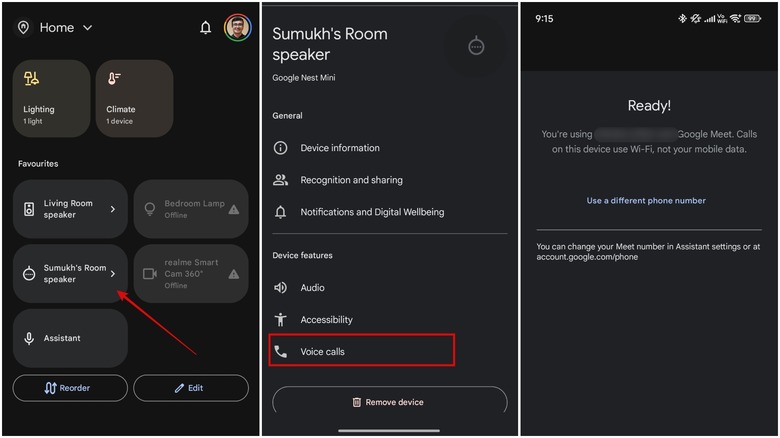
While your Nest speaker or display may not have a SIM card slot, did you know you can still use it to make voice calls directly from the speaker without being connected to your phone? This is possible via Google Meet and its ability to link your account to a phone number. If you're thinking why you'd want to do that — well, this feature is extremely handy if you have kids at home who don't have their own phones. They can ask Google Assistant to dial a parent's number, and the speaker will oblige. Another use case? If you're feeling a bit lazy or simply don't want to fetch your phone from another room, you can just ask your Nest speaker to call a contact.
Google disables this feature by default, but enabling it is simple. Tap on the speaker on which you want to enable calls, and then select Voice calls. Follow the on-screen instructions to enable it. Notably, Google uses the Wi-Fi network your speaker is connected to in order to make calls. So, if there's a Wi-Fi outage or downtime, the calls won't go through. Additionally, the setting is enabled per device, so if you have multiple speakers and want calling available on all of them, you'll need to repeat the process by selecting each speaker individually in the Google Home app.
Set home and work locations
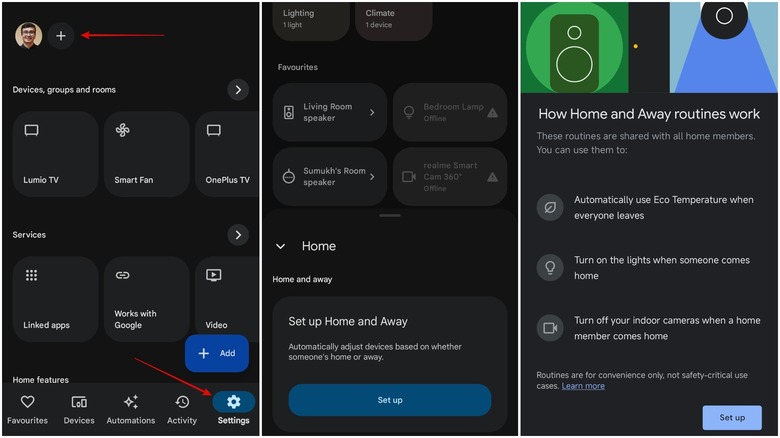
The Google Home app has access to your phone's GPS data. Thanks to this, it can detect when you arrive at a certain location and when you leave. Combine that with the Automations feature inside the Home app, and you get some fabulous use cases. First, go to the Settings section of the Google Home app and tap on the "+" icon at the top. Here, you'll be able to add your Home and Work addresses. Once that's done, you can set up various automations based on your phone's location.
For example, you can set your lights and all electronic appliances, including air conditioners, to turn off as soon as you leave home. This way, you don't have to go around the house to manually turn off all the switches individually. You can also set all of these switches to turn on automatically as soon as you arrive at home. A similar set of automations can be set for work. You can turn on your work computer or the coffee maker in the pantry as soon as you enter the office premises, and turn them off when you leave. The possibilities are endless. Once you set up these automations and routines, there's no going back since they make life so much more convenient and also help you save money on energy bills in the long run.
Disable personalized ads
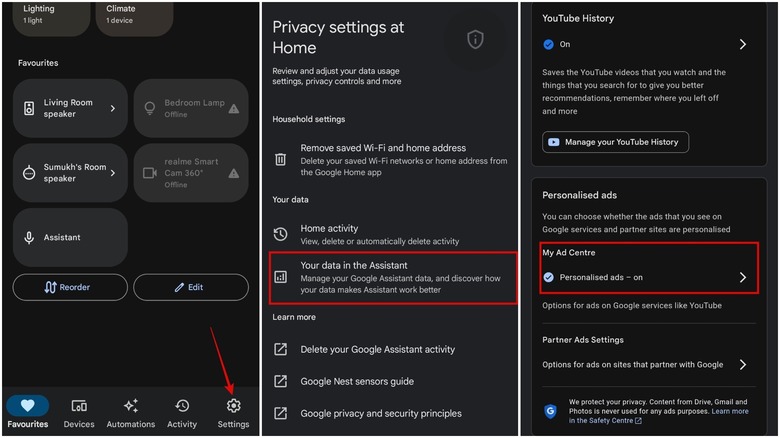
Everyone on the internet is served with ads. Whether it's on a website like this or while scrolling through social media feeds, ads are everywhere. After all, that's how platforms monetize content. While ads are a necessary evil, they become problematic when you start seeing ads based on your conversations, search history, or message exchanges. You may have often observed that searching for a specific item online results in ads about that item on several platforms. These personalized ads can also be triggered by something you've said in the presence of a smart speaker at home. Thankfully, Google lets you turn off personalized ads, and we recommend doing it right away to protect your privacy.
Head to the Settings pane in the Google Home app and navigate to the Your data in the Assistant section. Under My Ad Centre, disable Personalized ads. Disabling this setting turns it off on all your Nest speakers and for the Google Assistant built into your smartphone, too. Going forward, you shouldn't be seeing ads based on the queries you ask your smart speakers, or on the basis of your search queries when using Google. Since most ad engines on the web are powered by Google, disabling this setting should result in a noticeable drop in personalized recommendations.
Change Hey Google sensitivity
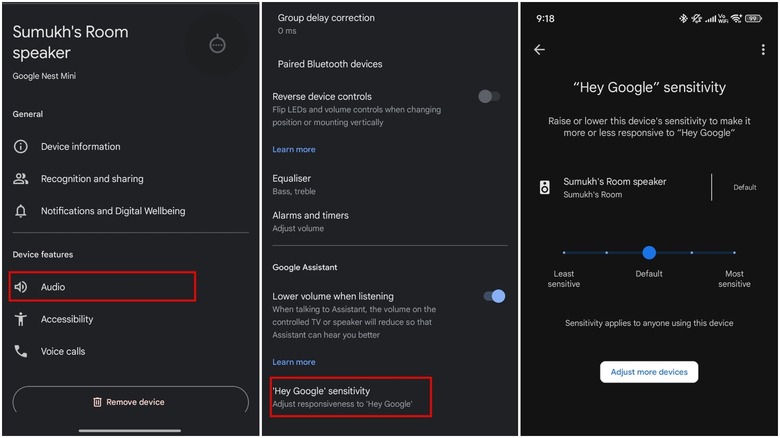
The hotword to trigger Google Assistant on any smart device is generally "Hey Google" or "OK Google." Depending on which smart device you have, the microphones onboard are generally extremely sensitive and can, hence, listen for the hotword from a long distance. However, if the speaker is in a different room or placed in a noisy environment, it may not be able to detect when the trigger phrase is uttered. If you're facing this issue often, it's time to up the sensitivity of the device's mics. Select the speaker, display, or device for which you wish to change the sensitivity, and go to the Audio section. Navigate to 'Hey Google' sensitivity and change it to Most sensitive.
On the contrary, if you think Google Assistant gets triggered more often than you'd like, and for phrases that sound similar to the trigger phrase, you may want to lower the sensitivity. For example, I've observed that the Nest speaker in my living room gets triggered when I say "noodles" or "doodle" at times, which is not the expected behavior. In such cases, move the slider to the Least sensitive setting. Since the sensitivity setting is device-specific, you can set one speaker to max sensitivity while reducing it for another. If you're in your bedroom but the living room speaker gets activated when you say "Hey Google" instead of the one in your room, it's time to meddle with the sensitivity settings.
Auto-delete audio recordings
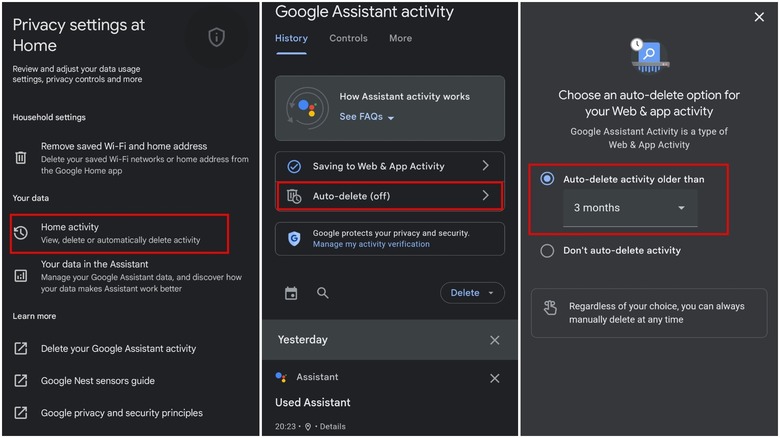
For those unaware, Google stores an audio recording every time you ask Google Assistant a query. Even if you don't have a query, it records the audio for a brief duration after you say "Hey Google." While it uses these recordings to optimize Google Assistant and give you better results over time, it is a potential threat to your privacy. Moreover, a lot of folks may not even be aware of the fact that their audio recordings are being stored and accessed by Google. Luckily, all the recorded data can be accessed by the user and deleted from Google's servers. While you can manually carry out this task every few weeks or months, Google also allows you to automatically delete all stored activity at set durations.
Navigate to the Settings tab in the Google Home app and select Home activity. Then, choose Auto-delete, and select the frequency at which you want your recordings to be deleted. The minimum duration is three months, and we suggest selecting it as a balanced choice between functionality and privacy. Save your preferences, and all your audio recordings will automatically be deleted from Google's servers every three months. Thankfully, this change takes place at an account level, so you don't have to modify the setting for each device individually. All your Google devices logged in to the same account will follow this procedure.
Add all your subscriptions
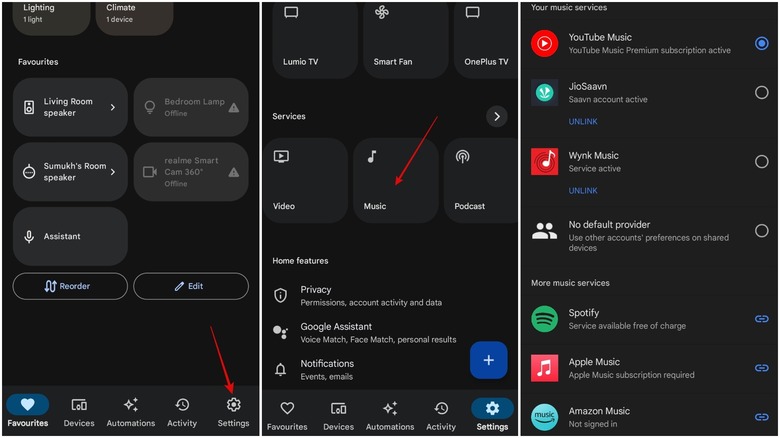
Depending on whether you have a smart speaker or a smart display, Google lets you link all your subscription services to recommend and source content from those platforms. If you have a Nest speaker, you can link all your music streaming apps. So, the next time you ask the speaker to play a song, it will browse through all of the linked platforms and then play the relevant track by sourcing it from any of them. This way, if the track you asked for isn't available on Spotify, Google can look for it in Apple Music if you have an active subscription to both platforms. Similarly, you can select streaming platforms for your Google TV, too. If you ask to play a movie, Google will look for it on Netflix, Prime Video, Hulu, or any other platforms you've selected.
To do this, head to the Settings pane and scroll through the tiles in the Services section. If you only have speakers, select the Music tile and link all your subscriptions. If you also happen to have a smart screen or a smart TV linked to the Google Home app, tap on Video and pick from the list of available apps. Linking all the relevant apps results in a larger library for you to play content. You can also set the default service of your choice so that the speaker knows where to look first every time you ask a query.
Enable Broadcast
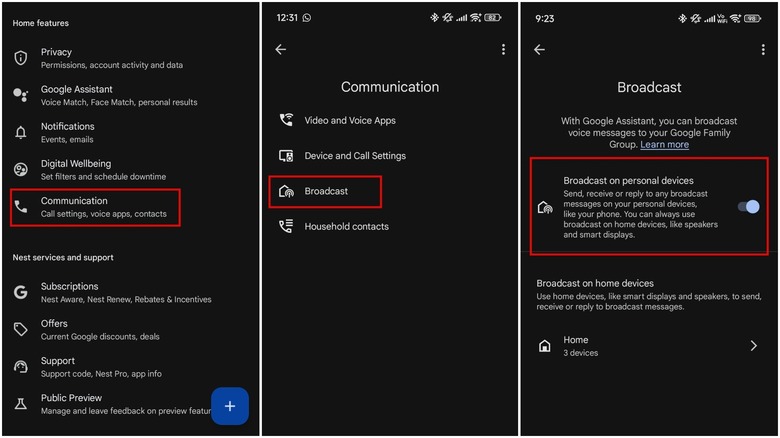
Here's a smart little setting that can make your life a lot easier if you have multiple smart speakers powered by Google. If you have a Nest speaker in every room of your home, and they're all connected to the same Google account and Wi-Fi network, you can enable what's known as the Broadcast feature that links all the devices together. To do this, go into the Settings page and select Communication. Then, head to Broadcast and enable the toggle next to Broadcast on personal devices. Now, all you have to do is say "Hey Google, broadcast ..." followed by your message. Once you do that, the message will be played on all the connected speakers.
Let's say you've just finished preparing dinner, and you want to inform all the members of your family. If you have a Google Assistant-powered speaker in the kitchen, you can simply say, "Hey Google, broadcast that dinner is ready. Everyone, please assemble at the dining table." This message will be played on all the speakers, regardless of where they're placed inside the house. So, your partner in the study and your kids in their bedrooms can be informed at the same time. The Broadcast feature is also available on mobile, so you can use the same command with Google Assistant on your phone, and the message will be delivered to all the connected speakers.
Turn off the display at night
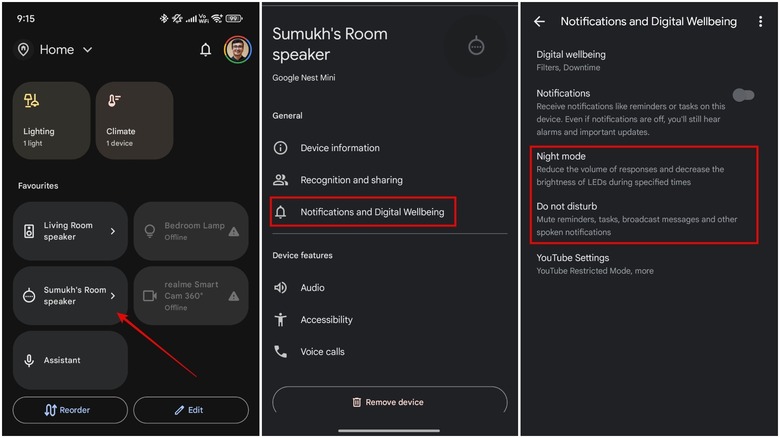
Several people use Google Nest displays as bedside clocks. While they're excellent for that use case since they can be used to set alarms, control smart devices, and even track your sleep, the bright display when the lights go out can be rather distracting. Even if you're not using a display and only a standard Nest speaker, the LEDs onboard can flash from time to time, which is enough to disturb sensitive sleepers. To avoid such situations, it's best to enable Night mode before going to bed. This turns off the display at night or dims the LEDs to keep any sort of distractions at bay. Additionally, it also reduces the volume of responses or reminders so that you aren't startled to hear a sound at night.
You can go one step further by also enabling Do not disturb from the same menu. This setting completely mutes audio responses like reminders, alarms, broadcast messages, and any other notifications. If you're in a meeting or attending a lecture, this setting can be beneficial. It's also useful when you or your partner is asleep, and you don't want random pings to cause any disturbance. Notably, these settings need to be enabled on every device, so select the relevant speaker, head to Notifications and Digital Wellbeing, and enable either Night mode or Do not disturb, depending on your requirements.
Enable or disable personalized results
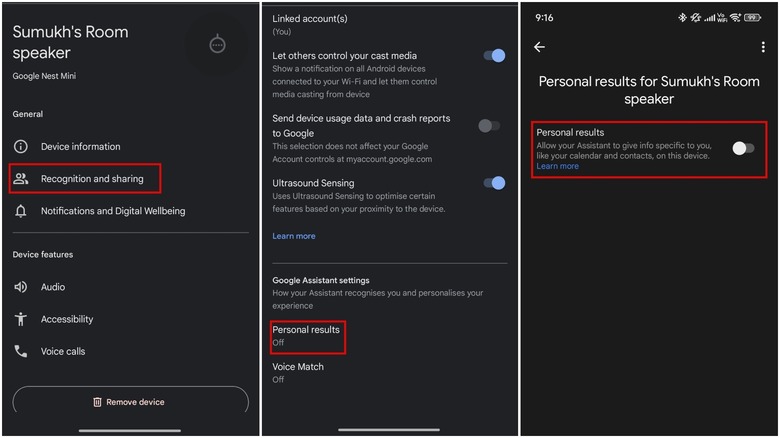
Since the Google Home app uses your Google account, it has access to all your personal information, like notifications, calendar data, emails, incoming calls via Google Meet, contacts, etc. It puts this to good use by allowing you to perform actions with this data, like sending a message to a contact, setting up a meeting with someone, adding an event to your calendar, checking your schedule on a specific date, etc. However, you may not always want Google to access this data, since your smart home device — whether it's a speaker or a display — may be used by multiple users at home. Even if you set up Voice Match using the steps mentioned above, incoming calls and notifications will still be sent to the device since the speaker doesn't need voice activation for those tasks.
Hence, disabling Personal results is a good idea in such circumstances. On the other hand, if you don't share your device with anyone else, or you're comfortable with your personal data being displayed on the device, you can enable Personal results to increase the functionality of your smart speaker or display. It unlocks several possibilities using just your voice, making it convenient to schedule meetings or answer calls when your hands are occupied. To access the setting, select the relevant speaker, head to Recognition and sharing, and toggle the Personal results feature on or off based on your preference.