How To Put An iPad Into Recovery Mode (And Why You Might Need To)

Since its release in 2010, the iPad has dominated the tablet market for good reason: it's easy to use, its larger screen makes it better for media consumption than the average smartphone, it has a huge app library, and it integrates effortlessly with the larger Apple ecosystem. Some may argue that Android tablets could never beat the iPad, but as good as they are, iPads experience problems just like any other tech device. Whether that's a problem with its hardware, software, or a mix of the two, you may find yourself dealing with issues like the screen freezing up on you, unresponsive apps, connectivity problems, or even a device that won't turn on.
When these things happen, you probably go through the usual series of steps that we all do when a device isn't working as it should, including turning it off and on, making sure all of its settings are configured correctly, and checking for software updates. Depending on the problem, they may work, or you may have to do some additional troubleshooting. In some situations, such as your computer not recognizing your iPad or your screen getting stuck on the Apple logo, you'll need to restore your iPad to get it back up and running again.
What is Recovery Mode?
Whether you have the latest iPad Mini or an iPad that's been around the block a couple of times, there may come a time when you need to put it in Recovery Mode. Recovery Mode does a couple of things: it allows you to update your iPad by reinstalling the operating system or restoring the device to its factory settings if necessary. It's important to note that restoring erases your iPad's information and settings while updating it leaves them unchanged.
Most often, you'll want to use the update option when you enter Recovery Mode. Doing so will allow you to download the latest software to your iPad and reinstall the operating system, which can address ongoing software issues that standard updates haven't fixed. In contrast, restoring your iPad to its factory settings should be used as a last resort option after you've exhausted other methods since this process will erase all data and restore the device to its original state.
Recovery Mode vs. DFU Mode

Recovery Mode isn't your only option when dealing with an iPad that's experiencing technical issues. There's also DFU Mode, short for Device Firmware Update Mode, which allows you to make more tweaks to your iPad than you'd be able to in Recovery Mode. Recovery Mode is a built-in fail-safe for iOS devices that makes it possible for you to use iTunes or Finder to update your iPad's operating system.
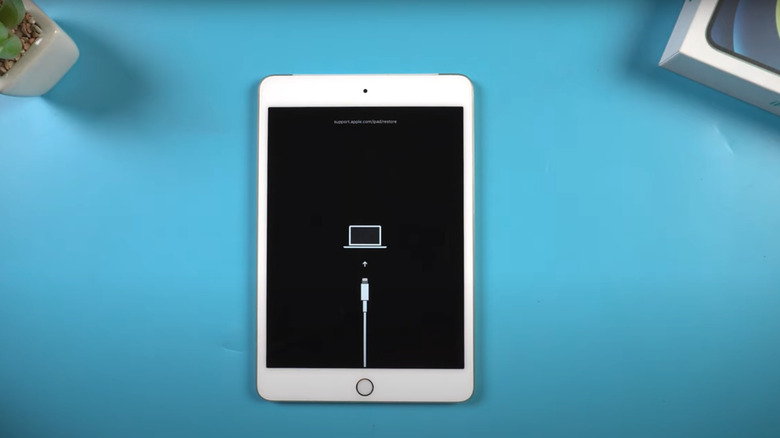
When your iPad is in Recovery Mode, it loads the iBoot bootloader to verify that the firmware being installed is authorized and compatible with your device. That way, you don't have to worry about outdated or unauthorized firmware being installed on your iPad. Whenever your iPad is in Recovery Mode, you'll see an image of a computer and a cable on its screen, letting you know it's ready to be restored or updated. If you're experiencing typical software glitches or update failures, Recovery Mode will usually be enough.
DFU Mode works a bit differently, although, like Recovery Mode, it's used for troubleshooting and restoring iPads and other iOS devices. When your iPad is in DFU Mode, it bypasses iBoot bootloader, allowing you to make deeper modifications to its firmware. When your iPad is in DFU Mode its screen goes completely black even though it's powered on. You may need to put your iPad in DFU Mode if your device is unresponsive or stuck in a boot loop, if you want to downgrade iOS to an earlier version, if you're dealing with software issues that Recovery Mode can't fix, or if you want to jailbreak your device. You should be careful when placing your iPad in DFU Mode because using it incorrectly could harm your device.
Why you might need to use recovery mode

Recovery Mode is your iPad's troubleshooting tool that allows you to restore or update its operating system when standard methods aren't working. You may find yourself needing to use Recovery Mode for any number of reasons. If your device freezes, becomes unresponsive, or doesn't react when you touch it or press buttons, you can use Recovery Mode to help restore functionality. Sometimes, your iPad may get stuck on the Apple logo screen during startup; when that happens, initiating Recovery Mode will let you reinstall the operating system to resolve the issue.
Failed software updates are another scenario where you might need to use Recovery Mode. For example, if an over-the-air update fails or experiences errors, you can use Recovery Mode to complete the update process or restore your device to a stable state. Another problem iPad users experience from time to time is their computer not recognizing their device or registering it as being in recovery mode. When this happens, you can use Recovery Mode to re-establish the connection and make necessary repairs. If your iPad displays the recovery mode screen — a graphic indicating a connection to a computer — it's prompting you to use Recovery Mode to restore or update your device.
How to put an iPad into Recovery Mode

Given that iPads tend to last a long time, there's a good chance you'll have to put your iPad in Recovery Mode sooner or later. Before putting your iPad into recovery mode, confirm that your Mac is up to date. If you're running macOS Mojave or earlier or using a PC, make sure you've downloaded the latest version of iTunes to your computer. If you're using macOS Catalina or later, you'll use Finder instead.
Follow these steps for macOS Catalina or later (using Finder):
- Open Finder.
- Connect your iPad to your Mac with a USB cable.
- Wait for the Recovery Mode screen to appear.
- If your iPad doesn't have a Home button:
- Press and release the volume button closest to the top button.
- Press and release the volume button farthest from the top button.
- Press and hold the top button until you see Recovery Mode.
- If your iPad has a Home button
- Press and hold both the Home and top (or side) buttons at the same time.
- Continue holding until Recovery Mode appears.
- In Finder, select your iPad under Locations.
- Choose Update (to reinstall iOS without erasing data) or Restore (to erase everything).
Follow these steps for macOS Mojave or earlier (using iTunes):
- Open iTunes.
- Connect your iPad to your PC or Mac with a USB cable.
- Follow steps 3-5 above to put your iPad into Recovery Mode.
- Look for your iPad in iTunes instead of Finder.
- Choose Update or Restore.
If updating, your computer will download the software and try reinstalling it. If the download takes more than 15 minutes, your iPad may exit Recovery Mode. If that happens, let the download finish, then repeat step 3. Once updated or restored, your iPad will be ready to set up