How To Remove Write Protection From Your USB Drive

Copying, moving, or deleting files on a USB drive is usually straightforward. However, this may not be the case if the USB drive you're using is write-protected. As the name suggests, write protection prevents you or anyone else from making any changes to the drive. As a result, when you try to add or remove files from the drive, you'll see a "The disk is write protected" message on your computer, indicating the drive is in Read-Only mode.
Enabling write protection on a USB drive is one excellent way to prevent accidental changes and deletions of files, the other being password-protecting your USB drive. In most cases, the write protection is enabled by a user or administrator. However, sometimes, a USB drive may also enable write protection on its own to prevent data loss. This usually happens when the external drive's health deteriorates, or corruption is detected.
In any case, it's possible to remove write protection from a USB drive. Some USB flash drives and hard drives come with a physical switch that lets you enable or disable write protection as needed. So, it's a good idea to check if your external USB drive has a switch like this. If it has, you simply need to move it to the off position to disable write protection.
If you can't seem to find this switch, you will have to use the DiskPart utility or the Registry Editor on Windows to remove write protection. Below, we'll walk you through the steps for both methods.
Remove write protection using DiskPart utility
DiskPart is a handy command-line utility from Microsoft that lets you manage both internal and external storage devices on your PC. You can use it to easily remove write protection from a USB drive. Here are the steps for the same.
- Press Windows + E to open File Explorer, go to This PC, and note down the drive's storage capacity from which you want to remove write protection.
- Now, click the search icon on the taskbar and type "command prompt" in the box.
- Right-click on the first result that appears and select "Run as administrator."
- Select Yes when the User Account Control (UAC) prompt appears.
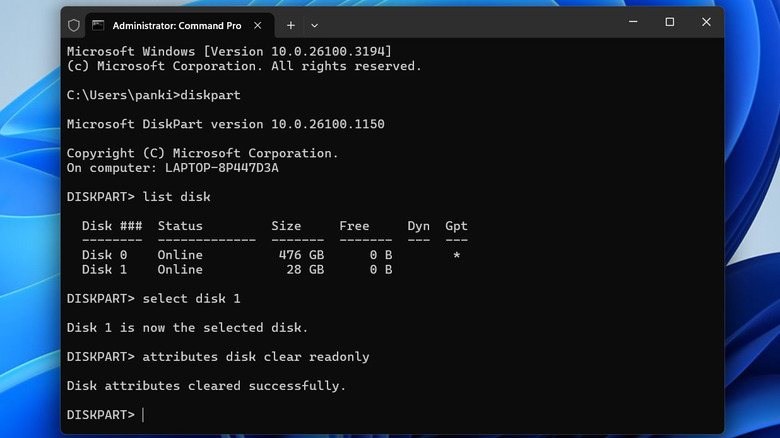
- In the Command Prompt window, type "diskpart" (without quotation marks) and press Enter.
- Next, type "list disk" and hit Enter. Once the Command Prompt displays all the storage drives, find your USB drive by checking its storage capacity and note its disk number.
- Now, type "select disk X," replacing X with the disk number you noted in the previous step. Then, hit Enter.
- Finally, type "attributes disk clear readonly" and hit Enter.
- Once you run the above command, you should see the "Disk attributes cleared successfully" message.
- Optionally, you can run the "attributes disk" command and hit Enter. The Command Prompt should return the "Read-only" status as No.
After completing the above steps, you can close the Command Prompt window. Your USB drive should now allow you to copy, move, and edit files as usual.
Remove write protection via Registry Editor
If the DiskPart utility doesn't work, you can also remove write protection by modifying a few registry files. Since registry files contain important settings for your computer, you should only use this method if the DiskPart utility fails. Also, it's a good idea to create a restore point on your PC before proceeding with any changes. Once you've done that, you can follow these steps to remove write protection via Registry Editor:
- Press Windows + R to open the Run dialog box.
- Type regedit in the box and hit Enter.
- Select Yes when the User Account Control (UAC) prompt appears.
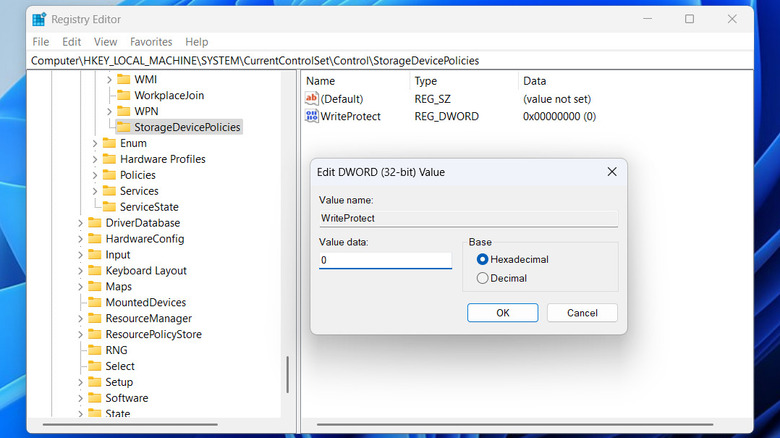
- In the Registry Editor window, use the left pane to navigate to HKEY_LOCAL_MACHINE > SYSTEM > CurrentControlSet > Control.
- Within the Control folder, look for the StorageDevicePolicies folder. If you can't find it, right-click on the Control folder and select New > Key, then name it StorageDevicePolicies.
- Right-click on the StorageDevicePolicies key, go to New and select DWORD (32-bit) Value. Name it WriteProtect.
- Double-click the newly created DWORD and enter 0 in the Value data field. Then, click OK.
After making the above changes, restart your PC, and the write protection will be removed. If you want to re-enable it later, repeat the above steps and change the WriteProtect value to 1.