What Is Raspberry Pi Connect And How Do You Use It?
Sometimes, you don't have direct access to the Raspberry Pi running your project. Perhaps it's installed outdoors with no display and keyboard attached. Or maybe it was squeezed into a compact chassis you don't want to disassemble. In that case, the only ways you can connect to the Pi are via remote methods.
Usually, this means logging into the Pi via SSH or VNC. But while both methods work just fine and have been many users' go-to for years now, they come with one drawback: if you want to use the Pi over the internet, you have to configure port forwarding, which might not be the easiest and most secure way to go, especially for beginners. An easy alternative is relying on third-party services like VNC Viewer or ZeroTier instead.
But what if you're not a fan of external services? Thankfully, you now have Raspberry Pi Connect. Offered by Raspberry Pi itself, Connect lets you manage your Raspberry Pi remotely, whether you're on or outside the network. Here's a deeper dive into what Connect is and how to use it.
Raspberry Pi Connect, explained
First introduced in May 2024, Raspberry Pi Connect, or simply Connect, is a user-friendly way of accessing your Pi board over the internet. This gives you the freedom to control the single-board computer (SBC) even while you're away in another country, at a friend's house, or in line at the grocery store. As long as you have an internet connection, you can manage your Pi remotely. Connect works exclusively on the Raspberry Pi OS and Pi OS Lite, starting with the Bookworm version, and can be used on all models, from the decade-old Pi 1 to the latest Pi 5. It comes pre-installed in the latest desktop version of the Raspberry Pi OS Bookworm. For Pi OS Lite, you'd have to install it yourself, but the process is pretty straightforward and quick.
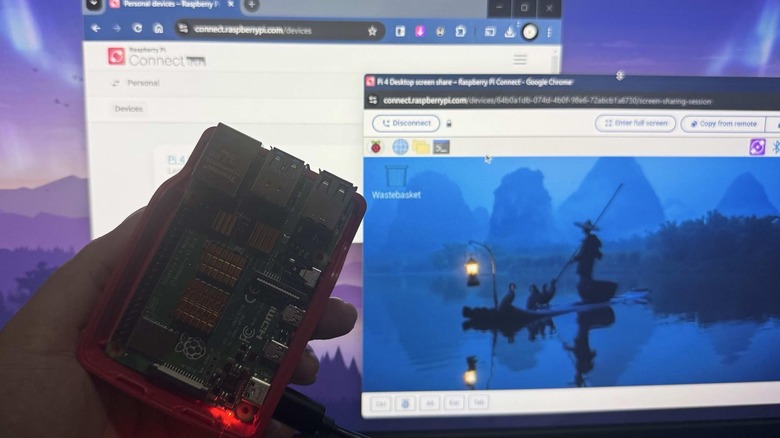
Connect features two options for controlling the SBC: screen sharing or remote shell. Yes, you can view and use both the Pi's full desktop and terminal session using just a single service. You can also access both at the same time from different devices. The best part is that Connect doesn't need to be installed on your local machine — it's completely accessible right from your browser. This also means you can use Connect even just with your phone.
However, do note that only the Pi 4 and newer support both screen sharing and remote shell. If you're on an older model, you're limited to only remote shell sessions. Pi OS Lite only allows remote shell access. As of this writing, Connect is still in the beta phase, so expect to run into changes and bugs occasionally.
How to set up Raspberry Pi Connect on the Pi OS Desktop
To install and configure Connect on the Raspberry Pi OS Desktop, here's what you need to do:
- If you don't have an existing OS installation:
- Install Raspberry Pi OS via the Raspberry Pi Imager. Make sure to use the latest Bookworm and desktop image.
- Insert the microSD card or USB drive into your Raspberry Pi.
- Go through the initial setup.
- If you already have Raspberry Pi OS (any version) set up:
- Update and upgrade your system to the latest Raspberry Pi OS version by connecting to the internet and running sudo apt update, followed by sudo apt full-upgrade in the terminal.
- After the upgrade, install Raspberry Pi Connect. Type sudo apt install rpi-connect.
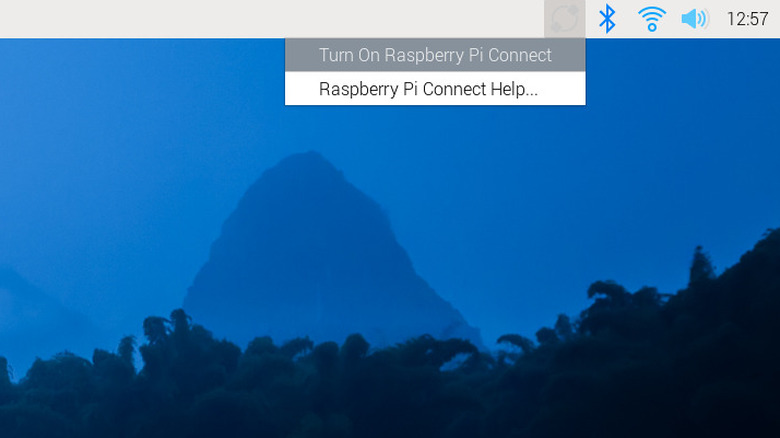
- On the Pi desktop, click on the gray circle icon in the upper right corner of the screen.
- Select Turn On Raspberry Pi Connect. This will automatically open your browser on the Raspberry Pi Connect sign-in page.
- Click Sign in with Raspberry Pi ID. If you don't have an ID yet, press "create one for free" to proceed.
- Sign in to your Raspberry Pi ID.
- On the New Devices page that opens, type a name for your Pi board to help you identify it better.
- Hit "Create device and sign in" to proceed.
You'll then see a "Device sign in successful" message on the page and receive an email from Raspberry Pi confirming the same. From here, you can start accessing your Pi remotely via Connect. It's important to note, though, that you can't use your microSD card or USB drive in a different board, as Connect is tied to the current device's serial number. If you need to transfer the card/drive, you'll have to reconfigure Connect on the new board.
How to set up Raspberry Pi Connect Lite on Pi OS Lite
If you're running the Pi OS Lite and want to use Connect, follow these steps to set it up on your board:
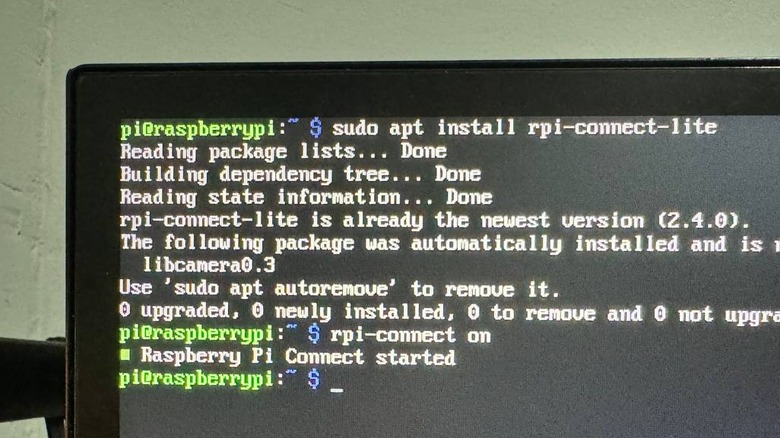
- Upgrade your Raspberry Pi OS Lite, by running sudo apt update && sudo apt full-upgrade in the terminal.
- Install Raspberry Pi Connect Lite with sudo apt install rpi-connect-lite.
- Type rpi-connect on to activate Connect You should get a "Raspberry Pi Connect started" message.
- Run rpi-connect signin to generate a unique Raspberry Pi ID sign-in link.
- Go to the link on a different computer or phone.
- Sign in to your Raspberry Pi ID account or create one if you haven't already.
- Set a name for your Pi.
- Click "Create device and sign in" to add the Pi to your Connect account.
After signing in, you'll get a "Signed in" message on the screen. Raspberry Pi ID will also send you an email notifying you of this change. Your Pi is now ready for remote access via Connect. Similar to Connect for the Pi OS Desktop, you'll have to set up Connect again should you decide to move it to a different board.
How to use Raspberry Pi Connect
Now, with Connect set up on your Pi OS of choice, here's a step-by-step guide on using it:
- Open any browser on a different computer.
- Go to connect.raspberrypi.com.
- Sign in to your Raspberry Pi ID.
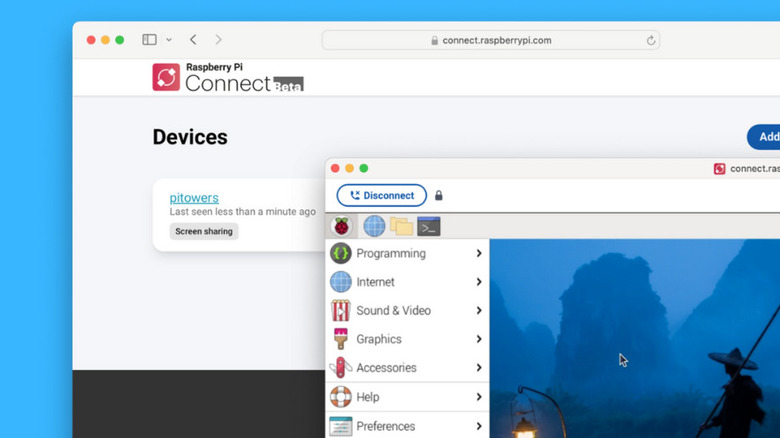
- Click on the "Connect via" button next to the Raspberry Pi you want to remotely access.
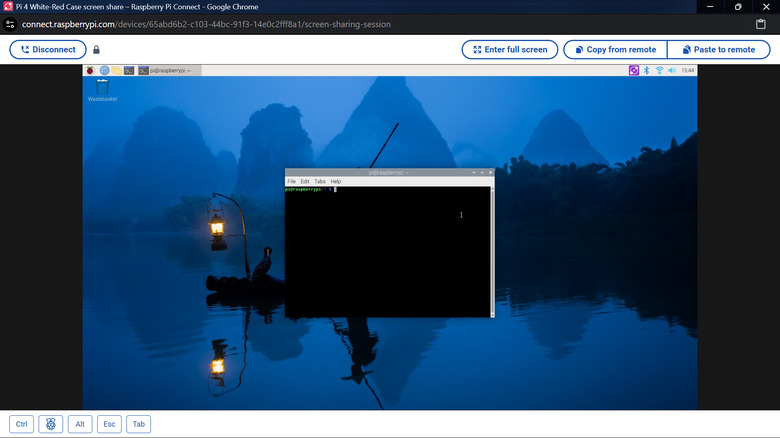
- To view and use the Pi's entire desktop, select Screen sharing.
- To view and use the command line interface only, choose Remote shell.
- Wait for the connection to be established. Once the Pi responds, you should see either the Pi desktop or the CLI (automatically logged in).
- For screen sharing:
- To get the full-screen view, choose Enter full screen at the top.
- To paste text from your computer to the Pi, copy it on your computer like you normally would. Then, go back to the Connect window, click Paste to remote in the top-right corner, and allow connect.raspberrypi.com to use your clipboard.
- To copy text from the Pi to your computer, copy it like usual, select the "Copy from remote" button at the top, and paste the text to your computer.
- To stop the session, press Disconnect in the upper left corner.
- If you haven't closed the same Connect window yet, press Reconnect to start a screen sharing session again.
- For remote shell:
- To copy text from the Pi to your computer, use Ctrl + Insert.
- To paste text from your computer to the Pi, press Shift + Insert.
- To stop the session, type exit or simply close the Connect window.
You can have multiple screen sharing or remote shell sessions active at the same time. For screen sharing, anything the other users do on the desktop will show up on your session too. For instance, if they click on the Raspberry Pi menu or open a file, you will see these actions in real-time. However, for remote shells, each session is an entirely different connection.
How to manage your Raspberry Pi Connect device
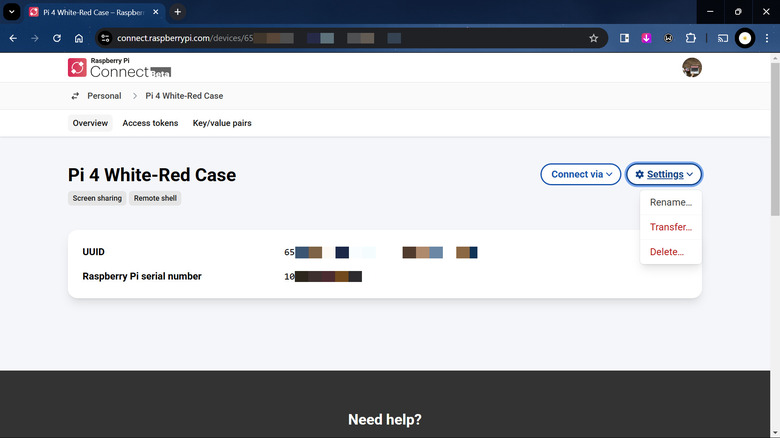
Connect gives you the option to easily tweak the settings to your needs, whether that's turning off screen sharing or remote access to a specific Pi board, renaming it, or deleting it from your Raspberry Pi ID account completely. Here's how you can manage your Connect devices:
- To turn off Connect on your specific Pi, open the terminal, and run rpi-connect off.
- To turn Connect back on, type rpi-connect on.
- To disable screen sharing on your Pi, click on the Connect icon in the menu bar and press Allow Screen Sharing or run rpi-connect vnc off in the Terminal. If you do this while in a Connect session, it will immediately end.
- To re-activate screen sharing without directly connecting to the Pi, start a Connect remote shell session or SSH into the Pi and run rpi-connect vnc on.
- To switch off remote shell access for the Pi, go to the Connect icon and select Allow Remote Shell Access or type rpi-connect shell off on the CLI.
- To switch on the remote shell access again, run rpi-connect shell on via SSH or directly connecting to the Pi.
- To change the name of your Pi, go to the Raspberry Pi Connect dashboard (connect.raspberrypi.com), click on the device, and hit Settings. Then, choose Rename from the drop-down and enter a new name. Hit Update Device once done.
- To delete the Pi from your Connect account, go to connect.raspberrypi.com and sign in to your ID. Click on the device on the dashboard. Select Settings and press Delete. Hit Delete on the popup to confirm. This will also sign out Connect on the Pi itself. You'd need to sign in from the Pi to re-activate Connect for that board again.
Keep in mind that if Connect is turned off, you can't use the Connect dashboard on your browser to access the Pi. You can only rename or delete it.