12 Ways To Make macOS Sequoia Run Faster
If you've spent any amount of time working with Microsoft Windows, you know it can become rife with slowdown, errors, and non-stop updates, making it tempting to switch from Windows to Mac in pursuit of Apple's "it just works" promise. But one of the several things you should know before buying a MacBook is that even the mighty Mac can slow down. Macs aren't immune to viruses and errors, and sometimes that "just works" philosophy can start to feel like marketing hype. So what do you do if your Mac starts to lag?
In some cases, you may just have the wrong machine for your needs; all baseline MacBooks, until very recently, started with 8GB of RAM, which tends to be too little for anything beyond basic web browsing and document work. Or maybe you've got an old Mac that needs expert revival. Barring those exceptions, we've compiled a list of 12 tips that should fix the problem for 99% of people running the latest macOS Sequoia. Try one of the following and see if that bring your Mac back up to speed.
Restart your Mac and update it

If humanity is ever wiped out and archaeologists from a far-flung future examine the remains of our civilization, they are guaranteed to find one phrase etched somewhere: "Did you turn it off and on again?" It's the clarion call of every tech support guru out there, and it really works. Restart your Mac if you've suddenly started to have problems. Doing so clears away the cobwebs of broken background processes, memory leaks, program errors, and more. Just make sure that when the restart prompt pops up, you hit the checkbox for "Reopen windows when logging back in." You'll be back to what you were doing in a couple of minutes, tops, hopefully with whatever issue you were having gone.
If that doesn't work, then update your device. It's a widespread myth that updates intentionally slow down your device in order to get you to upgrade. In reality, updates are critical to patching security vulnerabilities and — important for our purposes — improving performance. Ironically, you may be tempted to avoid updates because of one of the iPhone's most important moments in history: Batterygate. TL;DR, Apple was caught slowing down old iPhones seemingly to force users to upgrade, when in reality, this was a necessary move to prevent serious performance issues. So upgrade your Mac. There's a good chance Apple engineers have identified and exterminated some wrinkle in the code that's slowing your device down.
Quit apps properly
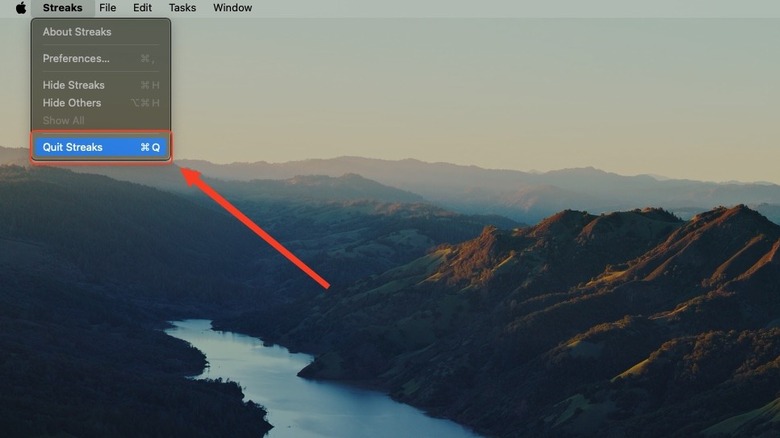
If you recently switched from Windows to a MacBook (or you're not super tech savvy), then you may still be unfamiliar with how to close apps correctly in macOS. Unlike Windows, where most apps can be closed with the X, most Mac apps, conversely, remain open after you click the X — thus consuming resources in the background and potentially slowing down your device. Get into the habit of pressing command + Q when the app is in focus to completely close it out. Otherwise, you can close an app from the menu bar or through its menu bar icon (if it has one) and selecting the quit option.
You can also use Activity Monitor. Search for it with the Spotlight, then find any unwanted running apps and kill them with the Stop button. For any app that refuses to close, you can use the keystroke option + command + escape to summon the Force Quit window. It's safe to quit anything here, including Finder — if for whatever reason it's giving you grief — but do try to quit the program properly first. Force quit does carry the risk of losing your unsaved work.
For the ultimate convenience, you can install a program like QuitAll. QuitAll is a user-friendly way to quit programs; it doesn't bombard you with processes like Activity Monitor and lets you see background processes in plain English — not tech nerd speak. QuitAll comes with the extra benefit of an auto-quit feature that closes apps for you that you haven't touched in a while. However, the app does cost $10 for the full version after a free trial.
Remove Login Items
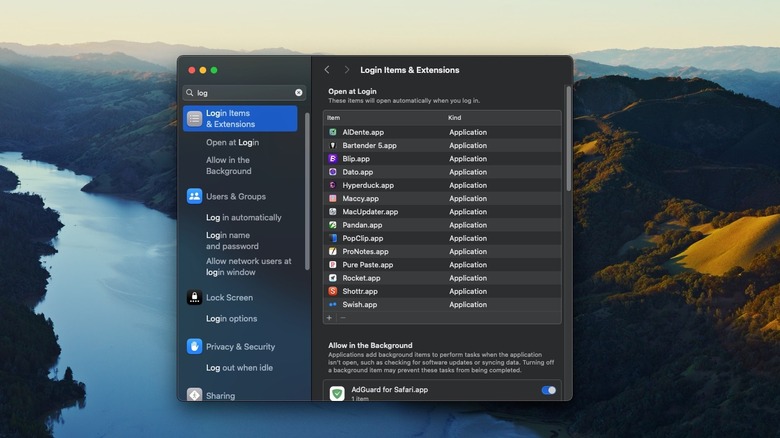
One way to make your Windows PC boot faster is to cut down on apps in the Startup section. MacOS has similar functionality. The "Startup" section is called "Login Items" on the Apple side, and it is somewhat buried in the Settings. As a result, many Mac users never even touch it. Removing programs from this section could produce some performance gains.
To find it, open Settings, then search for "Login Items," and choose "Login Items & Extensions." In the first section (Open at Login), you can click on an app, then the minus button to prevent it from launching. Most apps, in my experience, have their own Open at Login setting, so if you know which apps are opening at startup, you can go directly to their settings instead and disable them there.
Now, keep in mind that editing login items doesn't necessarily improve overall performance. It only impacts the startup time of your computer. Once the app is loaded, you can quit it and get back the system resources it was using. Removing login items is more about preventing apps from loading automatically on startup that you might later forget are running. It'll stop those apps from ever opening in the first place instead of you wondering why your PC is feeling sluggish, having to investigate, and then closing those apps manually.
Prevent background processes
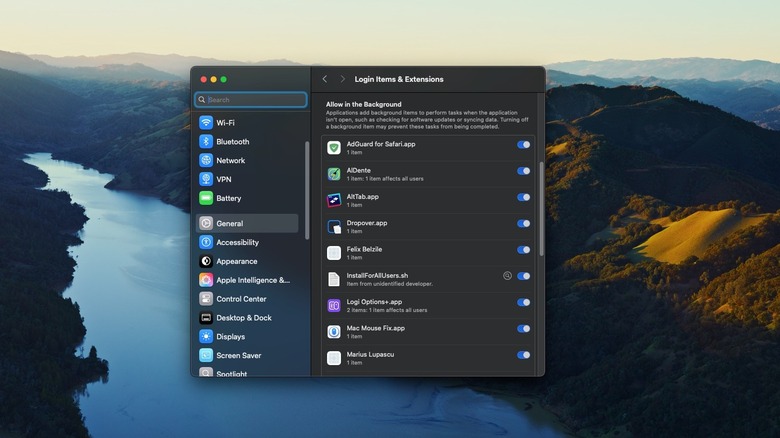
Before quitting out of the Settings app, scroll down to the next section that says "Allow in the Background." Apps here can do things even when they aren't open, which (depending on how many apps you have installed) could be a goldmine for getting performance back. Toggle off any program that shouldn't be running in the background and you're good to go.
Before you do, be wary of which apps you restrict. If you take that permission away from, say, AlDente, then the app may not behave as expected, and your battery management features may not work properly. Only take away background permissions from apps that won't impact your workflow.
Also, keep in mind that most of these background processes are very minimal, amounting to checks for updates and things of that sort. Avoid going scorched earth on this section unless you have a metric ton of apps running in the background. Likewise, use this as an opportunity to remove anything you no longer use, and maybe even delete the app to free up space as well.
Check Activity Monitor for heavy programs
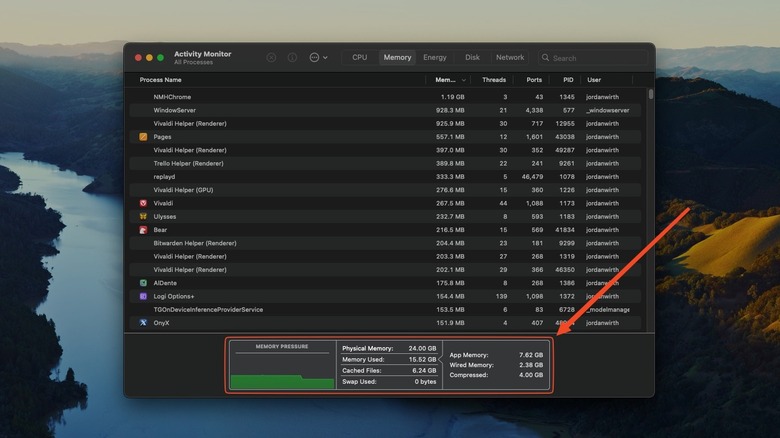
Activity Monitor isn't just for quitting programs — it's an excellent diagnostic tool for figuring out which ones are creating the most slowdown. Open it up again and take note of a couple of things. One, you can filter programs by their system resources usage, such as CPU and memory. Programs that use a lot of CPU and memory are typically the worst offenders, and if you can close them, do so. Two, the system graph at the bottom gives a visual overview of how many system resources you're using versus how many you have available.
Pay particular attention to the memory pressure graph when filtering apps by memory usage. If the memory pressure line is yellow, that means you're using a lot of RAM and may have begun to use swap — which will slow your computer down and slowly wear out your internal drive. Red memory pressure means you do not have enough RAM for whatever you're doing. If memory pressure is high and a lot of swap is being used, it's time to close some apps.
Using Activity Monitor to figure out what's slowing your system down can be an eye-opening exercise. You may realize that you're running too many programs at once and you can afford to close some of them and open them later as needed. As impressive as macOS is with resource management, you do have to exercise some discipline and be mindful of how many programs are open at any given time. Like leaving too many tabs open, leaving too many programs open is going to create issues.
Free up some storage
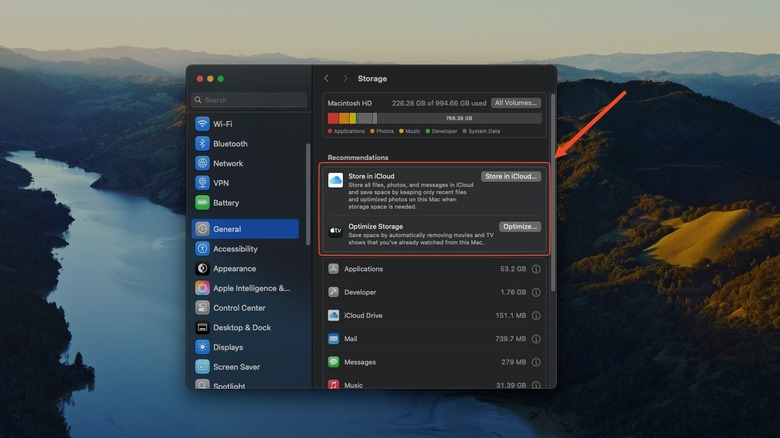
Believe it or not, having too little storage space on your internal hard drive can slow your computer down, not just keep you from storing more files on it. Plus, SSDs last longer and operate at their best when you give them a free space buffer of about 20%. So on a 1TB hard drive, you should ideally leave 200GB free. All this to say, if your hard drive is lacking elbow room, it's time for some spring cleaning. Go through and delete duplicate documents, random pictures, and unused files. If you haven't done this in a while, you could easily knock out a couple dozen gigabytes in a matter of hours.
Aside from that, there's a whole bunch of ways you can free up space. You can optimize storage by storing more files on iCloud; delete old downloads like installers and zip files; empty the trash; open the Mail app and erase your junk mail; or compress files you don't use very often. There are other, less obvious ways to reclaim storage, such as your GarageBand sample library, which could contain upwards of 100GB of material.
If push comes to shove, you may just not have enough storage. MacBooks charge an arm and a leg for storage and don't allow upgrades, so this may be the time to grab an external SSD. Before you do, here are some things you should know before buying an external hard drive.
Delete the cache for any offending program
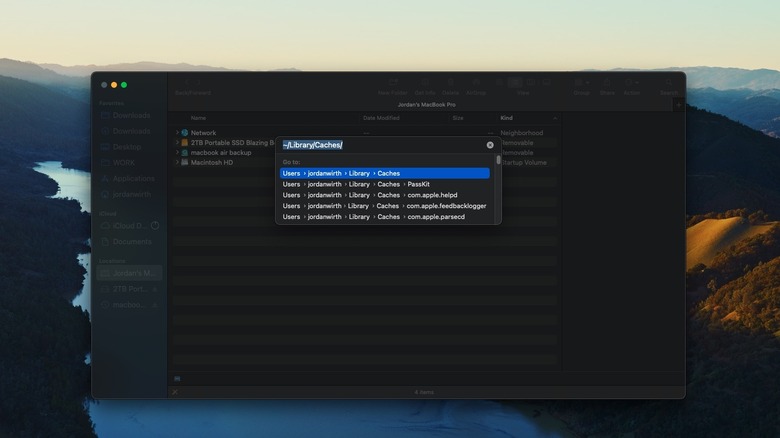
Many programs, especially web browsers, use what's known as a "cache." This allows the next time you visit a web page to load a saved, local version instead of downloading it from the internet — faster and less taxing on your data cap. While the cache is a vital tool for keeping your computer running snappy, it can eventually slow your system down and may need clearing. Caches are spread across various programs on your computer, so here's how you find — and delete — them.
Fair warning, we highly recommend backing up your Mac with Time Machine before trying this out. A deleted cache could cause issues. Further, we recommend only deleting the caches for specific programs that are behaving unexpectedly. It would be best to skip this tip and try the others on this list first to see if that fixes the problem.
With those warnings out of the way, head to Finder. From the menu bar, go to Go > Go to Folder. Copy this into the dialog box without quotations: "~/Library/Caches/" After clicking Go, find the folder for the app in question and delete it, then empty the trash can. If that problematic app works better now, then you've solved your problem.
Run First Aid
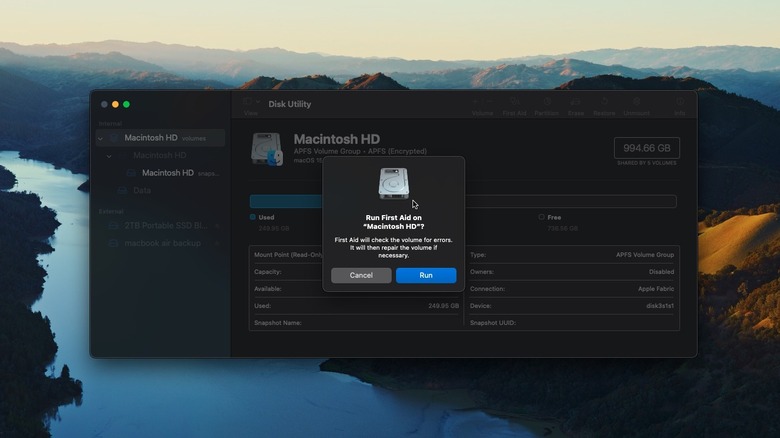
Sometimes, you may have unexplained slowdown and a number of strange errors that don't have an obvious cause. If that's the case, you might try out First Aid in the Disk Utility app. This checks your hard drive or any removable media for errors and fixes them automatically, if possible. Using First Aid is risk-free, so there's no harm in trying it out to rule out hard drive issues.
You can find First Aid by searching for Disk Utility in the Spotlight. Apple recommends expanding the hierarchical tree of any drive you plan to check and beginning with the volume at the bottom. Click the icon with the doctor's stethoscope and let it run. You may need to enter your password if prompted. Once it finishes, it'll tell you if it found any problems. The green check mark means you're full steam ahead, no issues in the hard drive department. We recommend checking any drives that you regularly use, especially an external hard drive that you keep connected for file access.
Fully remove a program with AppCleaner or Pearcleaner
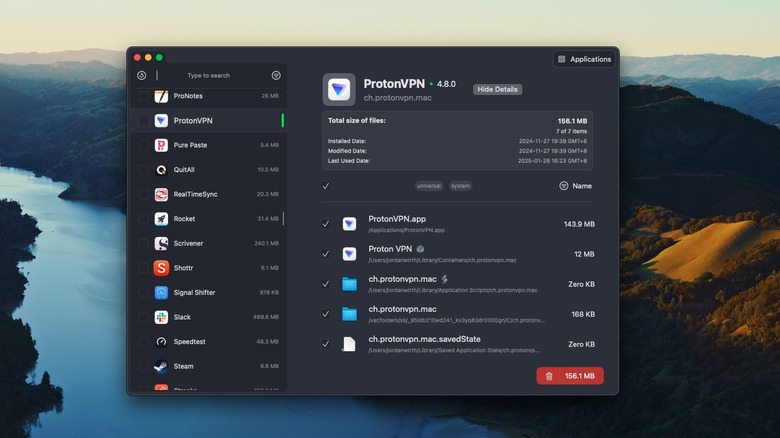
Perhaps the cause of slowdown is a misbehaving program that, no matter what you do, continues to misbehave. You've tried changing settings, logging in and logging out, resetting the app, all to no avail. The solution may be to remove the app completely. Not just uninstall it, but wipe it and all its traces — files, caches, etc. — from your device. We recommend two programs for this: AppCleaner and Pearcleaner. Both achieve the same thing.
AppCleaner is perfect for those who prefer simplicity above all else: Simply drag and drop an app from the application folder to fully delete it. The only issue with the app is the release cadence. AppCleaner has gone long periods between releases, which, in my experience, can make it a bit glitchy and sometimes unreliable. Pearcleaner gets more frequent releases and is a lot more feature-rich.
With Pearcleaner, you can immediately search for any app on your device and uninstall it with one click. It also has some great extra bonus features such as automatically cleaning up the remains of an app installed via Homebrew or ones you dragged to the trash. Use one of these two apps to completely remove a problematic program and then reinstall it, fresh, to see if that fixed the issue.
Change Spotlight settings

Spotlight on macOS is excellent. It's like the search bar in the Windows Start menu on steroids. You can use it to not only find files and search the internet but also do quick currency conversions and check the weather. Alas, with great power comes great responsibility. Giving Spotlight the ability to do so many things could make its results arrive a bit on the slower side, and so you may wish to narrow its search focus.
First, open Settings > Spotlight and scroll down to Search results. You'll see a huge list of things it's searching for, some of which you may never use — such as fonts or tips. Uncheck anything you don't think you'll need, and there may be a small performance boost, at least for Spotlight.
If Spotlight is acting a bit wonky, there's one more thing you can try to fix it: rebuilding your Spotlight index. In Settings > Spotlight > Search Privacy, add a specific folder (or folders) that hasn't been showing accurate Spotlight results. So if Spotlight has been struggling to find files in your Documents folder, add that one.
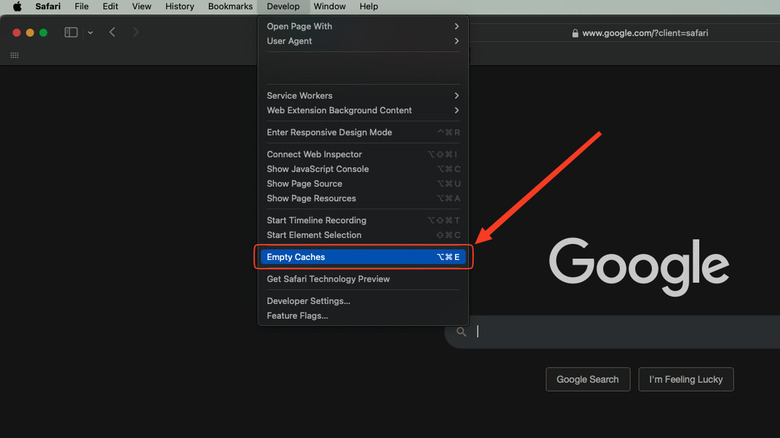
Clear the cache in Safari (or any other browser)
Browser caches are a somewhat different beast compared to other apps, and deleting them can also help resolve performance issues. Safari is a bit of a wild card compared to competitors since it requires extra steps to delete its cache. To do so, go to Safari > Settings > Advanced > and enable "Show features for web developers." Now you should get a new option in the menu bar that says "Develop." From there, drop down to the "Empty Caches" option. Deleting this may help clear up any issues with the Safari browser. If Safari is still feeling sluggish, then consider changing some settings to improve speed and performance.
Clearing browser caches in other browsers is usually much easier. Use this guide for clearing the cache in Google Chrome. Most Chromium browsers have similarly easy settings for wiping their respective caches. For Firefox, head to Settings > Privacy & Security > Cookies and Site Data, and hit the Clear Data button. Make sure only to remove "Temporary cached files and pages" for the purposes of this guide.
Speaking from personal experience, clearing a browser's cache tends to have a more significant impact than clearing an app's cache. Browsers can accumulate several gigabytes over time from the various sites that you visit. It's good practice to clear your browser's cache every few months to keep things clean and snappy.
Clean your system with Maintenance
If nothing else on this list has worked, then it's time to try the nuclear option: Maintenance. The developer describes it this way: "It is a reliable application that provides a clean interface to many tasks that would otherwise require complex commands to be typed using a command–line interface." That includes (but isn't limited to) rebuilding databases, deleting caches for applications and fonts, and more, per the dev's website. Maintenance is 100% free to use, but please consider donating to the dev. They've been making Maintenance and its sister apps with love for years.
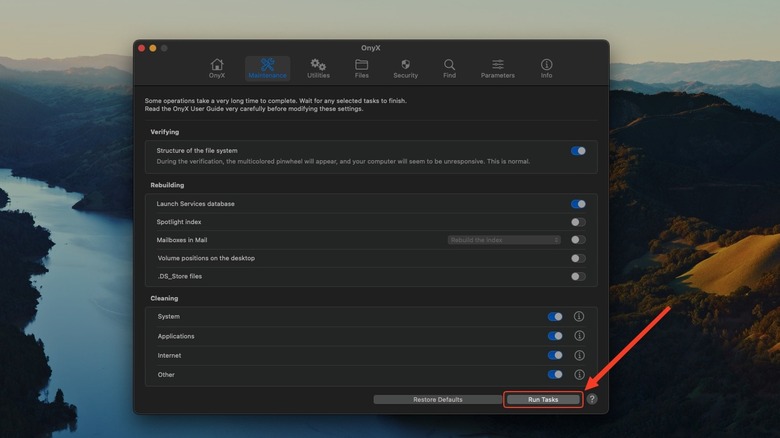
Every time you use Maintenance, you need to put in your administrator password since it effectively requires access to your entire computer to do what it does. Give it the necessary permissions when you first open it. We recommend hitting the "Run Tasks" button with default settings and letting the app do its thing. Once it finishes, your computer will restart. It's not recommended to use Maintenance on a weekly or monthly basis, but rather when you are experiencing serious issues — like slowdown — or your Mac hasn't had a proper cleanup in years. For me, Maintenance even fixed a hard drive backup error that had been causing random shutdowns.
If you want to go even further, you can try OnyX. It's made by the same developer and includes everything Maintenance does, plus a whole lot more. OnyX adds a bunch of goodies, including the ability to change hidden settings that would normally require the command line.