6 Hidden Google TV Features Every Owner Should Know About By Now
Getting to know the basics of your Google TV isn't too difficult, thanks to its straightforward interface. Even for first time users, navigating through apps, adjusting settings, and managing your content is fairly easy. That said, Google TV has a lot more to offer beyond the basic functions.
While you may already know how to do things like rearrange apps, turn off autoplay, and manage your watchlist, there are several hidden Google TV features — some tucked away in the settings menu — that can take your experience to the next level. So, if you're looking to make the most of your entertainment setup, this guide will share some useful Google TV tips and tricks that you may have missed.
From decluttering your home screen to making your TV safe for your child, and even using your phone as a remote, there's something for everyone on this list. Let's take a look.
Enable apps-only mode
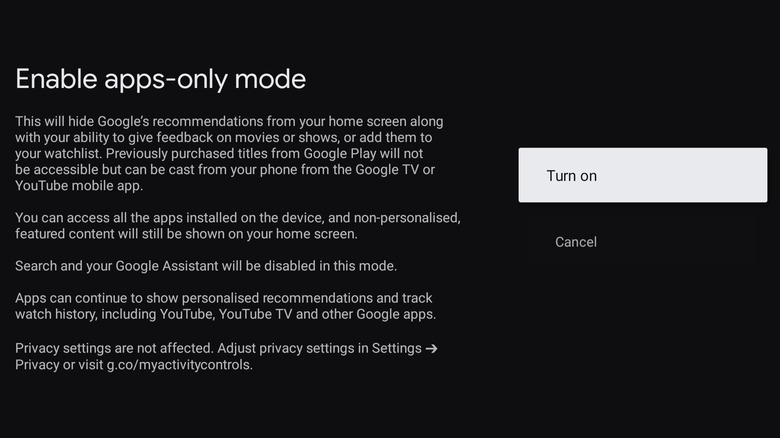
By default, your Google TV home screen shows all kinds of stuff, such as your watch history, trending content, and personalized suggestions. While this can be helpful, it can also make it difficult to get to your favorite apps. Enabling "apps-only mode" can help streamline your Google TV home screen by removing top picks and the "Continue Watching" row, as well as hiding the "Live" and "Library" tabs at the top. This is perfect if you don't want to be distracted and only wish to interact with the apps you've installed on your TV. Here's how to enable "apps-only mode" on your Google TV:
- On your Google TV home screen, select the gear-shaped icon in the top right corner.
- Scroll down to select "Accounts and sign-in."
- Select the profile you want to use in apps-only mode.
- Enable the "Apps-only mode" toggle.
- Select "Turn on" to confirm.
Once you complete the above steps, your Google TV home screen will only show your installed apps and the "Highlights" section at the top. Note that this mode also disables the search feature and Google Assistant on your Google TV.
Use your phone to control the TV or install apps
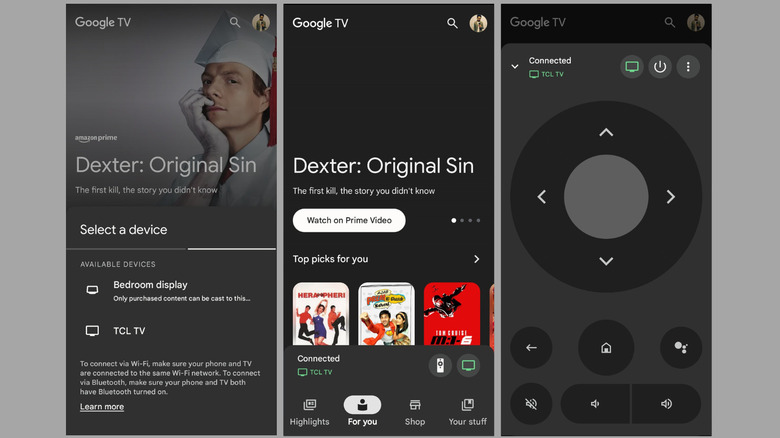
If you are someone who frequently misplaces the Google TV remote, you don't have to go searching for it every time you want to watch something. Instead, you can turn your phone into a remote using the Google TV app. Here's how:
- Download and install the Google TV app on your Android or iPhone.
- Open the Google TV app and tap the TV remote icon in the bottom right corner.
- Select your Google TV once it appears.
- Enter the six-digit code that appears on your TV screen into the Google TV app on your phone. Then, select Pair.
Once you've paired your phone, tap the remote icon in the Google TV app to bring up the virtual remote. You can then use it to navigate menus, control media playback, and even turn off the TV. If you have an Android phone, you can also add the "TV Remote" button to the Quick Settings panel for even faster access.
Besides controlling the TV, you can also use your Android phone to install apps on your Google TV, as long as you're using the same Google account on both devices. To do this, open the Google Play Store on your phone and search for the app you want to install on the TV. Then, tap the tiny arrow next to the Install button, select your Google TV from the list of devices, and hit Install.
Use Button Mapper to remap buttons on your remote
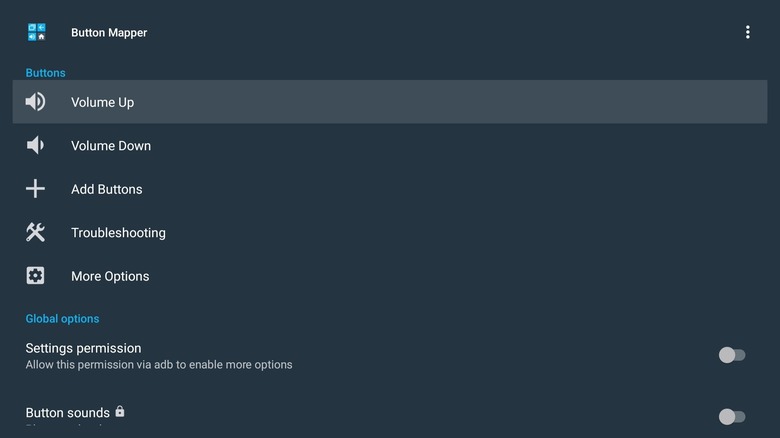
Your Google TV remote already comes with several preset buttons for opening apps like YouTube, Netflix, Prime Video, and more. However, if some of those presets don't match your viewing habits, you can remap them using a third-party app like Button Mapper. You can even configure certain buttons — such as Home or Volume — to perform specific actions when you double-tap or long-press them.
To get started, install the Button Mapper app on your Google TV from the Play Store. Once installed, you will need to give the app accessibility permissions on your TV. To do that, follow these steps:
- Head to the Google TV Settings menu.
- Scroll down to select System and then choose Accessibility.
- Find the Button Mapper app on the list and select it.
- Select the Enable option and then choose OK to confirm.
After completing the above steps, you can start using the Button Mapper app to remap buttons on your Google TV remote. For instance, you can configure the Volume Up button to capture a screenshot or launch your favorite app when you long-press it. You can then assign a different action to the same button when you double-tap it. The basic remapping features are available in the free version of the app, but you can unlock even more features by paying for the pro version of the app.
Set up a Google TV Kids profile
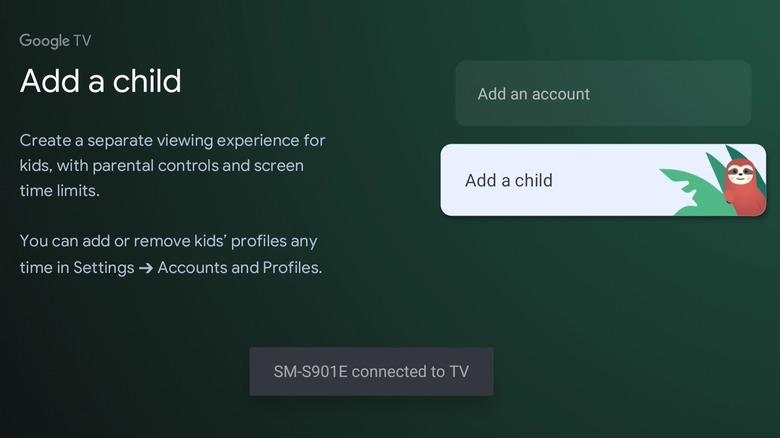
Setting up different Google TV profiles is a great way to personalize the experience for different users in your household. However, if you have kids at home, setting up a Google TV Kids profile is a smart move. It not only creates a safe viewing environment but also gives you access to various parental controls, such as screen time limits, content restrictions, and app management. This ensures that your child can only access age-appropriate content while keeping unwanted recommendations out of sight. Here's how to set up a Kids profile on your Google TV:
- Go to your Google TV home screen and click the profile picture.
- Now, select "Add an account" and then choose "Add a child."
- Click the "Get started" button and then select "Add a child" again.
- Enter your child's name and age, then accept the terms and conditions by selecting the checkboxes and clicking the "I agree" button.
- Next, click Send and you will receive a six-digit code on your phone number.
- Enter the code on your TV and select Next.
After you've created the profile, you can finish setting up by creating a PIN, installing specific kid-friendly apps and then enabling preferred parental controls. Once everything is configured, your child will see a simplified home screen designed just for them, showing only apps you've approved.
View your own photos as screensavers
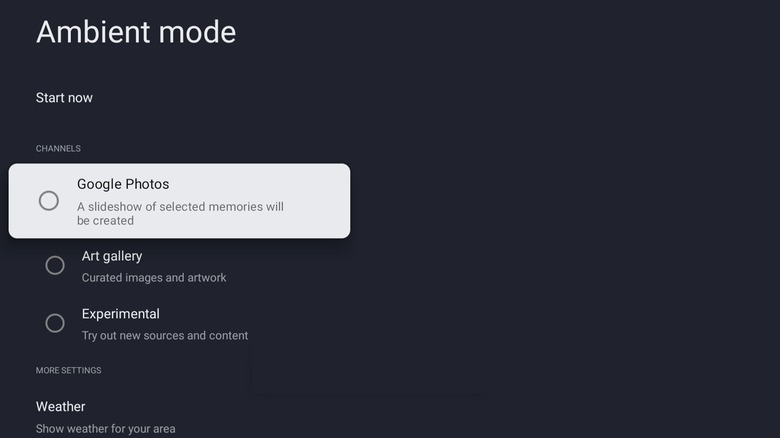
When you're not using your Google TV, the built-in Ambient mode kicks in and displays a slideshow of stock images curated by Google. However, if you find those default stock images a bit dull, you can customize your Google TV to show pictures from Google Photos as screensaver. This will allow you to turn your Google TV into a digital photo frame and showcase your favorite memories, travel shots, or family moments. To set your Google Photos as screensaver on Google TV, follow these steps:
- On your Google TV home screen, select the Settings icon in the top right corner.
- Scroll down and select System.
- Click the "Ambient mode" option.
- In the Ambient mode menu, select Google Photos.
- Enter your Google account password or PIN to verify your identity.
- Finally, select the albums you want to use as screensaver and click Confirm.
Once everything is set, your selected photos will appear as a screensaver when your TV is inactive. You can further customize the experience by heading to the "More settings" section in the Ambient Mode menu. From there, you can hide album names, change which albums appear, or adjust the slideshow duration to your liking.
Enable HDMI-CEC and Game Mode
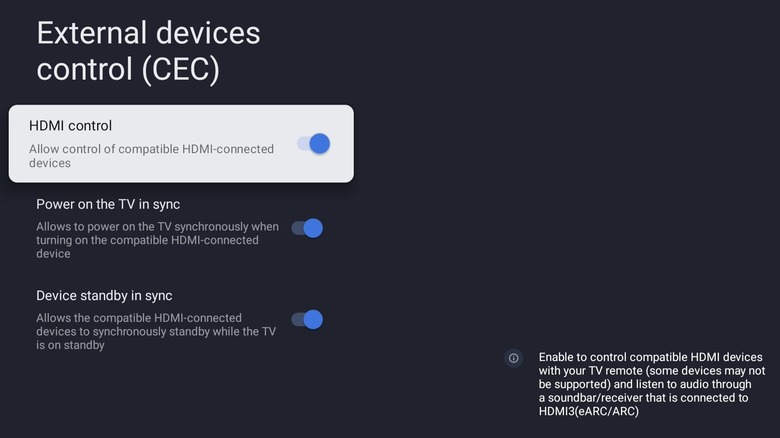
Enabling HDMI-CEC (HDMI Consumer Electronics Control) on your Google TV allows you to control multiple connected devices — such as gaming consoles, soundbars, and streaming devices — with a single remote. So, if there are multiple HDMI devices connected to your Google TV, it's a good idea to enable the HDMI-CEC feature. This way, your Google TV will be able to automatically switch inputs, turn on connected devices, and even control basic functions like volume and playback without needing extra remotes. For example, with HDMI-CEC enabled, turning on your TV will automatically power on the connected Xbox Series X/S and switch to the correct HDMI input.
If you use your Google TV for gaming, you can take advantage of the built-in Game Mode to reduce input lag and ensure faster response times while gaming. To enable Game Mode on your Google TV:
- Go to your Google TV home screen and select the settings option.
- Select "Display and Sound" and then choose "Advanced display settings."
- Turn on the "Allow game mode" toggle.
When you're done gaming, you can return to the default display settings by turning off the game mode toggle.