12 Settings You Should Immediately Change On Your New Windows Laptop
Anyone who's set up a new Windows PC knows you spend a good chunk of that process removing or disabling the things that make the operating system a pain. If it's not finding ways to make Windows 11 look like the Windows 10 you're used to, then it's trying to set up Windows 11 without a Microsoft account to limit Microsoft's rampant data collection as much as possible. Even after you think you're finished, you'll realize you still need to disable or remove widgets, and on and on, ad infinitum. In the interest of time, however, which settings should you tackle first?
We've compiled a checklist of 12 different things we recommend disabling, removing, or uninstalling altogether from a brand new Windows 11 laptop. Most of what we're about to cover can be tackled directly from the settings, but some of it will involve a little rooting around, and maybe even using third-party software to get the job done. The goal here is a streamlined Windows 11 experience bereft of all the unnecessary crud. All steps are beginner friendly, so strap in and let's get right to it.
Clean up the lock screen
It's unlikely most people spend much time — if any — on the lock screen. It's just a barrier between ne'er-do-wells and your computer. Despite this, Microsoft seems to think everyone wants stock prices and ads right then and there — and rather than ask for permission, they make you opt out. So let's opt out.
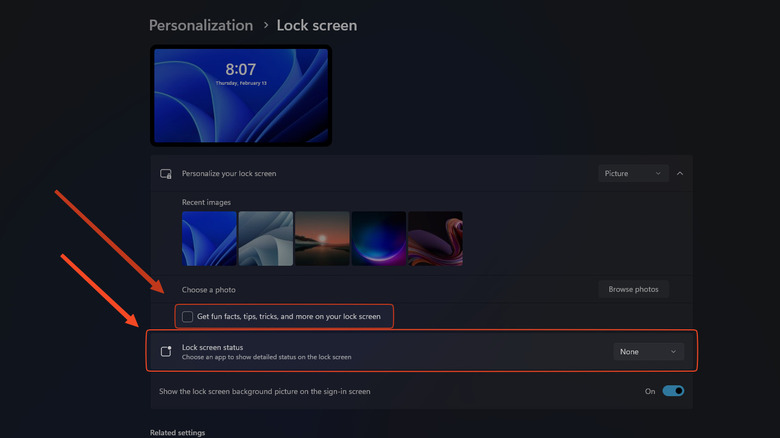
Open the Settings app, then go to Personalization > Lock Screen. Scroll down until you see the "Lock screen status" option and click on the drop-down menu. We'd recommend changing it to "None," but if you'd like, you could add a widget that you actually use like Mail or the Calendar apps. Keep in mind this will require you to use Microsoft's apps, not your own preferred third-party mail or calendar client.
While you're here, go ahead and remove the checkmark from "Get fun facts, tips, tricks, and more on your lock screen." This is when, for example, you might see a little internet icon with the words "Stay connected to friends and loved ones," or a random fact about the Windows Spotlight image currently displayed on your lock screen. You can change that Windows Spotlight to be a set, static one, if you like, from Settings > Personalization > Background. With all this done, your lock screen will immediately be more minimalist, streamlined, and clean. And who knows, you may save a pinch of battery by keeping that stuff from running in the background.
Move the Start menu back to the left hand side
One of the most controversial decisions made for Windows 11 was putting the Start Menu button at the bottom middle of the screen, a baffling choice, given that Windows has had its Start Menu on the bottom left since time immemorial. The new Start Menu lost a great deal of customization and shows less information overall, with a brand new Recommended section (pretty unanimously disliked) consuming a good chunk of that real estate. You can change most of this fairly easily.
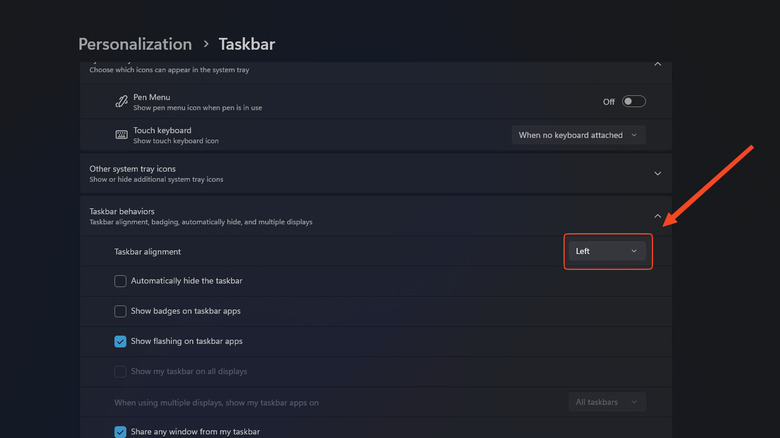
For the Start Menu's position, head back to the Settings app, then Personalization > Taskbar. Scroll down until you find Taskbar behaviors. Click the drop-down menu beside taskbar alignment and change it back to left. Done and done.
For the other things like the Recommended section, go back to the Settings app, then Personalization > Start. Assuming you don't want those recommendations, change the selection to more pins — which means more of your own personal apps. If you like, you can also toggle off the options below, such as "Show recently added apps," "Show most used apps," and "Show recently opened items in Start, Jump Lists, and File Explorer" for a cleaner Start Menu. Unfortunately, there's no easy way to completely remove the Recommended section, but at least now it will be empty and less distracting. Bonus tip: go to Settings > Personalization > Start > Folders, and you can add extra shortcuts like File Explorer or Downloads to jump straight to them from the Start menu.
Trim down the notifications
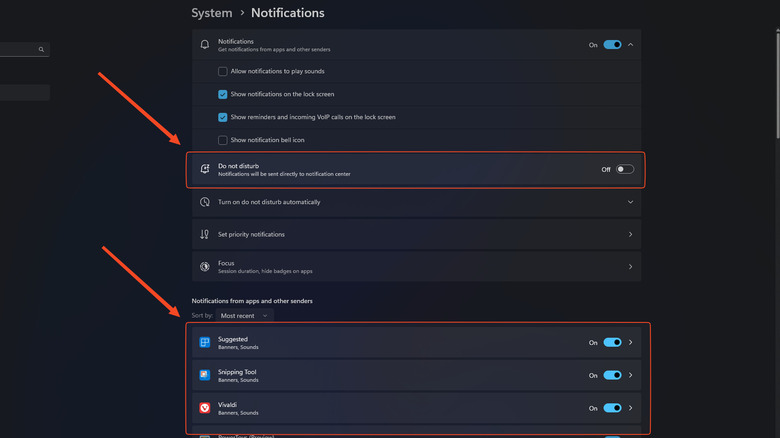
Even on a brand new Windows 11 PC where you haven't yet replaced Microsoft apps with your preferred alternatives, you're already getting hit with unwanted notifications. Go to Settings > System > Notifications. Either disable notifications completely (not recommended) or spend some time going through this screen to uncheck or untoggle anything you don't want. For example, you might want to uncheck "Allow notifications to play sounds" and "Show notifications on the lock screen." This is also a good time to set up Do Not Disturb to run automatically if you'd like to avoid interruptions during your regular work hours.
We'd recommend scrolling down to the next section and untoggling the notification permission for any app whose notifications you don't want to see. Consider giving priority status to any app whose notifications you do need to see from the "Set priority notifications" section. Keep in mind, you can disable notifications from a specific app, forever, as said notifications appear. If one pops up, click on the three dots next to the X icon and choose the first option: "Turn off all notifications for..." and the name of the app. That way, you can streamline your notifications center on the fly without going into Settings.
Disable advertising ID and suggested content
While there are definitely some settings you should immediately change on a new Mac, thanks to Apple's stance on privacy, very few of them are privacy-related. Microsoft is a different story. This step and the next few will discuss disabling its many privacy infringing settings, most of which are opt-out.
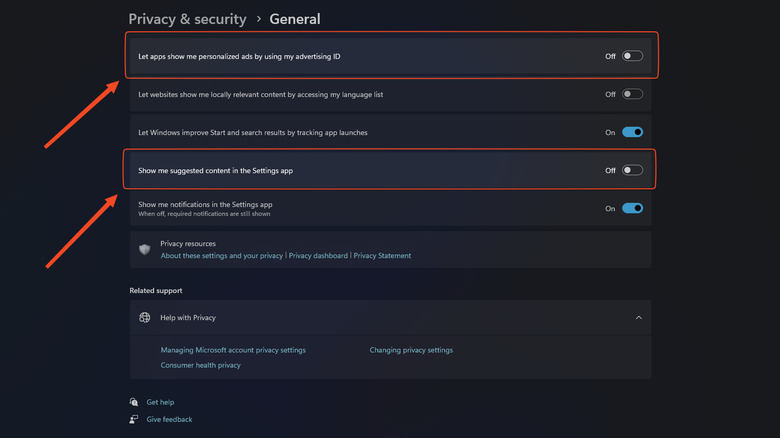
First, your advertising ID. Windows creates one for you so advertisers can identify you specifically, and feed you ads they think you'll like. Microsoft doesn't beat around the bush in admitting that this includes your personal data — unsettling, to say the least. Go to Settings > Privacy & Security > General and disable "Let apps show me personalized ads by using my advertising ID." Keep in mind this won't stop you from seeing ads, it just means they won't be relevant.
Don't exit out of this page just yet. Next, go to "Show me suggested content in the settings app" setting. Though it's worded as if it'll just show you tips on how to use the Settings app, it's really a veiled way of promoting specific Microsoft apps and services like Office 365, or the Xbox Game Pass streaming service. We're going to go out on a limb and say you're probably well aware of the Microsoft services you want and the ones you don't want, so just turn this one off.
Reduce Windows location permissions
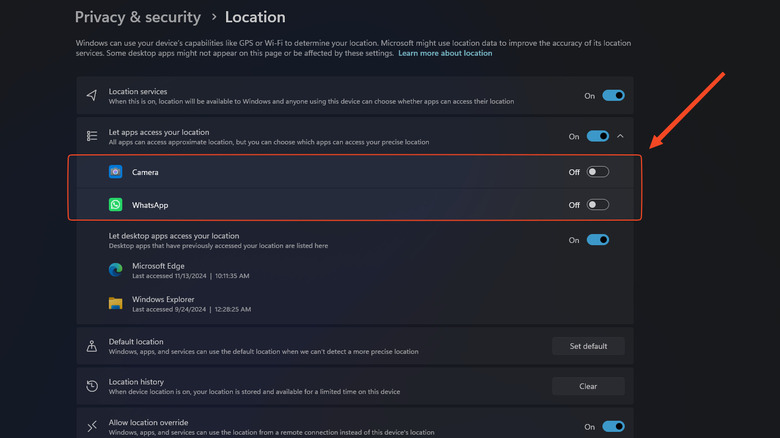
Location permissions tend to be one of the sorest spots for those concerned about their privacy, and it's no less of an issue with Windows — Microsoft sends your device's precise location to the cloud for its services. To be fair, not everything it does with your location is questionable; it sets up your time zone automatically and enables you to find your device if it gets lost, among other things. As a compromise, we'd recommend leaving it on (so you can use stuff like Google's new Find My Device network for Android), but taking away permission to use it from apps that don't need it.
Below the main location toggle, underneath the "Let apps access your location" section, disable it for anything that does not need it. Your PC's webcam, for example, arguably has no good reason to see your precise, geographical location. In the event you do give an app location permissions, go into its settings and make sure it's not misusing it. One Google privacy setting you should change immediately is the timeline, something you won't be able to control from Windows settings.
If you really want to lock things down, you can disable location permissions for your device entirely and allow them only for specific desktop apps. For example, a browser downloaded and installed from an .exe file. It goes without saying that any app you install on your PC could potentially abuse your location data despite the settings mentioned, so exercise caution.
Disable inking and typing personalization
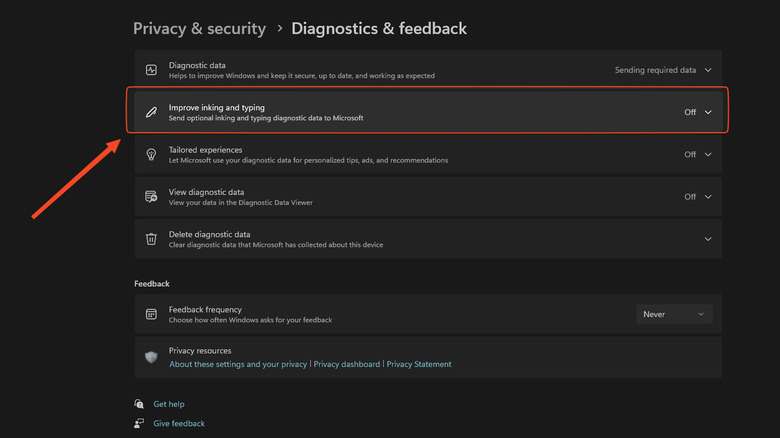
The inking and typing personalization in Windows 11 intelligently learns uncommon words you type to create a personal dictionary. It functions much like the self-learning autocorrect on a smartphone, but it raises questions about data privacy, and is intended for someone heavily immersed in the Microsoft ecosystem. Considering that typing is a lot more accurate than texting on a phone, it's probably best to disable it. In the Settings app, go to Privacy & Security > Inking and Typing Personalization, and change it to "Off."
If you plan to use Windows dictation (now known as voice typing) there's an additional privacy setting to consider here. Voice typing sends all of your dictated audio to the cloud for further processing to get more accurate results. If that makes you concerned about how that audio is processed, who has access to it, and how long it remains in the cloud, you might want to disable the feature. To do this, go to Settings > Privacy & Security > Speech, and turn off "Online speech recognition." The voice typing will be less accurate, but you'll have the peace of mind knowing no audio is leaving your device. There are other, more accurate dictation apps such as WhisperWriter, too, which run on your device.
Disable all diagnostic and feedback settings
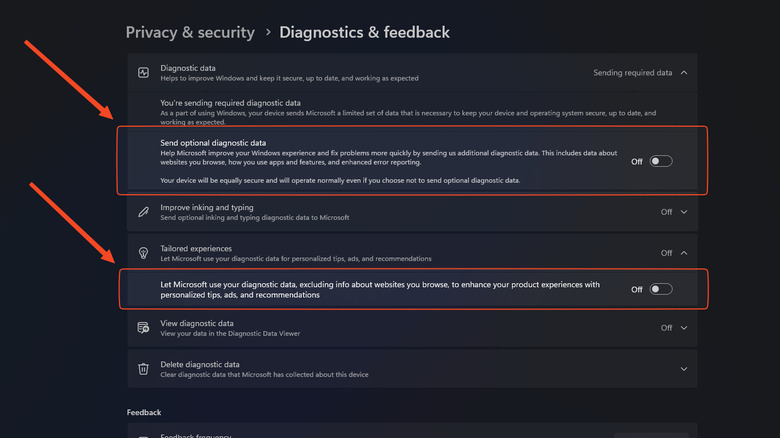
By far the most concerning privacy issue on Windows 11 is the diagnostic data it collects. The required data portion is understandable; things like error collection, information about your device's hardware, system performance, and so on. Microsoft needs that information to keep Windows in tip-top shape, and it doesn't present a huge issue to your privacy. However, the so-called "optional" diagnostic data, should raise a red flag or two. According to Microsoft, Windows 11 sees which websites you visit and the things you do on your device. Even more concerning: The setting is on by default, so head to the Settings app to switch it off. Go to Settings > Privacy & Security > Diagnostics & feedback, and then turn off the toggle for "Send optional diagnostic data."
While you're there, we also recommend setting "Tailored experiences" to Off — but don't worry too much about this one. It's similar to the tips settings disabled earlier, making suggestions about how to improve your overall Windows experience (ie, useful if you aren't particularly tech savvy).
Finally, go to "Delete diagnostic data" and click the button to remove any data collected already. There won't be much on a new laptop, but it's one easy click.
Bear in mind that these privacy settings (and some others we've mentioned above) can be changed during Windows 11's setup. So if you just bought a new laptop and haven't used it yet, now's the perfect time. Double-check for options to control privacy settings; Microsoft often doesn't advertise them openly.
Turn off delivery optimization
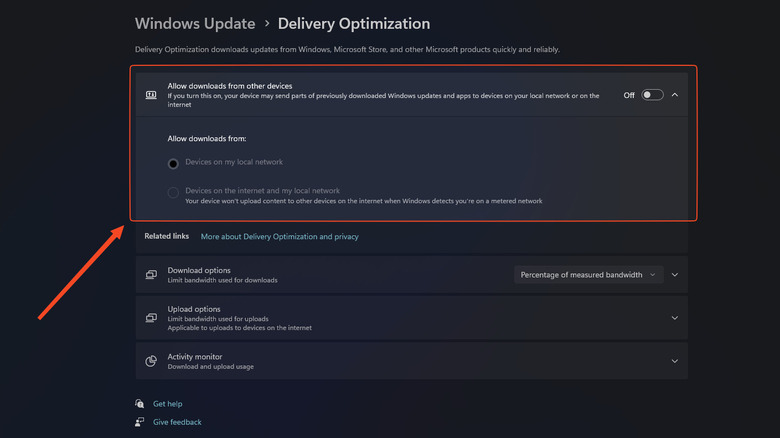
Delivery optimization is a clever system that allows Windows PCs to share pieces of an update (or app) with other PCs to ease the burden of big downloads. So when you download an update, your PC might grab little chunks of it from dozens of other computers. Problem is, this means your PC might — without your knowledge — also be participating, sending data to other strangers' PCs. It sounds a lot like peer-to-peer torrenting, a risky practice that exposes the IP address of your device to others. Although Microsoft has a number of security roadblocks to prevent delivery optimization from being used maliciously, the feature could be abused in the wrong hands. Best to disable it just in case.
Go to Settings > Windows Update > Advanced options > Delivery optimization, and change "Allow downloads from other PCs" to "Devices on my local network." This way you can still benefit from delivery optimization if you have multiple Windows devices on the same local network. Instead of wasting your data plan, one device will get the update and share it with others. Just keep in mind that this doesn't work on a metered or capped connection.
Disable Copilot
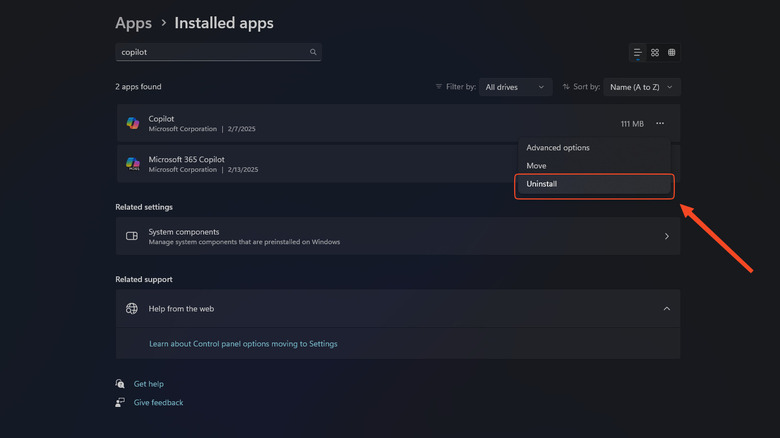
As Windows 11's built-in AI assistant, copilot has some useful features, but a lot of people simply never find a reason to justify it. And yet, it's always sitting there at the ready, consuming system resources. Here's how to shut it off — temporarily or completely.
Head to Settings > Personalization > Taskbar, and look for the toggle to disable Copilot. Of course, this only disables Copilot; it doesn't remove it from your system. If you'd like to go all the way, the easiest way (as pictured above) is to go to Apps > Installed Apps and uninstall Copilot. For a more thorough removal, search for "gpedit" (the Group policy editor), in the Start menu. Now, navigate down the hierarchy of folders in this order: User configuration > Administrative templates > Windows components and then finally Windows Copilot. Find the option to "Turn off Windows Copilot" and double-click it. In the window that pops up, make sure "Enabled" is selected, then click the "Apply" button and hit "OK."
Disable Recall
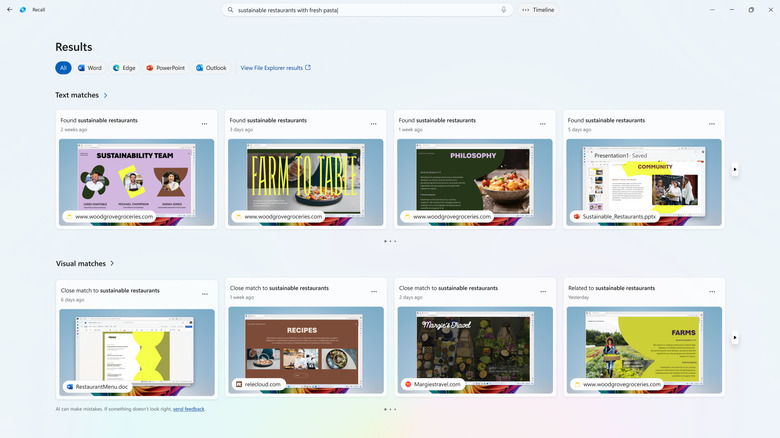
If you own a brand new Microsoft Copilot+ PC, then you likely have access to one of Windows most controversial features: Recall. Recall takes intermittent snapshots of everything you do on your PC over the course of days, weeks, and months. In theory, you'd be able to search back through everything you've done. For example, you could quickly find a picture you downloaded sometime last month by describing what was in the image — a personal search engine, if you will. When it launched, a lot of people felt this feature was something straight out of 1984, or at least just a great way to waste hard drive space. Here's how to disable it.
Go to Settings > Privacy & Security > Recall & Snapshots. If you don't see the option, it's because your computer doesn't support it. Next to "Save snapshots," turn off the toggle. And optionally (if you've been using the device already) open the "Delete snapshots" menu and click "Delete all." Similar to the diagnostics menu we went through earlier, this information remains unless you manually erase it.
If you don't mind going under the hood, you can also completely remove Recall from your system. From the Windows Start menu, search for "Turn Windows features on or off" and select the first option that appears. Move down the list alphabetically and uncheck the "Recall" option. Restart your computer after it finishes and it'll be gone for good.
Remove unwanted apps with Geek Uninstaller or Revo Uninstaller
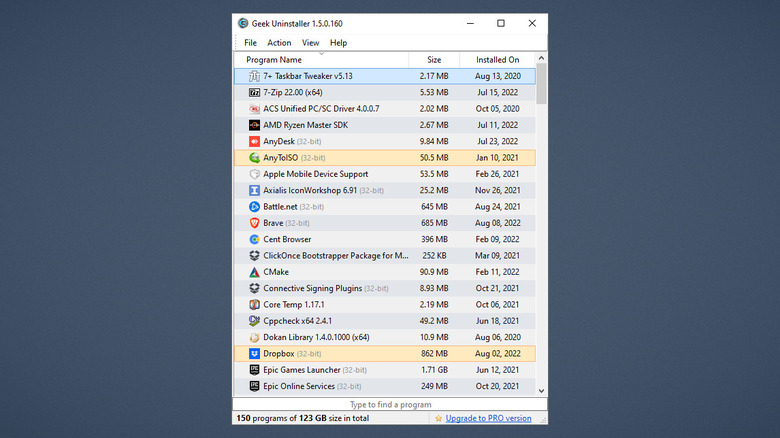
Every new Windows PC comes preloaded with bloatware from Microsoft and/or the hardware manufacturer. Think of things like Microsoft Clipchamp or the Prime Video app, or any app you don't plan to use. You could uninstall them, but that doesn't guarantee they're completely removed from your system.Two excellent programs make it easy to completely remove every trace of an unwanted app or feature — including those you download later on down the line.
The first is Geek Uninstaller, the easiest to use of the two. Download it from the link we've provided, and when you launch it, you'll see a complete list of every program on your computer. Removing them is as simple as double-clicking and following the prompts. Once it uninstalls a program, it'll look through various locations for leftover traces the uninstaller would have otherwise failed to remove.
Geek Uninstaller is great, but Revo Uninstaller ups the ante by an order of magnitude. It really hunts down every last drop of a program, speaking from personal experience, and it's not shy about how aggressive it can be. Before using it, it asks you to create a system restore point just in case. Geek will be plenty for most users; Revo is for those who want an in-depth removal and advanced user settings. Both are free to use.
Try out Power Toys
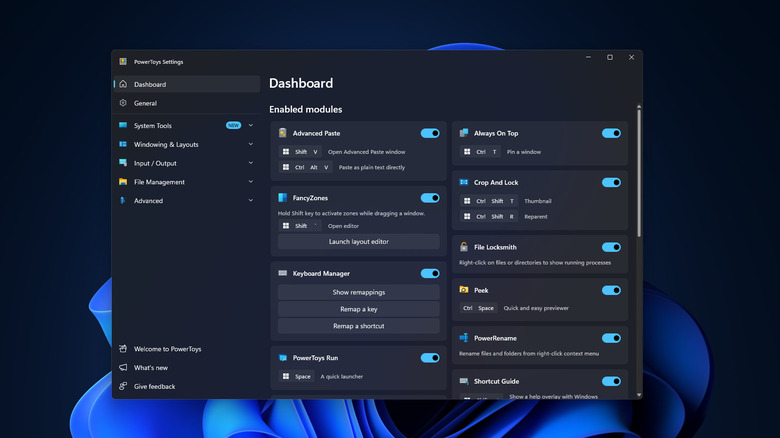
Looking for a bit more functionality beyond what Windows 11 provides by default? PowerToys is a must-have, built by Microsoft itself. Think of it as a bundle of mini tools for productivity and convenience.
For example, there's Peek, which lets you press Ctrl + Space to quickly preview a file without opening its associated program — similar to Quick Look on macOS, if you're a former macOS user converting to Windows 11. There's Image Resizer, which makes it easy to resize one — or multiple — images from the right-click menu. There's Text Extractor, another feature former macOS users might be missing; press the Win + Shift + T keystroke and then grab text from anything on screen, including images and videos. Always on Top makes sure whichever application you're using stays in focus over surrounding windows. Those aren't even half of the tools included in PowerToys, so if any of them catch your eye, there's sure to be more.
To install PowerToys, either download it from GitHub or directly from the Microsoft Store. We recommend the latter since that way, it will get automatic updates. Once installed, we recommend toggling off any utilities you don't plan to use to save system resources. PowerToys is in active development and brings new functionality all the time, so keep an eye on those updates for the latest PowerToys features from Microsoft.