How To Check Tire Tread (And Why Depth Matters)

Maintaining your car is more than just keeping the interior and exterior clean and making sure the engine is running like a dream. It's incredibly important to keep an eye on your tires too. Always check if they're inflated just right — overinflation can lead to hydroplaning and underinflation can increase fuel consumption, among other things. It's also a good practice to check your tire alignment as this can cause your steering wheel to tilt to one side or your car to veer off course.
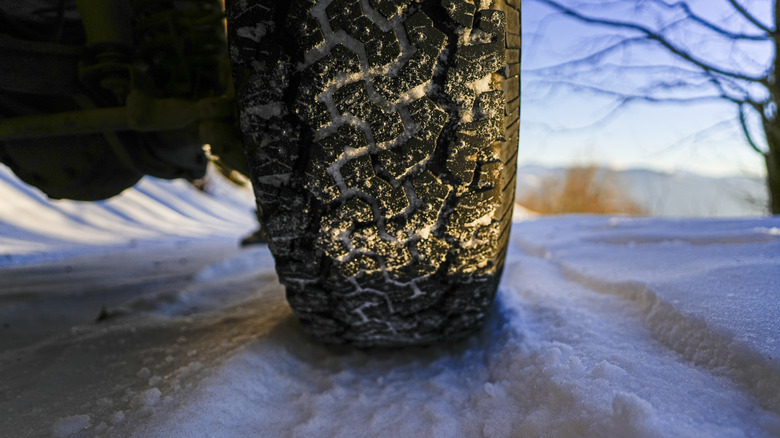
Another key attribute to inspect is your tire tread. The treads are the patterned rubber part of your tire that actually meets the pavement. They're designed to give your car its grip on the road, especially on wet surfaces and curves. But how do you know if your tire tread is still in good condition? This is where the tire tread depth comes in. By measuring the tread depth, you get a better idea of whether your tires are still safe for driving or if they're already due for replacement.
Why your tire tread depth matters
The tire tread depth is the measurement between the groove (the gap between the patterned rubber) and the top of the tire tread. For new tires, this depth is usually 10/32 or 11/32 inches (8 or 9 mm). However, it doesn't stay that way throughout your tire's lifespan. Tires naturally wear down as you use them, but they can also lose tread earlier due to inaccurate tire pressure and alignment and frequent acceleration and hard braking.
Once your treads become shallow, your tires' performance is reduced. They'll have a harder time expelling water and maintaining contact with the road, potentially causing you to lose control. You also lose braking power as your treads wear out, delaying your car's ability to come to a full stop. If you keep driving around with tire treads that are already at or below 2/32 inches (1.6 mm), you can be fined in some states in the U.S., including New York, Texas, and California.
That's why it's a must to know how deep your tire treads still are. It's recommended to measure your tire tread depth once every 3,000 miles (5,000 km). You should also do so more religiously as soon as you get to 4/32 inches. Once you reach 2/32 inches, it's time to buy new tires. But how exactly do you measure the tire tread at home, without needing to take your vehicle to a mechanic?
Method 1: Wear bars
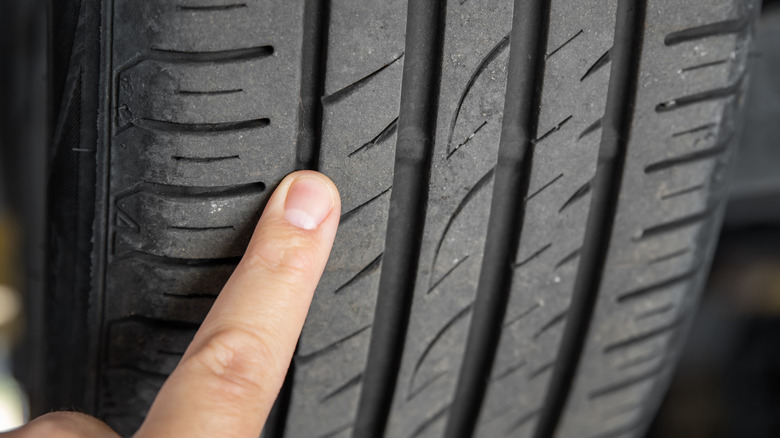
The quickest way to measure your tread depth is by reading the wear bars on your tires. Also called tire wear indicators (TWI), they're raised rubber bars in the grooves of your tires and can be found across and around your tire at certain intervals. Most manufacturers place these wear bars at 2/32 inches above the lowest part of the groove. That means when the top of tire treads are leveled with the wear bars, you're already at the 2/32 inches and need to get your tires replaced. If the treads are above the wear bars, you're still good. To find the wear bars, you can either feel for them between the treads or look for the TWI pointer some manufacturers add on the side of the tire. For instance, Michelin embosses a Michelin Man on the side, which points to where the wear bars are. Continental also has a "TWI" marking on the sidewall, along with an arrow.
While it's common to use bars as indicators, some manufacturers use alternative approaches to give you a clear indication of the tire's condition even before it reaches the 2/32 inch limit. For Cooper tires, it's the Wear Square. This little square on the middle or outer treads of the tire fades away gradually. When it's 25% worn, the top side disappears; at 50%, it becomes an L; at 75%, it's a single straight line; and when it's time for a replacement, it shows an exclamation point. For Michelin, you'll see the Wear2Check, three circles of varying depths: the outermost circle fades at 25% wear, the second at 50%, and the third at 75%. For Goodyear tires, the wear bars look like tiny stair steps, marked 8, 6, 4, and 2 for 8/32 inch to 2/32 inch.
Method 2: Coin test
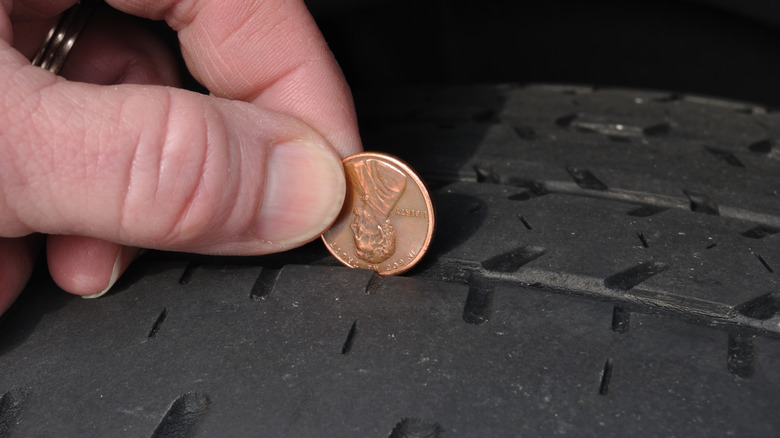
If you can't find your tire's wear bars or are confused how to interpret them, another way to measure your tire tread is with a coin. This age-old trick to ensure your tire safety only requires you to have any sort of coin: a penny or quarter in the U.S., a 20 pence in the U.K., or a 20 cent in Australia.
To test, first make sure your car is parked on a level road. Turn one of your tires outward. This way, you can get a look at the treads. Once done, put the coin on the groove (where the wear bars should be). Then, check the coin:
- For a penny: Insert it head down and see if Lincoln's entire head is visible. This means your tread depth is at least 2/32 inch or even lower. Change your tires! If, however, any part of his head is hidden by the tread, the tire's still safe.
- For a quarter: Insert it head down as well. Check where the top of Washington's head is on the tire. If it's below the tread (meaning, you can't see it), the tires still have some life in them. If the top of the head is fully visible, replace the tires.
- For 20-pence: Place the coin however you like. Look for the band of the coin. If the inner band is hidden in the tread, your tire is over 3 mm. If the inner band is shown, you should consider new tires.
- For an Australian 20-cent: Put the coin right side up. The tread should cover the platypus' bill. If it doesn't, you should start preparing to change tires soon.
If you don't have any of these coins, look up how to do a tire test with your country's coins.
Method 3: Tread depth gauge
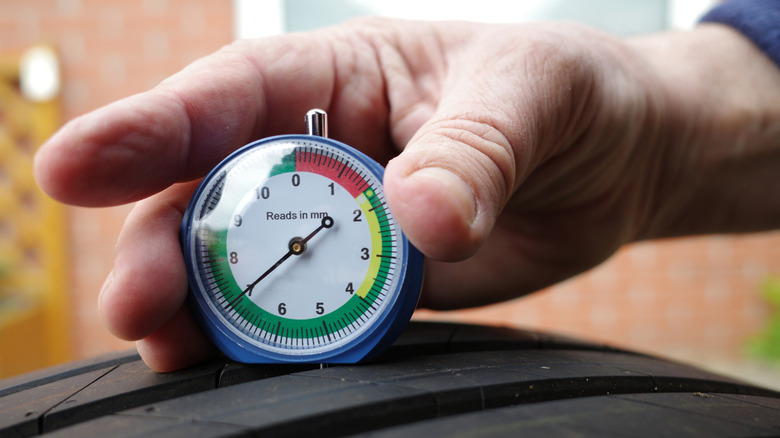
Neither the wear bars or the coin test will tell you exactly how deep your tire treads are at any given moment. If you want to have a better understanding of your tread depth without much interpretation, what you need is a tread depth gauge. This measuring tool tells you the exact measurement of the tread depth, so you can easily save up for new tires before your current ones wear down to the 2/32 inch threshold. Tread depth gauges typically come as either a pencil type, dial type, or digital type. Here's how to use the pencil/stick gauge:
- Calibrate the gauge by setting the base on a flat surface and making sure the reading at the end of the gauge barrel is 0.
- Push the probe down on the tire until it reaches the deepest part of the groove.
- Place the base on top of the tread. Make sure it's touching either side of the tread.
- Lift the gauge to better see the reading.
- Look at where the end of the barrel is closest to. If you have a color coded gauge, you can immediately tell if you're in the green safe zone (6/32 to 32/32 inch), yellow warning zone (3/32 to 6/32), or red dangerous zone (0 to 3/32).
The dial type gauge and digital gauge work similar to the pencil gauge — simply push its probe on the groove, level the base of the dial on the tread, and read the measurement. However, they can be easier to read since you can clearly see where the needle is pointing on the dial type or check the exact measurement on the display on the digital type. Digital gauges can even switch between millimeters and inches for your convenience.