12 Ways To Make Windows 11 Run Faster
We may receive a commission on purchases made from links.
Microsoft Windows is by far the dominant desktop operating system at 25% of devices worldwide, according to statcounter — and that's in competition with mobile operating systems too, mind. It's not hard to see why. It comes bundled for free with most PCs. Windows PCs tend to be far more affordable than Apple, the majority of software is made for it, and it can game a lot better than Macbook. But that comes at a cost. Microsoft is notorious for treating user privacy like a disposable wipe, for forcing updates when you least want them, and, in the experience of a lot of users, letting their OS get bogged down way too easily. It gets so bad at times that some people make the switch from Windows to Mac.
Diagnosing the issue of slowdown in Windows can be a needle-in-haystack situation. It could require a simple restart, or it could be a much deeper issue at the hardware level. Sometimes it's just a matter of trying every fix you can until something works. Here at 12 things you should try out if Windows 11 is running slow on you.
Restart and update your device
It's the clarion call of every tired tech support assistant: "Did you turn it on and off again?" Don't be too quick to shrug this simple trick off. Restarting your device can fix a lot more than you might realize. In fact, even Microsoft itself recommends restarting your computer at least once a week. To keep it simple, your PC accumulates digital crud that eats up system resources. Programs don't always close correctly, files get corrupted, and soon enough Windows becomes sluggish and error-ridden. Give it a good restart and see if that changes things. Better yet, get into the habit of shutting down your computer every day when finished, or at least once a week.
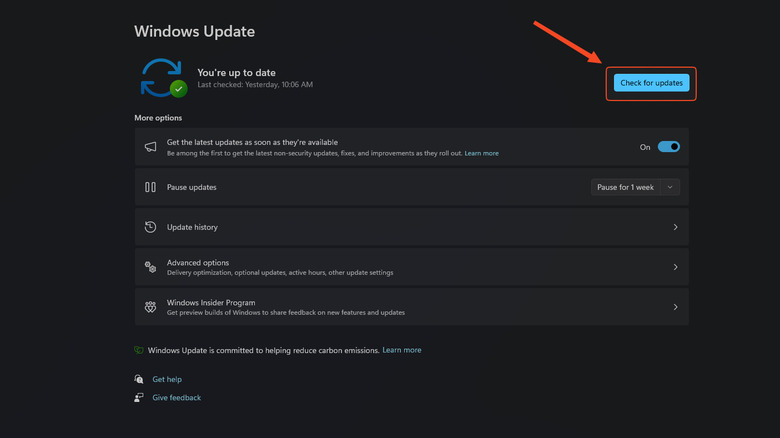
If that doesn't work, then let your PC do that update you've been ignoring. It's a common smartphone myth that manufacturers purposefully use updates to slow your device down, and the same applies to Windows. Updates can solve performance-related problems, fix bugs, and keep your device safe from cybersecurity threats. If you do feel that an update has slowed your computer down, it likely has a different cause, such as undiagnosed high CPU usage. In any case, this is only the first, easiest recommendation. If that doesn't work for you, try the next.
Disable startup apps
Unwanted startup apps are a thorn in Windows's side, performance-wise. Any program you install can give itself permission to run at startup, putting additional load on your computer even after having done a fresh restart. It's a shame that Microsoft hasn't created some sort of permissions system that programs need to go through before adding themselves to the startup list, so until such a feature comes, you can trim them from the list yourself.
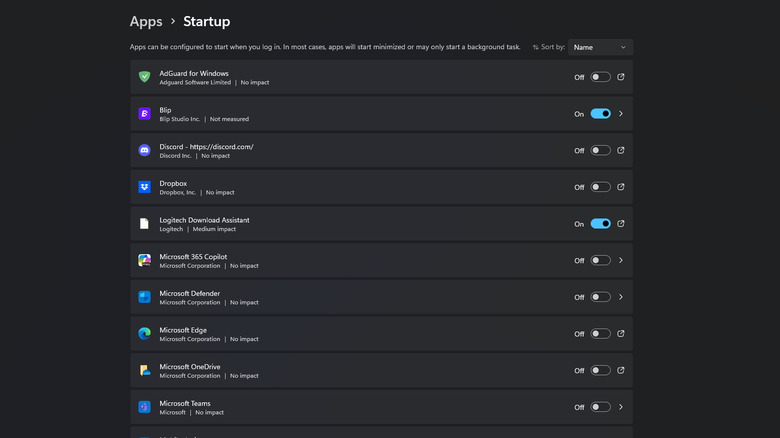
There are two ways to do this. One, from Windows settings, or two, from the Task Manager. Go to Settings > Apps > Startup and toggle off anything that doesn't need startup permissions. Do be cautious about what exactly you're disabling, as the absence of some items (such as, say, your Realtek HD audio driver) will only cause problems. It's highly recommended that you only disable processes for non-critical software you have personally installed.
Otherwise, you can open up the Task Manager using the key combination Ctrl + Shift + Esc. Mosey on over to the Startup tab, click on any unnecessary program, and then hit Disable at the bottom right. By clicking the Status column at the top, you can sort the programs by Enabled or Disabled. Task Manager is a bit more helpful for disabling startup apps because it gives an estimate of how taxing a program is on your computer. Anything with a high startup impact should, unless you need it immediately at startup, be disabled.
Kill programs from the Task Manager
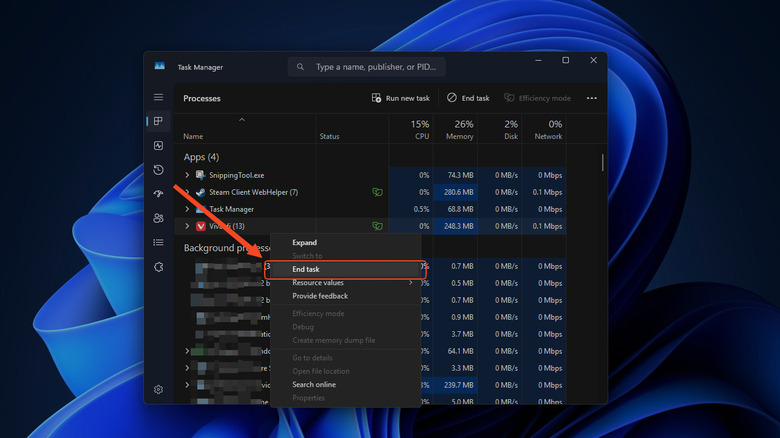
Think of the Task Manager in Windows like the thumbs-down in "Gladiator." You have full control over whether a program lives or dies, especially if it misbehaves or refuses to quit on its own. Use the Ctrl + Shift + Esc shortcut from before. Each column under CPU, memory, disk, and network tells you how many system resources (in percentage) an app is using, with darker colors indicating the heaviest consumers. Look for programs that are using a suspiciously large amount, especially if you're not using them, and hit End task, or right-click and End task.
Focus on apps and background processes. Click one of the columns to sort processes from highest to lowest usage so you can easily spot the problem items. Focus on CPU and memory, since high usage in these categories is the typical culprit for system slowdown. Same as before, be extra careful not to kill anything if you're not sure exactly what it does. Windows will show its own background system processes at the bottom, which you should leave alone unless advised to do so by an expert.
Killing a program from the task manager is only a temporary solution. There's a good chance that the program has given itself startup permissions and will be running again after your next restart. Before terminating programs from the task manager, consider opening their settings to make sure they're not doing anything you don't want.
Uninstall crapware with Revo or Geek
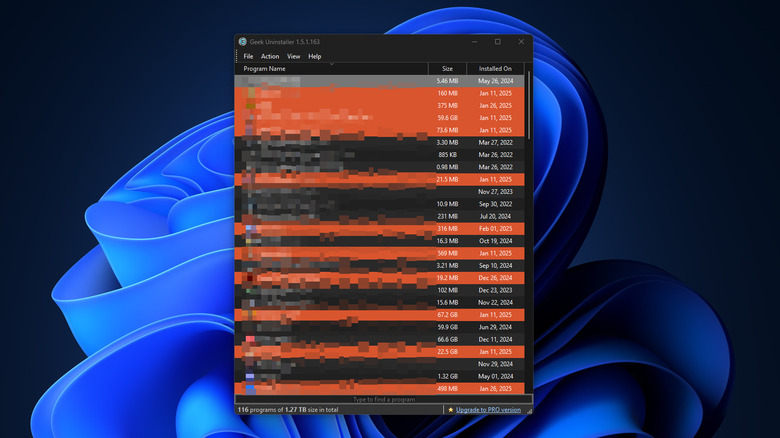
One thing every former Mac OS user going to Windows needs to know is that uninstalling a program isn't enough. Programs leave all kinds of leftovers in your documents folder and your registry. Using a program like Geek Uninstaller or Revo Uninstaller is practically a must, but there's an extra benefit here: these two suites can remove crapware (also known as bloatware) that's choking up your system. If you've ever been bombarded with McAfee Antivirus nags, you know exactly what we're talking about. Manufacturers will often make deals with these developers to ship their software, pre-installed, onto your device and make it difficult to remove. The two programs we've recommended can eliminate crapware from your system for good.
If you're not sure which one to use, go with Geek Uninstaller. It's the simplest of the two. Once you install and open it, it shows a list of all the programs on your computer. Double-click any program you want to remove and follow the prompts until all reminders are gone from your PC.
Revo Uninstaller does a much more aggressive job, digging deep into your computer to find every last trace. As proof of how aggressive it can be, it recommends making a system restore point before using it. Crapware includes things like free antivirus, pre-installed games, system apps from Microsoft like Groove Music, and so on. If you don't need it, remove it. There's a good chance that at least one crapware program is contributing to a general system slowdown.
Install an SSD and/or add RAM
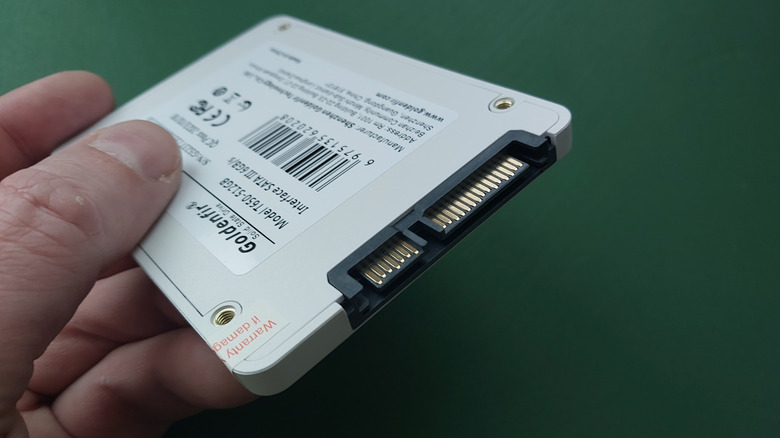
A guaranteed way to speed up your computer is also one of the most invasive: replacing your computer's HDD drive with an SSD. SSDs are more durable, more energy efficient, less noisy, and produce less heat. Most importantly though, they're faster. Your PC will start up faster, programs will open quicker, and performance overall will generally be snappier. SSD prices have been going up lately, but on the whole, they're quite affordable. This 1TB Crucial SSD, for example, runs for as little as $58.99 when on sale. You'll need to research if your particular model of desktop or laptop PC allows for drive replacements. It'll take a bit of elbow grease, but in the end, your computer will feel better than when it was new and last longer besides.
Upgrading the RAM is also a great idea. Giving yourself more RAM at faster clock speeds can allow you to run more programs (and more RAM-hungry programs) with less performance degradation. Your computer will experience a slowdown any time it runs out of RAM since it has to swap to your much slower hard drive. Even a blazing-fast new SSD won't make a difference with insufficient RAM.
RAM is even easier to install than a hard drive, though do keep in mind that you'll need to buy the right kind. Desktop RAM and laptop RAM are different. Also, keep in mind that replacing the RAM may be a non-starter. RAM in laptops may be soldered in, making it impossible to replace without expert know-how. As with anything else, do your research in advance before spending money on any new components.
Make sure Windows Security is in order

One thing that can definitely slow down your PC is malware. Everything from viruses to key-loggers occupies some amount of system resources — thus creating a slowdown — and they can slow down your device in other ways, such as when they corrupt your files. You could try one of these free antivirus programs to protect your PC, but fortunately, Windows Security is built in and it works great. The issue is that it might not be configured correctly, or you might have been ignoring its nags to address important settings.
Search for Windows Security and open it. First, we recommend going to "Virus threat and protection" and running a scan — especially if one hasn't been done for a long time. If there's malware on your computer, this should solve your slowdown issue in one fell swoop by quarantining any problematic file. Check "Device performance and health" next. If any remaining section is missing a green checkmark, click on it and make the changes recommended by Windows 11.
Take some time to go through each section (green checkmark or not) since most of the items on this list can have some indirect impact on performance. Speaking from personal experience, I went a long time without realizing core isolation wasn't enabled in "Device security," which leaves the Windows kernel vulnerable.
Switch to the best performance power mode
One setting requires only flipping a switch to (hopefully) give your device a performance boost: changing the power mode. Go to Settings > System > Power & battery > Power Mode. Note, that if you are using a desktop device, then the battery part will be missing. Your computer may be set to "Best Power Efficiency" when plugged in and — if it's a laptop — when on battery, too. This means it's prioritizing energy savings, particularly for battery life, which in turn causes reduced performance. If you don't mind the increased power draw to your device (especially if it's a laptop that you use on battery) then change it to "Best Performance."
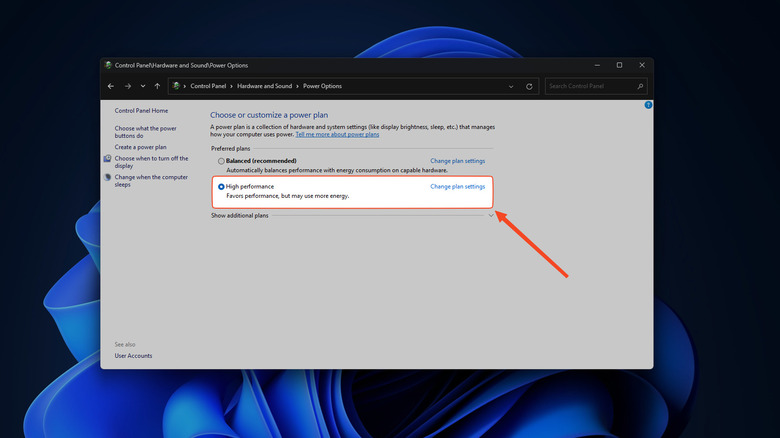
There may be additional power settings for even higher performance modes, but these are locked away in the control panel. Go to Control Panel > Hardware and Sound > Power Options. You should have a "High performance" option, but if you have a higher-end machine, then the "Ultimate performance" option will be unlocked for you. Again, keep in mind that choosing high or ultimate will lead to higher power draw and thus — depending on how much you use your computer — higher utility bills and/or reduced battery life.
Clear up disk space
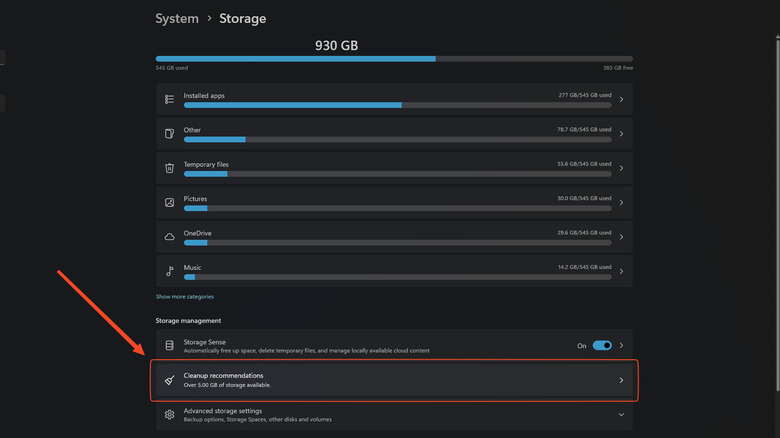
Another fairly easy fix for slowness is freeing up storage space. As you get dangerously close (within double-digit gigabytes) of your maximum storage capacity, your computer may begin to slow down. There are a number of ways to free up storage space with built-in tools in Windows 11. We highly recommend enabling Storage Sense in System > Storage to automatically clear out the temp files folder and empty the recycle bin. Use the "Cleanup recommendations" if that isn't enough; I've often found sometimes upwards of a dozen gigabytes hogged by an old Windows update cache.
If push comes to shove, take this as a chance to do some long-needed "spring cleaning" of your personal files. Go through document folders and pictures, deleting anything you don't need. Just taking an hour or two to do this can easily free up a couple dozen gigabytes. This might be a good time to consider buying an external hard drive to back up your files, too, or to subscribe to OneDrive (or any other cloud storage service) to store your files safely online.
If that still isn't enough, you can try a third-party software suite like BleachBit. BleachBit finds dribs and drabs of unneeded data squirreled away in applications and folders across your system, like thumbnail images for files in folders you don't regularly visit. Be cautious when using this tool; It can delete things like browser cookie data, meaning you'd have to log in to your online accounts in the browser again. Still, using a tool like BleachBit on a device that hasn't been given a proper clean in years can discard gigabytes of data — speaking again from personal experience, having used this on computers of less tech-savvy friends and relatives.
Adjust visuals for best performance
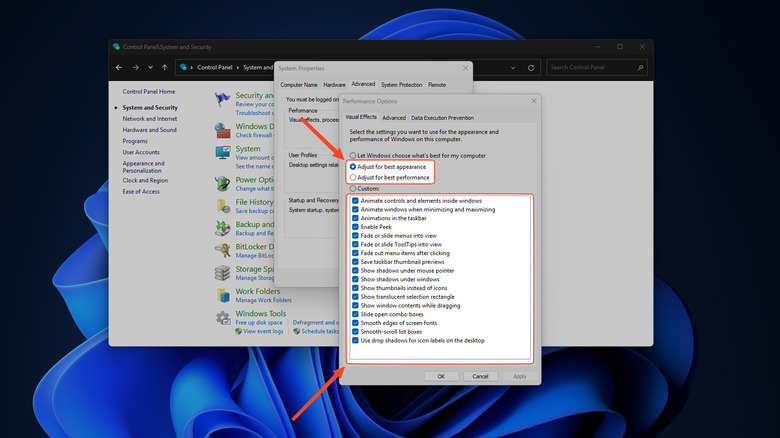
For a much smaller improvement in speediness, you can adjust Windows 11's visual effects. These include things like transparency and window animations when you open and minimize apps. Said visual effects certainly help Windows 11 to feel modern and slick, but they are, at the end of the day, just visual flourishes that most people can live without. If the goal is squeezing out every last bit of performance, it's best to disable them since they do have a small impact on performance.
Go to Settings > Accessibility > Visual Effects and toggle off the Animation effects and Transparency effects. Windows 11 will look a bit more "ugly" and may feel less smooth, but it will (at the very least) feel a bit faster. If you really want to strip down Windows 11 of any and all visual effects, no matter how small, then you can go even further.
Head to Control Panel > System and Security > Allow Remote Access. From the window that pops up, go to the Advanced tab, then under Performance, Settings, and then "Visual Effects." Here you can uncheck any visual effects to your liking. However, the easiest option is to toggle the "Adjust for best performance" setting —which unchecks everything — and click Apply. If you'd rather not forfeit some of the features you're used to, like peeking a minimized program, then re-check those must-haves as you like. Just keep in mind that disabling everything is going to make Windows 11 feel like it's taken a trip back to the 90s.
Pause OneDrive (or any cloud storage provider)
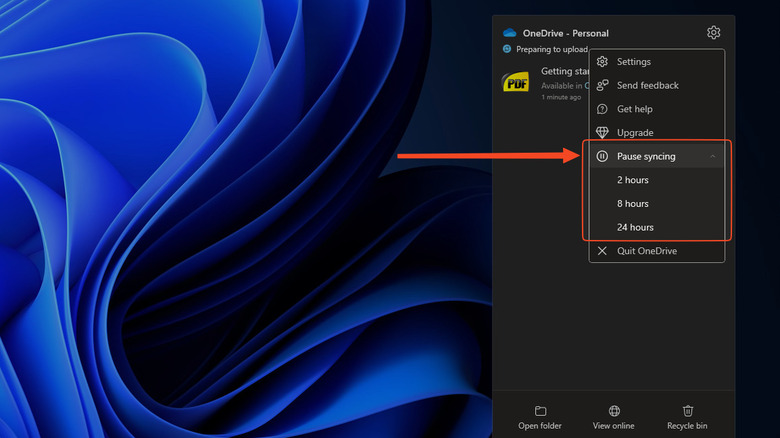
We've recommended using OneDrive to back up your files to the cloud, but OneDrive (and just about any other cloud storage provider) tends to be quite heavy on system resources even in the background. Especially when you're making changes to a lot of files. Speaking again from personal experience (and looking at many other internet users with the same complaint), this can sometimes interrupt your work and create unacceptable amounts of slowdown. If not that, then your device might blow its fans at full speed, or get uncomfortably hot in your lap. We recommend pausing OneDrive if this slowdown is getting in the way and then re-enabling it when you're going to step away from the computer.
Find the OneDrive icon on the taskbar and right-click it. Click the pause button. It only allows you to pause for a maximum of two, eight, or 24 hours. Otherwise, you can just quit the app entirely from the same drop-down, then reopen it later as needed. Doing this can also help if you have a slow connection and whatever you're working on requires faster speeds.
Disable File Explorer search indexing
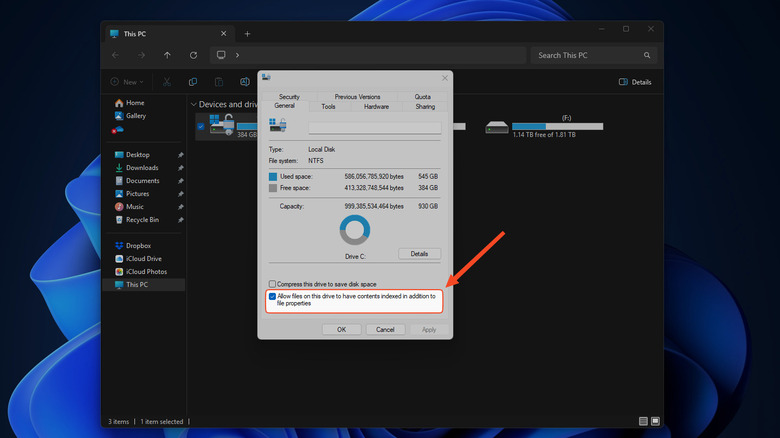
This tip is where we get deep into the weeds of changes you can make to improve system performance. By default, Windows indexes your files to make searches a lot faster. Unfortunately, this comes at a performance hit, one which may not be worth it if you don't do a whole lot of searching. That includes if you have an SSD. Unless you find yourself performing searches on a fairly frequent basis (as in, daily), it's probably a good idea to turn this one off.
The easiest way to do it is to open File Explorer and then go to This PC. Right-click on your system drive. Go to Properties untick the box near the bottom that says "Allow files on this drive to have contents indexed in addition to file properties" and hit the Apply button. Voila. Do the same for any other drives on your system. If you do find the searches are too slow for your liking, you can always come back to Properties and revert it.
Return to a restore point
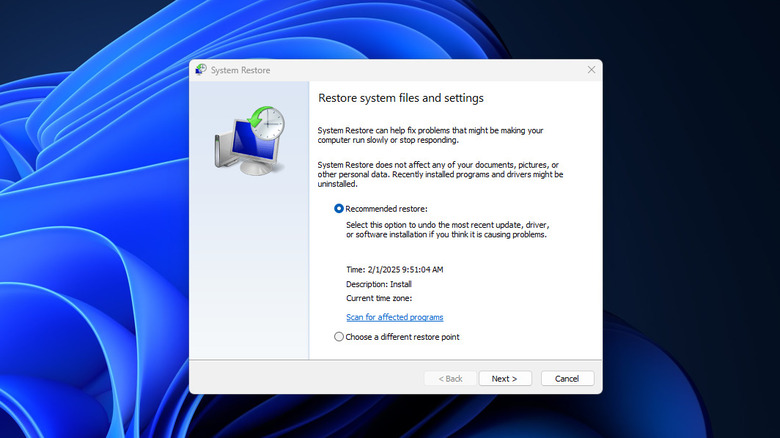
Here's a hypothetical situation: suppose your computer has gotten inexplicably slower all of a sudden, and you haven't been able to diagnose the root cause. You've then tried everything on this list, and still no dice. In that case, the best option for you is probably to return to a system restore point. System restore points are old snapshots of your PC used to return it to a moment in time when it was working properly, without affecting personal files. Any slowdown should — hopefully — be eliminated.
By default, Windows 11 creates system restore points during certain events like installing a new application. To use one, go to Control Panel > Recovery > Open System Restore then click next for "Restore system files and settings." Restore points will be organized by the date and time they were made. Choose one from before the problems started happening and see if that fixes it. If not, you can always choose another one later.