6 Cool Raspberry Pi Projects For Lego Fans
In terms of useful Raspberry Pi projects, there are abundant ideas online, whether you're on the lookout for some smart upgrades for your bedroom or handy builds for your kitchen. You can turn the Pi into practically anything you need, thanks to its portable and versatile design. However, not every Raspberry Pi-powered project has to be for something purposeful. Sometimes, it can just be for fun, and not function. Perhaps a creative project made out of LEGO pieces instead?
Just like a Raspberry Pi, LEGO pieces are multifunctional and can become pretty much whatever you want. You can easily customize and modify them for your enclosures, stands, and component supports, and even incorporate the LEGO sensors and actuators to your build so you won't need to buy extra components. If you already have some LEGO sets lying around, here are six of the coolest projects you can try making with a Raspberry Pi.
LEGO Nintendo
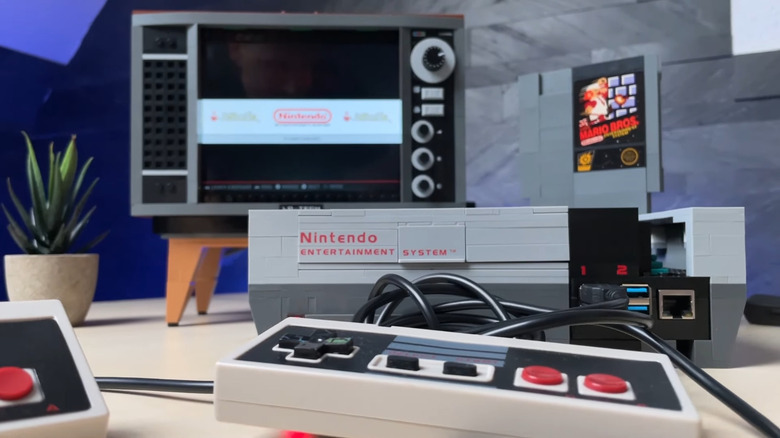
If you're a gamer and a lover of all things retro, then you've probably already built (or at least heard about) the LEGO Nintendo Entertainment System (NES). This set is a combination of a CRT-style TV, a NES console, and a NES controller, easily taking you right back to the 1990s. However, it doesn't have to be a simple display collecting dust on your shelf — you can actually turn this LEGO assembly into a fully functional Nintendo.
This retro gaming Raspberry Pi project is designed as close as possible to the real thing. It features support for up to four USB controllers, an Ethernet port, a power LED, and functional ports. To get started on this build, the main components you'll need are a Raspberry Pi for hosting the Nintendo software, an 8-inch IPS display panel, micro-HDMI to HDMI cable, NES-style USB controllers, small speakers plus adapter cable, and two USB hubs for power. Other extra requirements for this project include a Raspberry Pi LEGO case, a LEGO USB LED, and a power adapter. The Pi, USB hub, LED, and adapters/cable go into the console, while the display, USB hub, and speakers are installed in the TV. You might need to work your LEGO magic to fit the components, though.
On the software side, the only configuring you'll do is installing the RetroPie to the microSD via the Raspberry Pi Imager. RetroPie is a free retro gaming platform that comes with support for multiple systems, including the NES. Once installed, just configure the system, add your game ROMs, and you're ready to play.
Weather station

While you can find plenty of Raspberry Pi-powered weather stations out there, they wouldn't be as fun to build as a LEGO one. This Pi-based weather station made of LEGO blocks and motors from the SPIKE Prime set works as any standard weather station — it tells you today's forecast in terms of weather, temperature, and wind speed. The Pi extracts the weather data using the Met Office API, but depending on your location, you can also switch to other weather APIs like Open-Meteo and Weather API.
What's clever about this LEGO build, though, is that it doesn't use a typical screen or monitor to show the weather data. Instead, it relies on some LEGO motors, bricks, and some pieces of paper to display the information. For instance, the wind speed motor, which is attached to an indicator arrow, moves to the correct angle and points to a number on the paper to show the wind speed. The temperature, on the other hand, looks like an analog thermometer on the paper. The temperature motor moves a strip of paper up or down based on the temperature, making it line up with the correct reading on the thermometer drawing. Meanwhile, for the general weather condition (e.g., sunny, cloudy, rainy), another motor controls a circular paper with all the possible weather icons. It rotates to the right position to show the correct forecast through a window cutout on the paper.
The electronics aspect of the project only requires the Raspberry Pi and the Build HAT, a Raspberry Pi add-on board that enables you to control LEGO Technic accessories like motors, sensors, and lights.
Remote movie selector
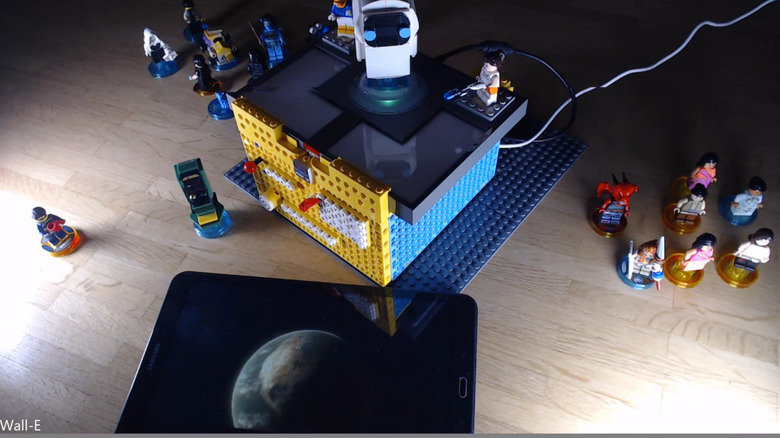
Building a Raspberry Pi media center with Kodi is fun and all, but to make your entertainment system even more convenient, try incorporating this creative remote movie selector made out of LEGO pieces. The premise of the project is simple: you pick a LEGO Dimensions minifigure, place it on the LEGO Dimensions Portable Base, and the movie associated with that minifig will then play on the screen straight from Kodi.
By themselves, the LEGO Dimensions minifig and Portal Base work using NFC technology — the minifigs stand on their own NFC disk, which the base then reads. This way, the base knows exactly which minifig is on. The Raspberry Pi then uses this unique data to look up the corresponding movie file path from a premade Tags.csv file. Once it validates the file path (found on a separate network storage), it then triggers the player device (either a Windows PC, Android, Xbox, or Fire TV on the same network as the storage and Pi) to play the media.
Besides the minifig movie selector, the project also features functions you'll find on a regular remote control. It comes with a play/pause button made out of a LEGO SPIKE Prime force sensor, a media selector using an angular motor (lets you change between movies, music, TV, and radio), and a channel selector controlled by a linear motor. If the media selector isn't on TV or radio, the channel selector doubles as a player device selector. Simply turn it to change which device on the network you want to play the movie on.
Pong game controller
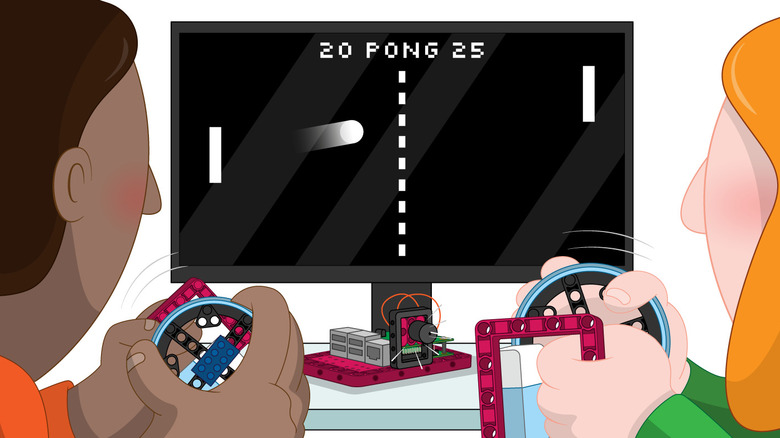
If you grew up during the golden era of arcades, then chances are you've played (or at the very least heard of) Pong. This simple tennis-like arcade game was all the rage in the 1970s, and for good reason. It was easy to understand — just move your paddle and make sure to hit the bouncing ball — and can be played with another person for some friendly competition. With Pong being a huge hit, it's no longer surprising how it's popular among the Raspberry Pi community too. Most Pong projects typically use potentiometers, joystick modules, or push buttons, though. What if you take a different route and go with LEGO instead?
This LEGO Pong project is a pretty straightforward setup made of a Raspberry Pi paired with theBuild HAT, two LEGO Technic motors, wheels from the LEGO SPIKE Prime kit, and a buzzer. To play, all you need to do is turn the wheel attached to the motor and watch as your paddle moves up or down depending on how you turn it. When you hit the ball, the buzzer goes off, but if you miss it, there's no noise, and your opponent gets a point.
The hardware aspect of the project is pretty easy to build. Add four connector pegs to the Prime motor, connect the wheel to the pegs, and attach another peg on the wheel itself to stop it from spinning all the way around. This wheel peg gives you a sense of which direction raises the Pong paddle and which one lowers it. If you like, you can even make a LEGO handle for the controller too. For the software side, you'll do some Python programming to handle the controller and make the Pong game itself.
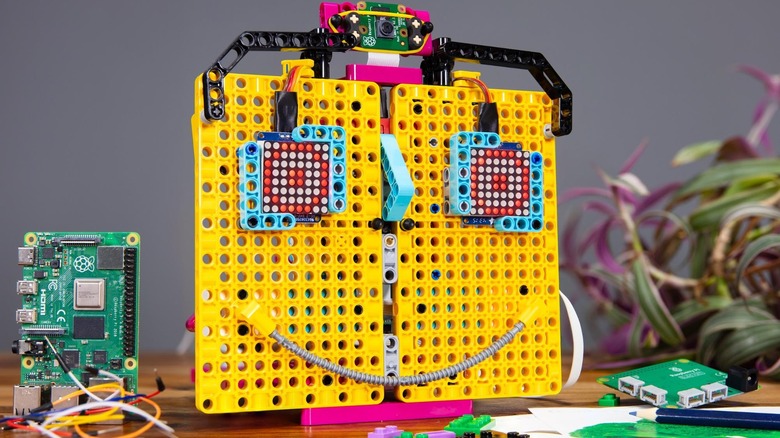
Gesture-copying robot arm
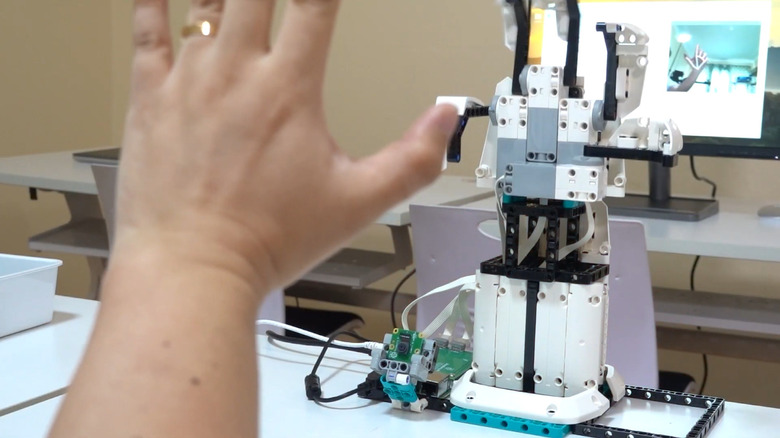
As a LEGO fan, you've probably challenged yourself to build a fully functional life-size arm at some point. It's a tricky assembly made of a lot of pieces and hinges, but it's a rewarding task once completed. If you want to make your version even more advanced, though, a gesture-copying robot arm might just be what you're looking for. What this Raspberry Pi-powered LEGO arm does is analyze your hand and finger gesture with the help of computer vision, and then mimic the same with its joints.
For the electronics, it uses the Raspberry Pi Build HAT and Pi Camera (and the corresponding power supplies and connectors). Meanwhile, the build pieces are from the LEGO Minstorms Robot Inventor set. The arm of this assembly doesn't actually move — only the fingers do. The thumb, index, and pinky fingers are connected to one motor each, while the middle and ring fingers share a single motor. All four motors are controlled by the Raspberry Pi through the Build HAT.
For the software part, this Raspberry Pi project is primarily powered by OpenCV, an open-source computer vision algorithm library. This is what helps the Pi perform hand gesture recognition. Once the Pi determines which of your fingers are up, it triggers the motors one at a time, eventually making the LEGO arm copy your gesture. However, since the middle and ring fingers are controlled by the same motor, your gestures will be limited to ones that use both fingers or none at all.
Remote-controlled submarine

You can't be into LEGO without having built at least one type of vehicle, whether that's a car, train, or bulldozer. They're pretty much a staple in many LEGO fan's collections, as they can be as basic or as intricate as you like. But out of all the many types of transportation you've put together, have you built a submarine, specifically a working LEGO submarine yet?
This LEGO submarine has two primary features: an automatic depth control and a remote movement control. The auto-depth control is powered by a Raspberry Pi Zero 2 W connected to a LEGO motor with a food syringe, a non-LEGO pressure sensor, and a non-LEGO laser distance sensor. The Pi extracts data from the pressure and laser distance sensors, which, respectively, measure the submarine's depth and how far the submarine is from the ground. Once this data is acquired, the Pi then triggers the motor to move the syringe, causing it to either push out or pull in water to reach the desired depth and keep the submarine from descending too deeply.
On the other hand, the remote movement control makes the submarine move forward or backward. It uses a 27MHz remote control from a toy submarine, offering a range of about three to four meters. The submarine is moved by a non-LEGO main propeller (Diatone Bull Nose) and a turn propeller (LEGO Propeller 3 Blade 3 Diameter). There's also a camera in front of the submarine to give you its POV while underwater. To run the entire submarine, a 1100mAh Li-Po battery that can run for two hours is installed inside the hull.