6 Raspberry Pi Projects To Try If You Love Star Wars
There aren't very many franchises in the world as influential as Star Wars. It's not an exaggeration to say that there's probably more Star Wars paraphernalia out there than any one person could ever hope to collect. The series as a whole puts a lot of emphasis on the creativity and ingenuity. Anakin built C3PO. Han, and Chewy kept the Millennium Falcon flying after every battle. Luke had to assemble his own lightsaber. So it's no surprise that fans might want to make their own Star Wars swag.If you're a fan of the franchise and you also enjoy using Raspberry Pi computers in fun DIY projects, then you will be pleased to know that there are a whole bunch of different Star Wars-themed tutorials out there just waiting to be discovered.
These range from toys and decorations to useful tools with a Star Wars twist. Some might be modeled after the original trilogy, while others may draw inspiration from the more recent Disney+ series, but all of them are inspired by that galaxy far, far away. Some might even be a good way for you to use an old Raspberry Pi that you have lying around. Fortunately, most of them include easy step-by-step instructions, so you don't need the skills of a starship mechanic to pull them off.
L3-37 home assistant droid head
There is a fair amount of crossover between people who enjoy the functionality of smart homes and those who enjoy making DIY Raspberry Pi automations. So it makes sense that people in the center of that particular Venn diagram who are also "Star Wars" fans might enjoy a way to make a smart speaker feel a bit more like it came from that galaxy far, far away ...
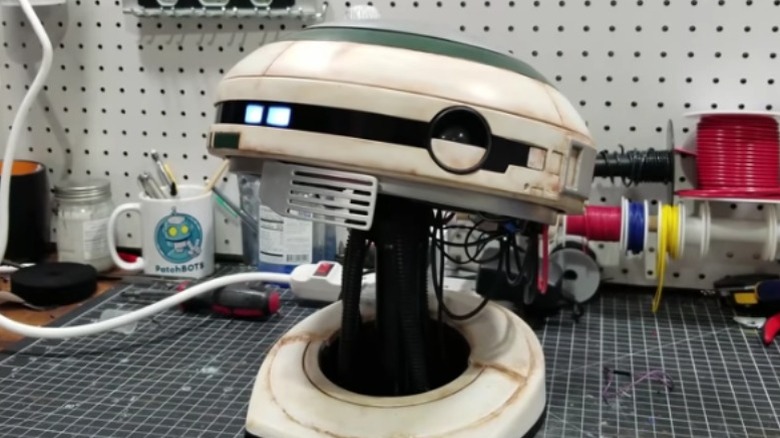
Patrick "PatchBOTS" Stefanski designed a way for one of these speakers to live inside the head of an L3-37 droid–the very same model that uploaded her mind into the Millenium Falcon during the events of "Solo." This project uses Amazon's Alexa voice architecture powered by a Raspberry Pi 3 contained inside a 3D-printed L3-37 head. It doesn't stop there though. Stefansky custom programmed wake-word "L3" to activate a servo in the neck which causes the droid head to perk up. Also, with the help of his friend Henry Mendez, he is currently working on adding a custom Amazon Voice Services code that makes the droid sound more like the model from the film and has several Star Wars-themed responses.
Stefansky has the 3D print files and code to make your own L3-37 head available for free on GitHub. He also has a full video tutorial on his YouTube channel where he walks you through the process of how he built this droid, along with a complete list of all the parts you'll need to build your own.
Darth Beats: A Star Wars Lego MP3 Player

Those who don't own a 3D printer or are looking for an easier project to start with might consider making something out of an already existing Star Wars product. Lego has been producing Star Wars-themed toys and playsets for decades now. There are a lot of creative ways that one might be able to introduce a little Raspberry Pi-powered functionality to these items, but one of the simplest projects is the Darth Vader Lego MP3 player designed by Dan Alrdred.
Aldred made this gadget, which he calls "Darth Beats" by taking a large Lego Darth Vader alarm clock, stripping out the old analog components, and introducing a Raspberry Pi Zero W and a Pimoroni Speaker pHat in their place, functionally turning the toy alarm into a functioning MP3 player. He also cut out the chest and back using a rotary tool. He embedded that HAT in Vader's chest, so the LED decibel meter in the front is displayed where the character's suit control panel would usually be, and several buttons are embedded on the back that you can use to control the player. All of this is controlled via an externally connected portable USB battery. In terms of software, Aldred used the GPIO Zero Python library to set up basic activation features and used Cron to run scripts for the audio playback. He then connected the Pi Zero remotely to his computer using the self-hosted file server Droopy to grant it access to a larger pool of MP3s than what the Pi could hold on its own.
Aldred has a full tutorial for building your own Darth Beats on his blog which also includes several embedded YouTube videos walking you through the process.
Pi-powered LED Death Star

Now let's turn to one of the more decorative projects out there. The Death Star is one of the most iconic objects in the Star Wars universe and a group of students from the School of Electronic and Electrical Engineering at the University of Leeds decided to make it into an interactive LED persistence of vision globe display.
Though it isn't quite to scale with the moon-sized space station, the project is fairly large. It's composed of a plastic globe that houses a ring of RGB LEDs that are able to rotate on an axis at 300 RPM, creating the illusion of a moving image inside the casing. According to the project's official page, "The mechanical structure of the globe is essentially an aluminum ring that has been carefully-designed to be balanced and hence stable when rotated at speed. The ring is mounted within a C-shaped frame at the same angle as the Earth is tilted (23.4°) and can rotate due to the heavy-duty thrust bearings at either end." This is connected to a Raspberry Pi in the center via HDMI cable and an FPGA-based HDMI decoder.
The blog has a full breakdown of how the students made this design. Unfortunately, a lot of the materials and software in this project are bespoke, and not readily available to the public. That said, there are tutorials from other makers for mini-board computer-powered persistence of vision globes (like this one from Hotcgik155 or this one from Rottaca) that have detailed breakdowns of the products, processes, and software needed to complete them. Once done, you should be able to display whatever image you want, even a weapon that can inspire fear in an entire galaxy.
Star Wars arcade cabinet
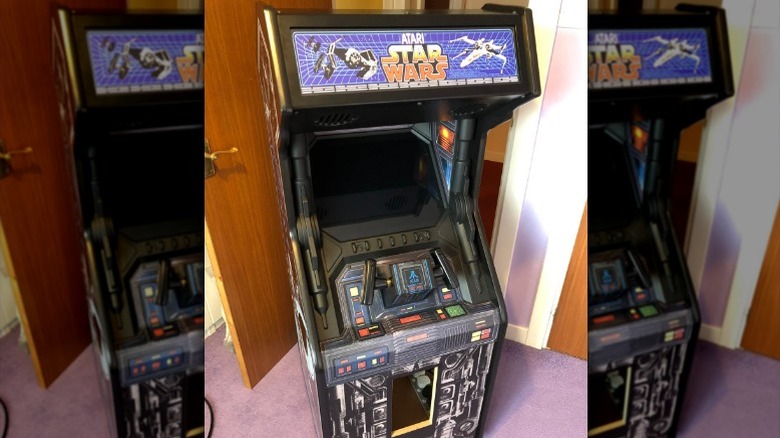
There have been a lot of amazing Star Wars video games over the years. From space flight and pod racing simulators to first-person shooters, action-adventure games, and RPGs. You might already know that there are a lot of amazing retro gaming Raspberry Pi Projects out there that every gamer should know about, but you might not know that many of these Star Wars titles can actually be played on your very own, Raspberry Pi-powered arcade cabinet. James Milroy took this one step further. He made a custom replica of the Atari Star Wars arcade cabinet that he played on back in the '80s, complete with the cockpit-style joystick handles from the original cabinet. He did this by CNCing the MDF, using CAD, and 3D printing. The actual emulation was handled by a Raspberry PI 3B+ and a Pimoroni Picade X HAT running MAME software while a Dell 17" TFT made up the display and stereo speakers.
Milroy shared several photos and a breakdown of how he created his arcade, but he didn't share specific instructions for his design, as much of it was bespoke. There are, however, several instructionals online that walk you through how to build your own arcade cabinet. Medium has a walkthrough that is heavily based on designs made by The Geek Pub, and Instructables has directions on how to make a miniature version housed in oak plywood. You can easily follow either of these tutorials, or any number of alternative options, and then load them up with Star Wars games and decorate them with whatever decals or other Star Wars decorations you like.
Personal animatronic droid

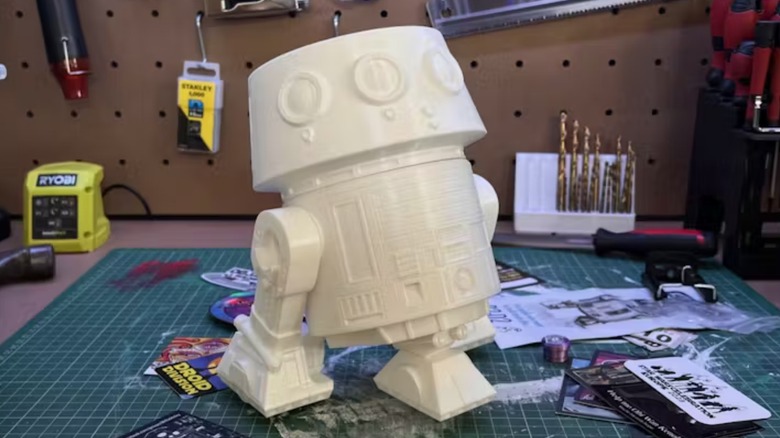
Just about every Star Wars fan out there has wanted to have their own droid at one point or another. A life-sized C3PO might be a little bulky for the average household, but it's hard to say no to a little animatronic droid that can fit right on your desk. That's exactly what Tomasz (Mellow_Labs) decided to make. Though he is a self-professed Trekkie, the creator met several droid builders when he volunteered at the annual Star Wars Celebration in London, U.K. which inspired him to build his own little Raspberry Pi-powered model.
This involved 3D printing a shell designed by Michael @mrbaddeley, and then installing a Raspberry Pi Pico W, a D1 Mini, a couple of servos, a toggle switch, a battery holder, and a Joystick breakout module. When combined, these components allowed Tomasz to turn the 3D-printed droid into one that could move around in four directions, controlled by a custom-built remote. He also later added an Adafruit FX Soundboard Mini, an amplifier module, and an Espressif ESP32 Development Board which allowed him to add sound effects to the droid so that it could make all those adorable beeps and boops that fans have come to expect of the little automatons.
Tomasz has supplied full instructions which are available on Hackster.io. This walkthrough includes a complete supply list with the specific component models that Tomasz used, instructions for assembly, 3D print files for the remote, and a link to the UDP-Droid controller software (designed by FireMarshmellow) that he used to program the Raspberry Pi.
Pi-Saber

Finally, if there's one thing that every Star Wars fan wants in their collection, it's a lightsaber. The laser swords used by the Jedi and Sith are easily the most iconic weapons in the series. Everything from their vibrantly colored glowing blades to their intricately designed handles is the epitome of cool. There are quite a few premade models out there, but the nicer ones can be expensive. Besides, every Star Wars fan knows that a true Jedi builds their own. Lucky for DIY fans, you can make one using a Raspberry Pi.
There are actually several small-board computer-based projects out there for constructing a lightsaber, but one of the better options is the one designed by the Ruiz brothers. It has both a slide and a push button. The slide allows you to control the light as it blooms from the hilt, while the push button allows you to switch the lightsaber into different modes. This was initially designed for the Adafruit RP2040 PropMaker Feather all-in-one board, but Toby of Raspberry Pi was able to make an alternate variation with a Raspberry Pi RP2040 Pico coupled with an Adafruit Feather RP2040 board at its core.
This saber is able to cycle through colors and produce sound effects. Adafruit provides a complete tutorial, including a list of parts, a circuitry diagram, software, and CAD 3D printing files (and links to hired printing services) for the hilt.