Laptop Screen Flickering? Here Are A Few Fixes To Try
One of the worst ways you can possibly start your day is by opening your laptop, with plans to have an extremely productive day and finally tackle your overwhelming to-do list, only to be greeted with a flickering screen. While most manufacturers make quite reliable and sturdy laptops these days, even the most expensive of laptops aren't immune to hardware and software issues.
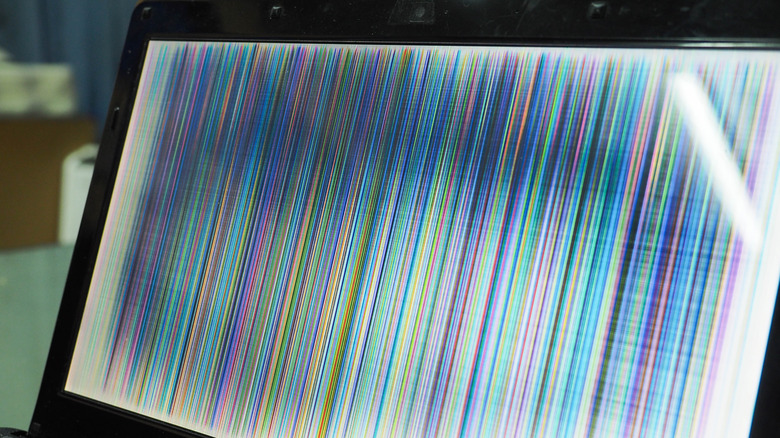
One hardware issue that is fairly common is a flickering laptop screen. Some users may notice their screen flickering only when they use certain apps or in specific situations, while for others, the issue can be so severe that it renders the laptop practically useless. Either way, a flickering laptop screen can be incredibly frustrating, and you will likely feel the urge to rush to the nearest repair store.
However, before you do (and potentially spend hundreds of dollars), there are a few fixes worth trying that might solve the problem and save you both a trip and money. Be sure to start with the basics, such as restarting your laptop and ensuring it's updated to the latest software version. Keep in mind that the guide below will focus on laptops running the Windows operating system. In case your MacBook's screen is flickering and you aren't willing to visit the Apple Store just yet, we've covered reasons why your MacBook's screen may be flickering and how you can fix it.
Identify the root cause by trying simple fixes

When troubleshooting a technical issue, it's a good idea to figure out what's causing it in the first place. There are multiple reasons why your screen may flicker: a problem with your laptop's graphic driver, a troublesome third-party application you recently installed, a software bug or, worst of all, a hardware issue. Thankfully, there are a few tests you can run to determine whether the flickering is due to a hardware issue, a display driver, or an incompatible application.
Begin by opening the Task Manager by typing "task manager" in your Windows search bar. Observe the Task Manager to check if it flickers as well. If it does, the issue is likely related to a hardware problem or your graphics driver. If not, the issue is probably caused due to a troublesome application.
Screen flickering can also be caused by incorrect resolution or refresh rate settings. To fix this, go to Settings > System > Display. Check if the display resolution under the Scale & layout section is set to the recommended option. If it's not, select it and see if the issue persists. If that doesn't help, click Advanced display under the Related settings header, expand the dropdown next to Choose a refresh rate, and change it.
You can also try connecting your laptop to an external display. If the external monitor works fine while your laptop screen continues to flicker, it typically indicates a hardware issue with your laptop's built-in display. By now, you should have a clearer idea of the cause, and you can proceed with troubleshooting using the relevant sections below.
Update your laptop's graphics driver
If you've narrowed down the flickering screen issue to an outdated or malfunctioning graphic driver, the good news is that it's an easy fix. The first thing you should do is update your laptop's graphic drivers. While you can do this directly from the Device Manager, it typically isn't the best approach, as it may not provide the latest drivers available.
Instead, it's a better idea to visit the official download pages for NVIDIA, AMD, or Intel (depending on your graphics card) and install the latest graphic drivers manually.
In case you aren't sure which graphic card your laptop has, there are multiple ways to find out. The easiest way to do so is by launching the Task Manager (by searching for it in the Start menu). Click the three horizontal lines in the top-left of the screen, select Performance, and then click on GPU. The name of the graphics card in your PC will be displayed in the top-right corner of the window.
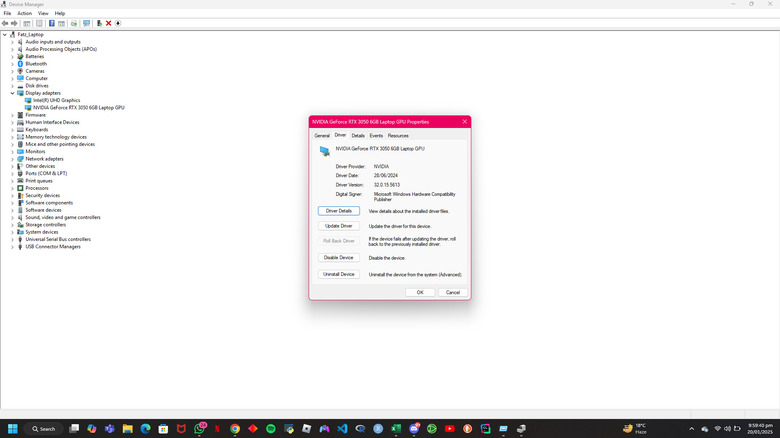
Once you've installed the latest graphic drivers available, open the executable file and follow the on-screen instructions to install it. If you'd like to confirm the driver is installed correctly, search for the Device Manager in the Start menu, expand the Display adapters section and click the graphics driver. Switch to the Driver tab and ensure the Driver Version matches the one you downloaded from the manufacturer's website.
Roll back your graphics driver
If your laptop's screen started flickering shortly after a recent driver update or a Windows update, rolling back your graphics driver might do the trick–unless a newer update addressing the issue is available.
Rolling back your graphics driver will essentially restore the previous version of the driver, which should fix the issue if the updated driver caused it. Fortunately, rolling back a driver is relatively straightforward. Here's what you need to do:
-
Search for the "Device Manager" in the Start menu.
-
In the Device Manager window, expand the Display adapters category, and locate your graphics card adapter.
-
Once you find it, right-click on it, and select Properties from the menu.
-
Click the Roll Back Driver button, and click Yes on the prompt to confirm the action.
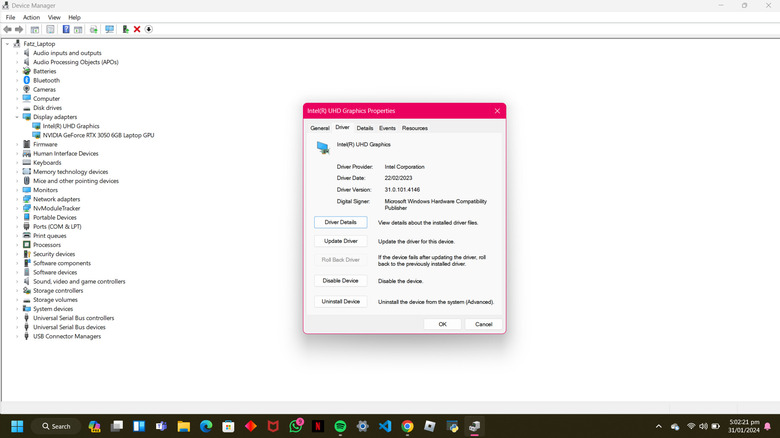
Keep in mind that the "Roll Back Driver" option will be grayed out if you haven't updated recently (as shown in the image above) Once you've done the above, Windows will automatically reinstall the previous version of the driver. After the process is done, restart your laptop, and check if the issue is resolved.
Uninstall and reinstall your graphic's driver

If the previous methods don't resolve the issue, starting with a clean slate by uninstalling the graphics driver from your system entirely and then reinstalling it again might help. You can uninstall your graphic driver from you laptop by following the steps below:
-
Open the Device Manager by searching for it in the Start menu.
-
Double-click on Display adapters to expand the section.
-
Locate your graphics driver, right-click on it, and select Uninstall Device from the pop-up menu that appears.
-
Click Uninstall to confirm the action.
If you would like to take it one step further and completely remove any traces of the graphics driver, you can use a third-party tool like Display Driver Uninstaller (DDU).
Once the graphics driver has been successfully deleted from your system, the next step is to install the latest driver. You can head to the Settings app, go to Update & Security on Windows 10 or Windows Update on Windows 11, and click Check for Updates. Windows will detect and install the driver compatible with your laptop.
Alternatively, you can install the driver that is compatible with your system by visiting your graphics card manufacturer's website (AMD, NVIDIA, or Intel), downloading the latest driver, and following the on-screen instructions.
Uninstall problematic apps

If your laptop's screen is flickering due to a problematic app rather than a driver issue, the best solution is to delete the app causing the problem. However, there's no direct way to identify which app is responsible for the flickering. To narrow it down, think about whether you recently installed or updated any apps before the flickering started.
To check for recently updated apps from the Microsoft Store:
-
Open the Microsoft Store.
-
Select Downloads from the bottom left corner.
-
Now, all recently updated apps will be listed under Recent updates.
To find apps you recently installed on your PC, you can configure the Start menu to display them in the "Recommended" section:
-
Go to Settings > Personalization > Start.
-
Toggle on the switch next to Show recently added apps.
Once you find the app you want to uninstall, right-click it and select Uninstall. You'll then be redirected to Settings. Here, locate the app on the list, click the three horizontal dots, select Uninstall twice, and follow the on-screen instructions. Alternatively, you can also sort applications installed on your PC by most recent by doing the following:
-
Launch the Settings app and select Apps from the left-hand panel.
-
Click Installed Apps.
-
You should see all the apps on your PC under an App lists header. Expand the dropdown next to Sort by and select Date installed
You can now uninstall the problematic app by clicking on the three horizontal dots next to the app's name and selecting Uninstall. Then, select Uninstall on the pop-up window to confirm. If the above methods don't work, you can also uninstall the app via Control Panel. Unfortunately, if your laptop's display continues to flicker, it may indicate a hardware issue. In that case, visiting a repair center could be necessary.