3 Ways To Password Protect Your USB Drive (And Why You Should)
USB drives offer unmatched convenience and portability, making them a go-to solution for transferring files between computers, storing backups, or carrying sensitive information on the go. However, this portability can also be a disadvantage. Since USB drives are small, they are easy to misplace and vulnerable to theft or unauthorized access. Losing a drive containing important work documents, personal files, or private data could have serious consequences. One way to safeguard your data is by password-protecting the USB drive.
By encrypting your files and requiring a password to access them, you ensure that even if your USB drive falls into the wrong hands, your data remains secure. Whether you are an individual looking to protect personal information or a business professional handling sensitive data, password-protecting your USB drive is a crucial step in ensuring data security.
Fortunately, password-protecting a USB drive isn't complicated and can be done using built-in tools available on your PC or Mac, as well as dedicated third-party encryption apps. Below, we'll walk you through the process of doing the same.
Encrypt flash drive using Windows' BitLocker feature
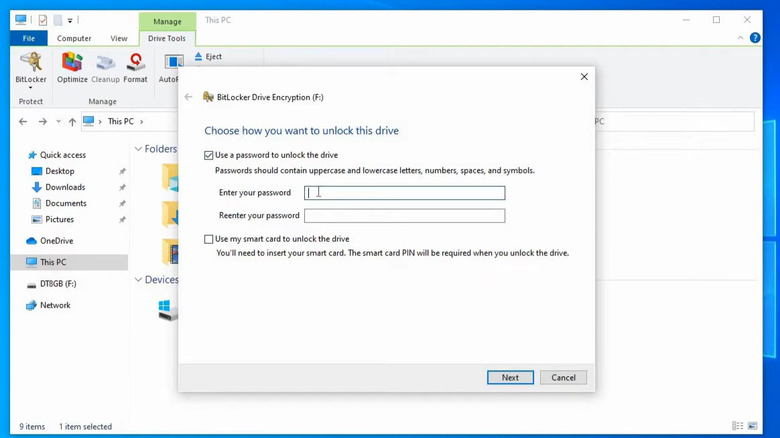
Both Windows 10 and Windows 11 make encrypting a storage drive fairly straightforward, thanks to the built-in BitLocker feature. However, it's important to note that this feature is only available on the Pro, Enterprise, and Education editions of Windows. If you're unsure, you can check your PC's specifications to determine which version of Windows you're running. To encrypt a USB drive using BitLocker on Windows:
- Plug your flash drive into a USB port of your computer.
- Press Windows + E to open File Explorer.
- Right-click your flash drive and select Turn on BitLocker. If you're on Windows 11, select Show more options first.
- Wait for BitLocker to initialize the drive and set a password for the drive.
- Next, specify where you want to save the recovery key, which you can use in case you forget the password. You can save the recovery key to your Microsoft account, a separate file, or print it. Then, click Next.
- Specify whether to encrypt the whole drive or only the used space and hit Next.
- Select the encryption type. It's best to select Compatibility Mode, as it ensures the drive is accessible on older versions of Windows.
- Click Start Encrypting to begin the process.
Wait for the encryption to complete. Once finished, your USB drive will then display a lock icon in File Explorer, indicating that it is securely encrypted. You will need to enter your password each time you attempt to access the drive.
Encrypt flash drive using a third-party tool
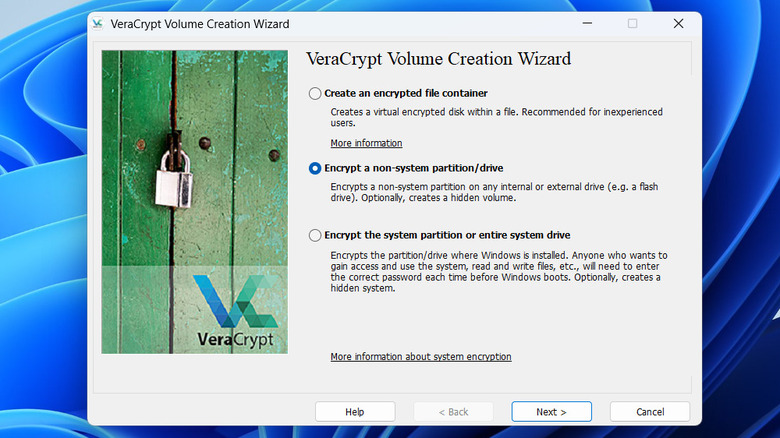
If you don't have access to the BitLocker feature because you're running the Windows Home edition, you can use a third-party tool like VeraCrypt to get the job done. VeraCrypt is a free, open-source disk encryption software that allows you to password-protect your USB drive on both PC and Mac. Here's how to use it:
- Download and install VeraCrypt on your computer.
- Connect your USB drive, open the VeraCrypt tool, and click the Create Volume button.
- Select Encrypt a non-system partition or drive and click Next.
- Select the Standard VeraCrypt volume option and hit Next again.
- Now, click the Select device button, choose your flash drive, and click OK.
- If your USB drive is empty, select Create encrypted volume and format it to proceed with encryption. If not, opt for Encrypt partition in place to protect the existing data.
- Now, select hashing and encryption algorithms. If you're unsure, go with the default settings (AES encryption and SHA-512 hashing) and click Next.
- Create a strong password for your encrypted USB drive and click Next. Move your mouse until the progress bar turns green. This motion will be used to generate a random key.
- Finally, click Format.
After you complete the above steps, your USB drive will have an encrypted volume on it. To access this volume, you must mount it in VeraCrypt. To do this, simply select a drive letter, click the Select Device button, and choose your flash drive. Then, click Mount and enter the set password.
Encrypt flash drive using Disk Utility on Mac
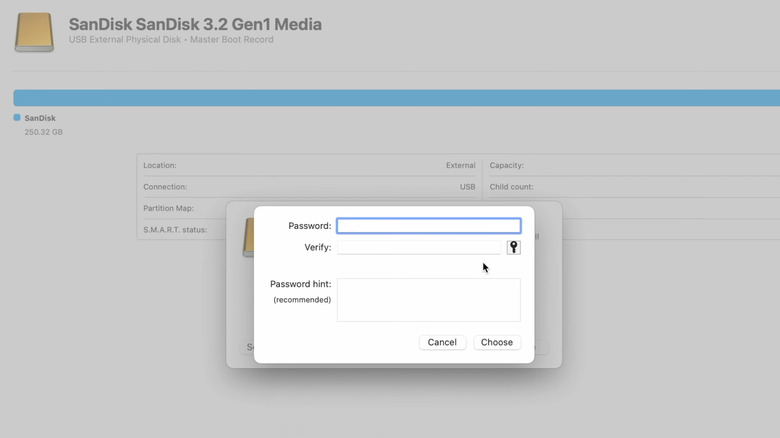
If you have a Mac, you can encrypt a flash drive using the built-in Disk Utility. However, keep in mind that this process involves formatting the drive, so be sure to back up your USB drive's contents to another location before proceeding. Once you're ready, follow these steps to password-protect your USB drive on macOS:
- On your Mac, press Cmd + Spacebar to open the Spotlight search.
- Type Disk Utility in the search field and hit Enter.
- In the Disk Utility window, click the View menu at the top and select Show All Devices.
- In the left sidebar, find and select your USB drive under the External section.
- Now, click the Erase button in the top right corner.
- Enter a name for the volume and click the Format pop-up menu to choose APFS (Encrypted).
- Set your preferred password for the flash drive and enter a password hint. Then, click Next.
- Finally, click the Erase button to begin the encryption process. Once it's complete, click Done.
Once the process is complete, eject the USB drive from your Mac and reconnect it to verify that macOS prompts you for a password before granting access. While encrypting a USB flash drive doesn't take long, you can also purchase an encrypted flash drive as an alternative. These devices offer built-in encryption and are a hassle-free option, though they come at a slightly higher cost.


