Raspberry Pi: How To Search For & Change Wi-Fi Networks Via Command Line Interface
Whether you plan for it or not, some aspects of your Raspberry Pi projects can change over time. One of the most common things you'll likely end up changing is your Wi-Fi network. Maybe you upgraded your router for faster speeds or set a new password or SSID for improved security. Or perhaps you were using a temporary connection — like your mobile hotspot — for testing and are now ready to switch to the project's dedicated network.
Whatever the case, changing your Raspberry Pi's Wi-Fi network is a generally quick and painless process. The best part is you can do it right from the command line. This is especially convenient if you're running a non-GUI OS like Raspberry Pi OS Lite or accessing the Pi via SSH.
A word of caution, though: if you're making this change over SSH, your current connection will drop as soon as you switch to a new network. You'd have to connect your computer to the new Wi-Fi network and find the Pi's new IP address before you can reconnect via SSH. Now that you know what to expect, let's walk through four methods of finding and changing to a new Wi-Fi network on your Raspberry Pi.
Method 1: Connect via nmcli
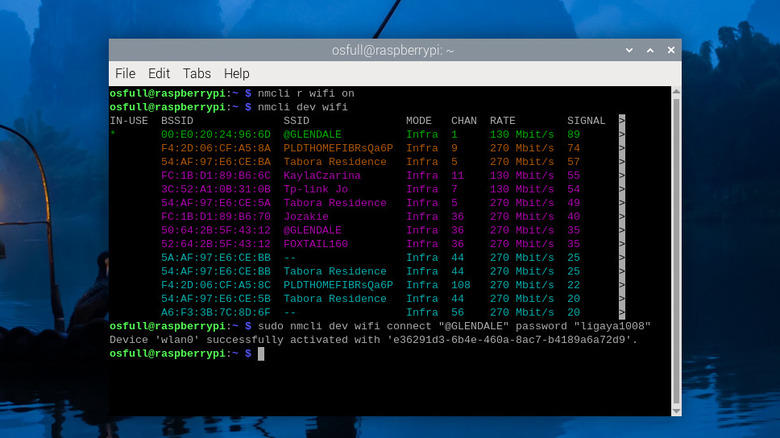
The command nmcli – or NetworkManager Command Line Interface — is a tool for managing your network-related settings. It's common to most, if not all, Linux distros, so you can use this method even if you're not running the Raspberry Pi OS. Here's a step-by-step guide on using nmcli to connect to a new Wi-Fi network on the Raspberry Pi:
- Type sudo nmcli r wifi on to turn on your Wi-Fi if it isn't already.
- Input sudo nmcli dev wifi. This will scan for all the available networks and provide you with a list.
- On a piece of paper, write down the Wi-Fi name of your chosen network (found under the SSID column) exactly as it appears. Alternatively, you can copy it into your favorite notes app.
- Connect to the Wi-Fi by typing sudo nmcli dev wifi connect "[SSID]" password "[Wi-Fi password]". So if your SSID is MyWiFi and your Wi-Fi password is mywifi123, your command should look like sudo nmcli dev wifi connect "MyWiFi" password "mywifi123" – complete with the double quotation marks.
- Wait for a few seconds for the Pi to connect to Wi-Fi.
A "Device 'wlan0' successfully activated" message should show up on the command line to indicate that you're now connected to that Wi-Fi network. To double-check, enter sudo nmcli dev status and find the wlan0 line. The State column should say "connected," and the Connection column should tell you the Wi-Fi name you're connected to. To make sure you also have an internet connection, enter ping 8.8.8.8 on the command line. This is Google's public DNS IP address. If you're online, you should see ttl and time values in the output. If not, the output would read "Destination Net Unreachable."
Method 2: Use nmtui
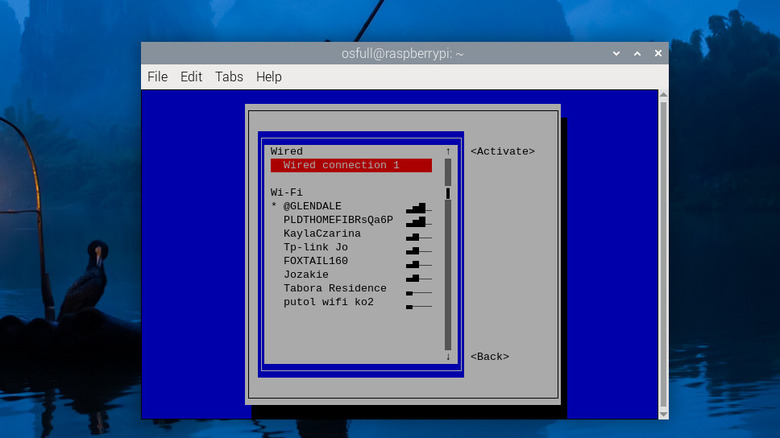
If you find nmcli overwhelming, a more beginner-friendly alternative is nmtui. The NetworkManager Text User Interface (nmtui) is accessible via the command line interface but provides a basic UI for easier navigation. Similar to nmcli, nmtui is also available in many Linux flavors. Follow these steps to use nmtui to change the Wi-Fi network on your Raspberry Pi:
- Enter sudo nmtui into the command line.
- Go to Activate a connection.
- Under Wi-Fi, highlight the network you want to connect to.
- Navigate to Activate on the right.
- Press Enter on your keyboard.
- If your Wi-Fi network is password-protected, enter the password.
- Select OK.
- Hit Enter.
You'll then see a "Connecting" message, and after a second or two, the Wi-Fi name should now appear with an asterisk label in front of it, meaning the connection was successful. You can also test if you're online by pinging 8.8.8.8. Exit nmtui first — choose Back and then Quit — and then type ping 8.8.8.8.
Method 3: Add network from raspi-config
The raspi-config utility, which is exclusive to the Raspberry Pi OS, helps you to configure a host of settings for the Raspberry Pi — from basic functions like identifying what Pi model you have and setting the timezone, to more advanced settings like changing the boot order and defining the behavior of the power LED. However, you can also use raspi-config for simply connecting to a Wi-Fi network. Here's how to do so:
- In the command line interface, type sudo iwlist wlan0 scan | grep ESSID to find all the available Wi-Fi networks.
- Take note of the SSID (a.k.a. the Wi-Fi name) of the Wi-Fi network you want to connect to.
- Input sudo raspi-config to open the Raspberry Pi Configuration.
- Highlight System Options.
- Press Enter on your keyboard to select it.
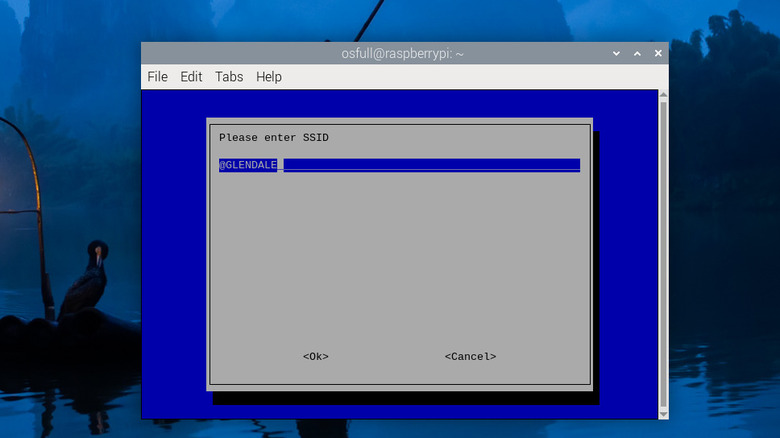
- Go to Wireless LAN.
- Hit Enter.
- Type the SSID in the empty field. SSID is case-sensitive, so make sure to pay attention to the capitalization and symbols if there are any. Otherwise, raspi-config won't be able to find that Wi-Fi network and throw an error.
- Select OK.
- Press Enter.
- Input the Wi-Fi password. Just like the SSID, this is case-specific too. If your Wi-Fi network doesn't have any passwords, leave the field blank.
- Go to OK.
- Hit Enter to save your Wi-Fi configuration.
It usually takes a couple of seconds for the Pi board to connect to Wi-Fi. Exit raspi-config by pressing Esc on your keyboard, and then type iwconfig to see which SSID you're now connected to and ping 8.8.8.8 to check if you're now online.
Method 4: Edit the wpa_supplicant.conf file
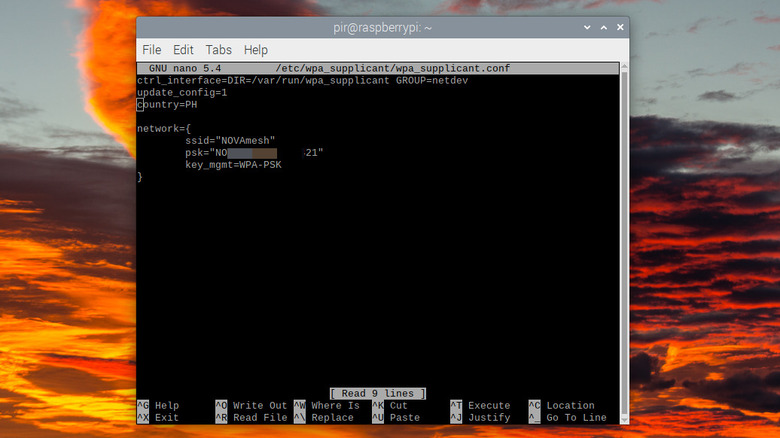
If you're using an older version of the Raspberry Pi OS like Bullseye, you can use the wpa_supplicant.conf file to switch to a different Wi-Fi network. It's essentially a configuration file in the /etc/wpa_supplicant folder where the network details like SSID and password are saved. This method, however, no longer works for Bookworm since network management for this new Raspberry Pi OS version has been handed over to NetworkManager instead. Plus, you'll no longer find this configuration file in the said folder.
To change your Pi's Wi-Fi network using wpa_supplicant.conf, here's what you need to do:
- In the command line, scan for available Wi-Fi networks by typing sudo iwlist wlan0 scan | grep ESSID.
- Remember the SSID of the new network you want to switch to.
- Type sudo nano /etc/wpa_supplicant/wpa_supplicant.conf to edit the config file.
- Replace the value for the ssid entry with the SSID of your new network. Make sure to keep the quotation marks.
- In the psk entry, type the new Wi-Fi's password, while also keeping the quotation marks.
- Press Ctrl + X to exit the file.
- Type Y to confirm.
- Hit Enter to save the file with the same file name.
- Type sudo reboot to restart the Pi.
Once the Pi boots up, it will automatically use the new network details you've configured in wpa_supplicant.conf. To check if the changes have been properly made, type iwconfig and see if the ESSID says your new Wi-Fi network's name. Then, enter ping 8.8.8.8 to check the internet connection.


