How To Print Labels From An Excel List
Printing a mailing label may seem like a straightforward task, unless you need to print a ton of them. Manually feeding the names and addresses to a Word document and printing them can easily become tedious and result in errors. Fortunately, you could use a combination of Word and Excel to massively streamline this tedious task while also avoiding errors.
The Mail Merge feature is a versatile Word feature that primarily helps create tailor-made bulk mails and letters for individual recipients. Apart from the primary usage, this handy feature can also help in printing labels from an Excel list. Mail Merge allows for a ton of label and address customization with label presets and handy address options. The entire label creation and printing process takes place in Word, but the Excel mailing list also plays a crucial role. Here's a thorough guide on how to print mailing labels in bulk using an Excel mailing list.
Creating a mailing list
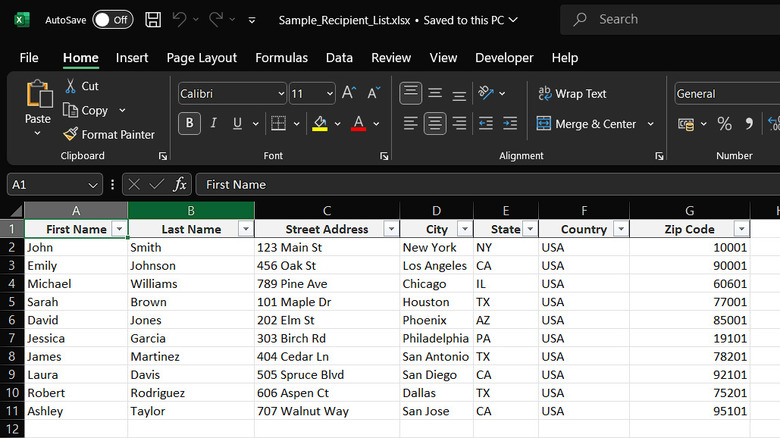
The first step in printing mailing labels is to create a recipient list with their names and addresses. A standard mailing label contains the first name, last name, street address, city, state, country, and the zip code for the recipient. To create the mailing list in Excel, create a column for each of these fields in the same order. Next, enter the details for every recipient in a separate row. Make sure to have a consistent formatting and leave no blanks to avoid any errors during the Mail Merge. To check for blanks, simply apply filters to the entire recipient table and search for blanks in the dropdown (something useful to have in all sorts of spreadsheets). Finally, make sure the zip code is formatted as numbers and save the mailing list in the desired location. That's all for the Excel part, as the next steps now use Word's Mail Merge feature to create the individual labels.
Printing labels in word
Here's a step-by-step guide on printing labels in Word using Mail Merge:
-
Open a blank Word document and head over to the Mailing tab.

Samyak Goswami -
Now, click the Start Mail Merge option and select Step-by-Step Mail Merge Wizard. Using the wizard eases the entire process by breaking it into six fundamental steps.
Advertisement
Microsoft -
In the first step, select Labels as your document type and click Next.

Microsoft -
The next step asks you to select a starting document. Since we started with a blank document, we can just update the document layout to fit the labels – choose the 'Change document layout' option and tap the 'Label options' highlighted in blue.

Microsoft -
The Label options dialog box allows you to customize the labels according to your needs. Choose a label vendor and product number that fits your requirements and click OK.

Microsoft -
The next step involves integrating the Excel mailing list in the Mail Merge Wizard. Simply choose the 'Use an existing list' option and browse for the mailing list.

Microsoft -
The 'Select Table' dialog box allows you to select the table containing the mailing list. As our mailing list only contains a single table, click on OK to move to the next step.
Advertisement
Microsoft -
The Mail Merge Recipients dialog box allows deselecting unwanted recipients before using them in the labels. Moreover, you can sort, filter, and even remove duplicates from your list from the same menu. Once you are satisfied with the final list, click on OK.

Microsoft -
In the next step, you can arrange your labels and modify how the address block looks. Tap the 'Address block' to open the 'Insert Address Block' dialog box. Modify the address block settings and click 'Update all labels' to copy the same settings to all the labels.

Microsoft -
The next step shows a page preview of the final labels with proper formatting. You can edit the recipient list one last time before printing the labels. After validating the preview, click OK to move to the last step.

Microsoft -
Finally, click 'Print' to print the mailing labels by selecting the printer and print settings.

Microsoft
Adding borders and margins to the mailing labels
While the printed labels are technically good to go, snipping them out without proper borders can lead to haphazard cuts. Here's how you can add borders to each mailing label:
-
After step 10, click on the drag handle in the top-left corner to select all the labels.
Advertisement
Samyak Goswami -
Now, click on the border dropdown option to select the borders.

Samyak Goswami -
Select 'All borders' to apply borders.

Samyak Goswami
That should add borders to all the labels, but you may want to adjust the margins for an easier cut. Here's how to add margins to each label:
-
Left-click the drag handle to select the entire table. Now, right-click the same drag handle to open the table menu.

Samyak Goswami -
Head over to table properties to open the dialog box.

Samyak Goswami -
Now, select 'Options' button to open 'Table Options'.

Samyak Goswami -
Next, adjust the margins according to your liking and hit OK
Finally, print this version of the mailing labels and use them on the go!

