12 Settings You Should Immediately Change On Your New Mac Laptop
There's never been a better time to switch to Mac from Windows. The Apple Silicon M-series chips (like the new MacBook M4) only need a trickle of energy for everyday browsing and watching, then turn into workhorses when you need real power. They come in a sleek aluminum chassis with an incredible trackpad, and they support a thriving ecosystem full of incredible Mac apps that improve your experience in every way. They can even play modern AAA video games. Whether you're a lifetime Windows user or prefer to start from zero with a new device, it's practically a rite of passage to skim through the settings and tweak things to your liking.
Some setting changes are a must no matter who you are; macOS for some bizarre reason does not come with the firewall enabled by default, to give one example. Others — such as setting the dock to hide automatically — come down to preference. Here are our recommendations for settings you should change once you've finished unboxing your new MacBook.
Opt out of all analytics
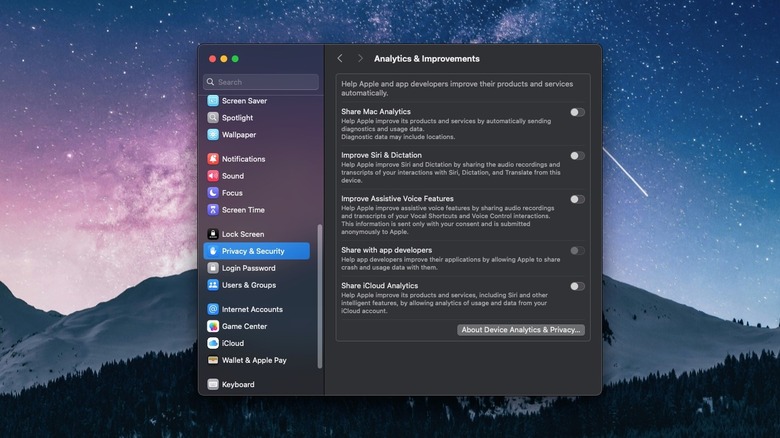
macOS doesn't come anywhere near Windows in terms of data collection and telemetry, but it does still gather some things. Apple claimed that you couldn't be identified by this information up until 2022 when it was discovered that this wasn't the case. Millions of other people allow analytics while doing the same things you do — helping Apple bug-fix and seal up vulnerabilities — so it's really no big deal if you turn it off. Open the Settings app, then go to Privacy & Security > Analytics & Improvements. Turn off all the toggles.
There are a couple analytics settings buried elsewhere. Go back to Privacy & Security, then Apple Advertising and disable Personalized Ads. Go back again, then into Sensitive Content Warning; this is Apple's automated system for blurring nude photos and videos sent to you, and it collects data (presumably, er, the photos) to improve. So yeah, definitely toggle this one off. Finally, go to Spotlight in the sidebar, scroll down to the bottom, and disable Help Apple Improve Search. Apple collects what you type into the Spotlight to improve it, which could include some pretty private information.
Now, you may wish to leave one or two toggles on in an effort to improve a particular feature you use a lot. I personally do so with the dictation toggle in the hopes that macOS dictation gets a major overhaul. Just know that the information could be tied to you.
Enable FileVault
Full disk encryption is a must for keeping the data on your computer safe when it's not in your hands. Without encryption, someone with physical access could potentially break in — even if they don't have your password. Surprisingly, Windows charges a premium for this feature. BitLocker disk encryption isn't supported on Windows Home (the most common version people use) and costs an eye-watering $99 to upgrade to. On macOS, however, FileVault (a BitLocker equivalent) is 100% free to use for all users.
FileVault should appear in the initial setup steps on a brand-new Mac. However, you may have skipped past it in a rush to get through and start using your Mac, possibly because you didn't want the hassle of using a password to unlock your Mac. We highly recommend setting a password and enabling FileVault.
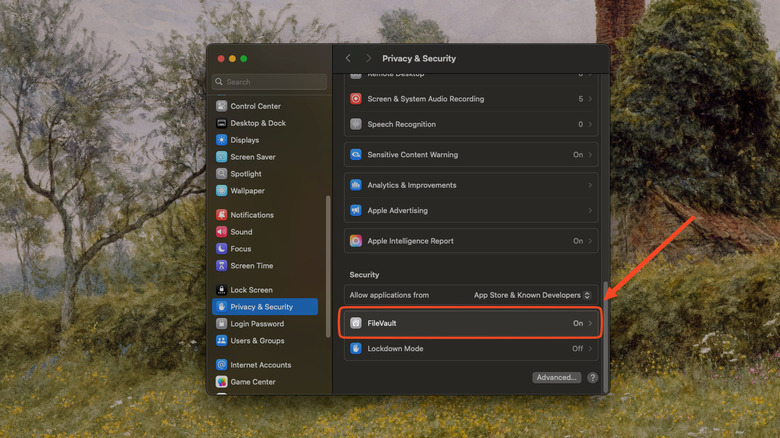
You can do so in Settings > Privacy & Security > FileVault. You have two options for recovering your device if you forget the password: one, you can click "Allow my iCloud account to unlock my disk;" or two, you can set up a recovery key. Just make sure to write it down and store it in a secure place. Apple makes it abundantly clear that if you forget your password and the recovery key, your data is as good as gone.
Set up Time Machine backups
MacOS is a remarkably stable operating system, but backups on an external hard drive are sacrosanct, no matter what you use. Unfortunate events can always happen to make you lose the contents of your digital life. All macOS devices ship with Time Machine, a convenient and easy-to-use back up service that can even restore your backups on another Mac. You'll need an external hard drive dedicated to being a back up drive (Apple says you should not store any other files on it), with at least twice the capacity of your MacBook's internal hard drive. If you have a hard drive with more space than that, make a separate partition on it for the backups alone.
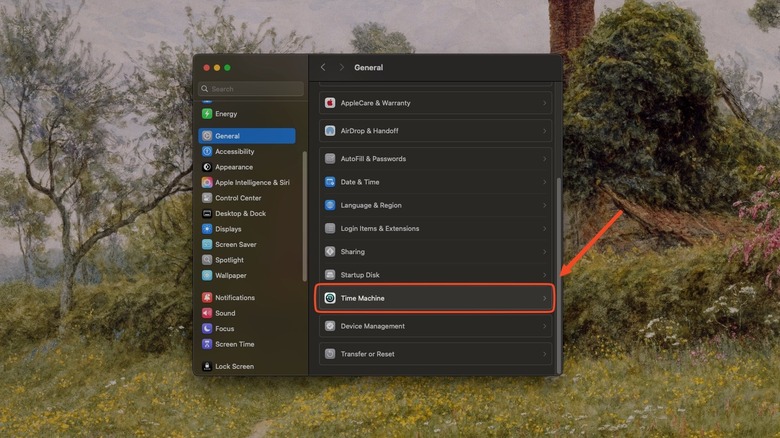
To set up Time Machine, go to Settings > General > Time Machine > Add Backup Disc. Make sure you choose the correct hard drive, or the correct partition on a larger drive. Set a password — and be 100% sure you put it in a secure place — and complete setup. Time Machine will do its own automatic backups every hour for the previous 24 hours in the background, plus periodic backups per week or month. You can keep track of Time Machine's backups and backup status via the menu bar icon.
Be extra careful anytime you want to unplug the external backup drive. Speaking from personal experience, you can easily corrupt the volume and your device if you don't properly eject it. The easiest way to go about this is to open Disk Utility and eject one of the volumes, then choose to eject the entire drive device when it prompts you.
Disable text correction
Text correction on macOS is famously pretty terrible and generally does more harm than good. If you leave it on, then it will aggressively change words — even after you correct them — which becomes a pain real fast since its dictionary doesn't recognize a surprising amount of common words. Disabling it and using the proofreading function with Apple Intelligence (or really any other proofing software) is a much better option.
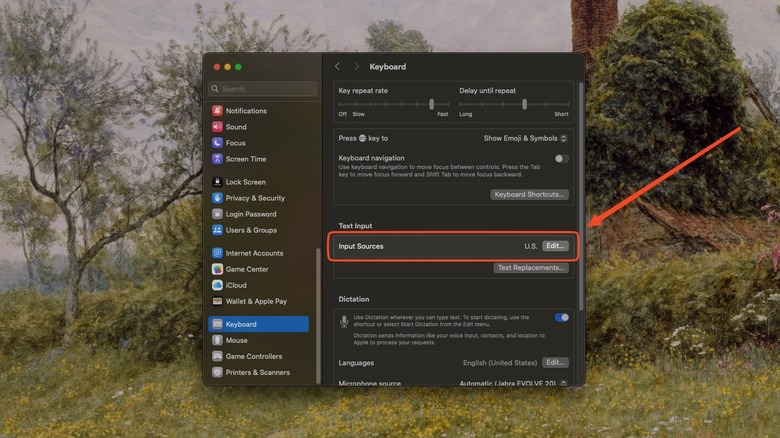
Go to Settings > Keyboard > Text Input and click Edit next to your keyboard(s) labeled as Input Sources. We recommend disabling "Correct spelling automatically." This won't entirely disable spellcheck; you still will occasionally see macOS providing a suggestion to correct the spelling on a word if you need it. We recommend leaving the other settings on, such as automatic capitalization, double space to add a period, and smart quotes.
The inline predictive text isn't super helpful, but it comes in handy now and again and only gets in the way if you accidentally press the spacebar one too many times. If you ever want to check spelling and grammar in a document, you can easily go to Edit > Spelling and Grammar > Check Grammar With Spelling. Bonus tip: Toggle off Show Input menu in menu bar, since it adds an icon to the menu bar that you probably won't ever use.
Remove (or add) Share menu extensions
The iPhone Share menu is incredibly powerful for everything from copying links to posting photos directly to Instagram from the gallery. On macOS, it feels more like an afterthought, especially because it adds a bunch of programs to the list that you probably never use. Take a second to remove — or add — items to the Share menu to clean it up and make it work better for you.
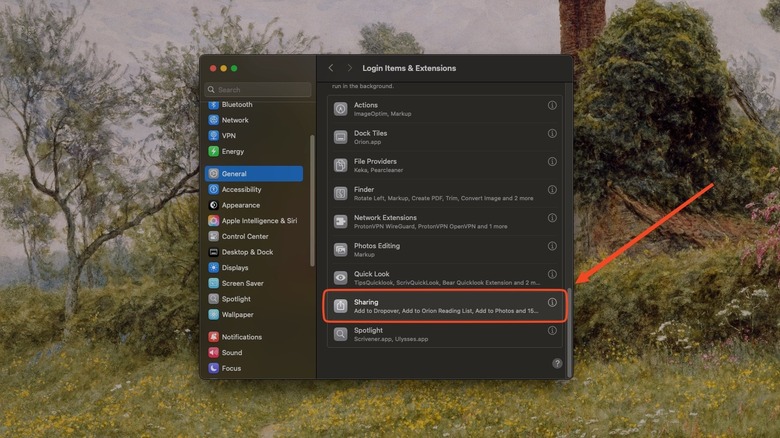
Go to Settings > General > Login Items & Extensions > Extensions and click the information icon to the right of Sharing. Here, you'll see a list of items with toggles. We recommend disabling stuff that most people don't use, such as Add to Reading List, Open in News, and Save to Books. If you install third-party apps that support share menu functions, then take the chance to enable them here. Telegram has a lot of issues, but it is one of the few messaging apps that bakes in a Share function, making it easier to quickly share pictures or documents.
Make Finder better
Finder is a great file manager out of the box, but it has way more customization options than first meets the eye. Simply go to Finder > Settings in the menu bar and feast your eyes. It's a lot to take in, so here are a few of our personal recommendations.
Under the General tab, considering showing External disks on desktop so you can easily drag to eject them; change the default new Finder window to Downloads, Desktop, or another folder of your choosing. Under the Sidebar tab, uncheck anything you don't want, such as Recents or Pictures, and add the ones you do. Under the Advanced tab, check Show all filename extensions and uncheck Show warning before removing from iCloud Drive; if you like, change the When performing a search to Search the Current Folder.
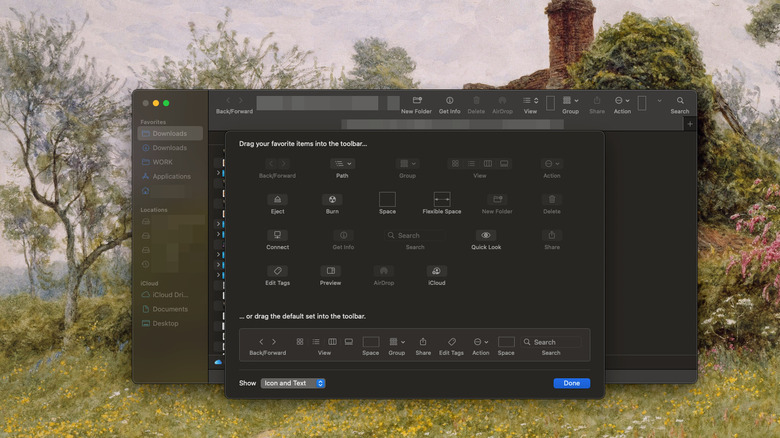
We've only scratched the surface here. Next, go to View > Customize toolbar and prepare to open the floodgates for complete Finder customization. Virtually everything about the look and feel of Finder can be changed from this menu. You can add or remove icons, put spacers between them, and choose whether to show just the icon, just text, or both. Personally, I've added items like the delete button, Get Info button, and AirDrop. You can make your Finder as simple or complex as you like just by dragging and dropping. Finally, we recommend selecting View > Show Path Bar and Show Status Bar; the former shows the location of the file on the bottom bar, and the latter shows extra information like how many items you selected and the available space on the drive.
Change scroll direction
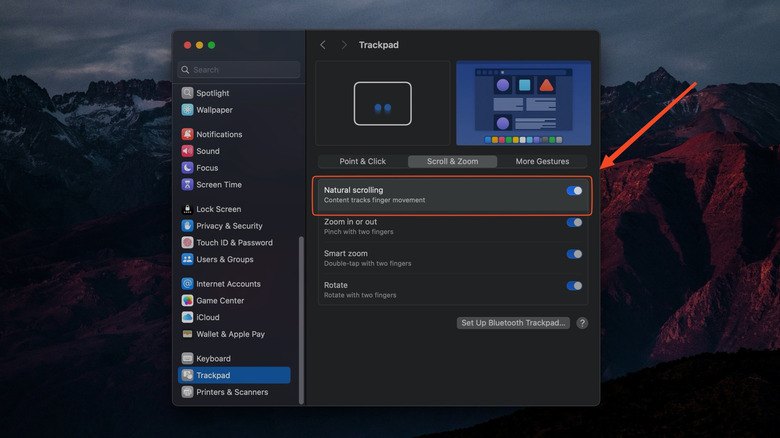
MacOS has had this maddening quirk for years where the scroll direction on trackpad and mouse is identical, which can drive you crazy if you switch between the two. Once you hop over from trackpad to mouse or vice versa, you'll likely scroll in the wrong direction several times until you readjust. The process repeats when you go back to the previous peripheral. Most people prefer to disable the default "natural" scroll direction in Trackpad in Settings > Trackpad > Scroll & Zoom, but you will need third-party software to keep different control directions for trackpad and mouse.
Quite a few apps do this for free — evidence of how frustrating it is for Mac users — but we recommend LinearMouse. Once installed, go to the scrolling option in the sidebar and reverse the scrolling direction for any mice you like. Who knows, maybe it's a matter of time; window tiling on macOS was absent for decades until macOS Sequoia in 2024.
Disable autoplay on Safari
Safari certainly isn't the best internet browser, but it can meet the needs of most people compared to Firefox and Edge. It's also the ideal browser to use on Mac for the best battery life, at least according to some tests, and it's one of the most popular alternatives to Chrome. When fine-tuning it to your needs, set up autoplay blocking.
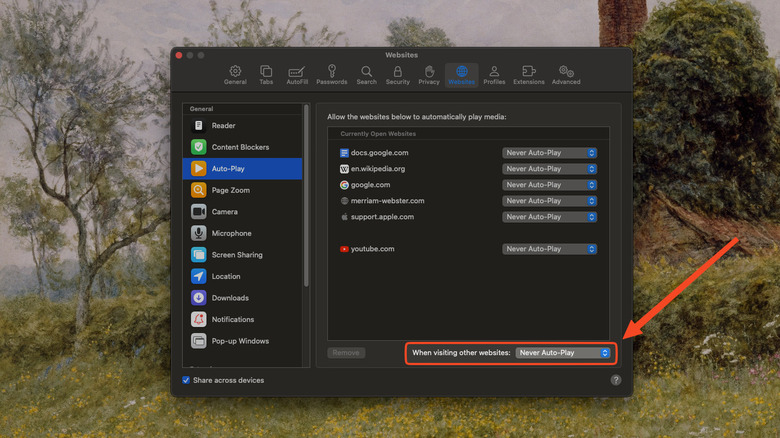
You have two options. You can either block it for a specific website only, or for all websites by default. For the former, click on the Website Settings, then navigate to the pop-up menu beside Auto-Play and choose to stop any media with sound, or block all autoplaying content for that specific website. For the latter, go to menu bar and click Safari > Settings > Websites > Auto-Play and choose "When visiting other websites" and hit Never Auto-Play. Speaking from personal experience, it's not bulletproof — some websites seem find ways to get around autoplay — but it works for ones like YouTube.
Allow installation of non-App Store apps
Apple takes a steep 30% cut of all sales made through the App Store. As a result, many Mac app developers bypass the App Store by distributing their app elsewhere, and (perhaps unsurprisingly) macOS does not allow you to install those non-App Store apps by default.
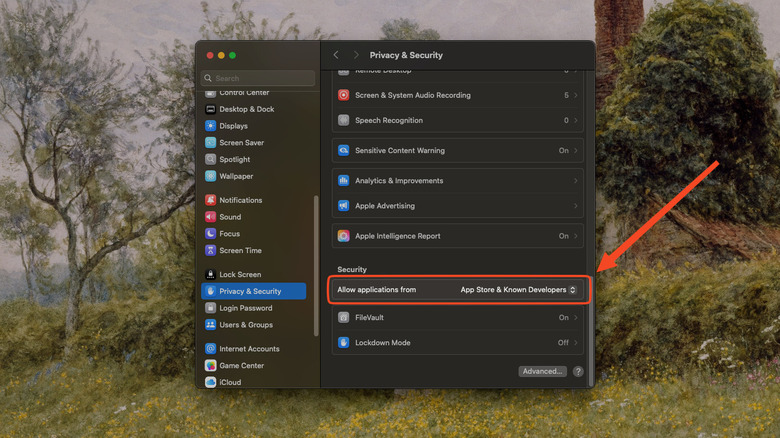
Go to Settings > Privacy & Security and then scroll down to the Security section. Change the selection beside Allow applications to App Store & Known Developers. Now, you can install apps either by unpacking them from a .zip file or double-clicking a .dmg file, then moving the app to the applications folder.
You will still get a prompt every time you run a new program installed outside the App Store. It's safe to click through this prompt, but do be on the alert for prompts that say they can't check the software for malware, or which automatically block the app and move it to the trash. Even if you don't get the latter two warnings, that doesn't mean the app is guaranteed to be safe. Exercise caution when downloading apps off the Internet just as you might in any other situation. Make sure to only download them from official, reputable websites like GitHub.
Connect your iPhone with Phone Mirroring
MacOS Sequoia introduced some great new features, and the best of them is iPhone Mirroring. It's a one-click, native solution to access your locked iPhone from your Mac, provided it's logged into the same account and in range. You have full control of your iPhone with your mouse and keyboard, you can listen to audio, and you can even drag-and-drop files seamlessly. Perhaps best of all, notifications from your iPhone-only apps will appear in your Mac notification center as if they were from native Mac applications.
Open the iPhone Mirroring application and follow the instructions. You'll have to enter your passcode into your iPhone, choose whether or not to allow notifications, and decide if you want your Mac to unlock your iPhone automatically or require authentication. After that, any time you click on the iPhone Mirroring application, it will load up your iPhone in a matter of seconds. You may occasionally have to re-enter the password, especially if you haven't used iPhone Mirroring in some time.
As a nice little security addition, your iPhone will tell you if it's been used for mirroring the next time you unlock it. So if someone uses your Mac while you were gone to get into your iPhone, you'll know. The only major downside to the feature is a lack of support for the iPhone's camera and microphone while mirroring.
Unlock your Mac with your Apple Watch
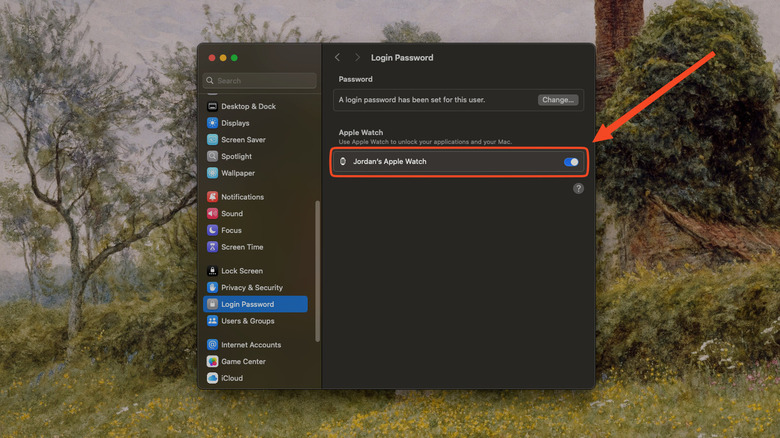
MacBooks may not yet have Face ID, but they do have a fast and reliable fingerprint scanner. If you use your MacBook in clamshell mode — or you have a desktop Mac like the Mac Mini M4 — then the only convenient way to unlock your Mac is with the expensive Apple Magic Keyboard. Putting in your password every time you want to unlock your Mac gets tedious fast, so if you have an Apple Watch, you're in luck. Provided your Apple Watch meets system requirements, is signed into the same account, and on the same network, it can unlock your Mac. Go to Settings > Touch ID & Password/Login Password and hit the toggle next to your Apple Watch — you'll have to put in your password to authenticate it.
Make sure your Apple Watch is on your wrist and unlocked, then wake your Mac and it should unlock automatically in a second or two. You can use your Apple Watch to approve a variety of requests, too. For example, anytime you need to change a setting that requires the admin password your Apple Watch may prompt you to double-click its side button. As one example, it can authorize putting in passwords saved to Apple Passwords.
Be warned: This can lead to accidents. If you're in an adjoining room and someone bumps the mouse, it may unlock your Mac. This feature may not be good to use in a public space where you leave your MacBook unattended, like at a local library.
Enable dictation
If you want to improve productivity, you could go all out on a fancy ergonomic keyboard for faster, more comfortable writing. But if you're looking for something free, try enabling macOS dictation. It's about as good as the dictation on iPhone, good enough to bang out a message or an email faster than you can type it. Once you get used to it, you'll probably find yourself dictating every chance you get.
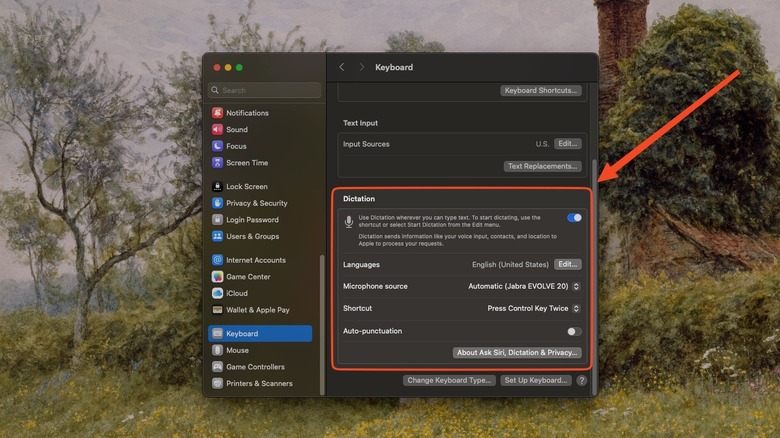
Go to Settings > Keyboard then scroll down to Dictation and toggle it on. We recommend choosing the "Don't share audio recordings" option unless you use it a lot and want to help Apple improve the voice recognition — something, in my opinion, that's desperately needed. If you have an Apple Keyboard, then you can press the Microphone key to start and stop dictation anytime you've clicked on a text field. If not, then you can change the shortcut in Settings to a specific key, or to a double-press on the Control, Command, or Globe keys.
You can dictate complete punctuation, too, so we recommend disabling the toggle for auto-punctuation. Say things like "period," "open parenthesis," "open quote," or any other punctuation mark and it will add them without you having to touch a single key. There's a full list of supported verbal punctuation here. You can even add emoji; for example, say "laughing emoji." While macOS dictation isn't perfect — certainly not as good as dedicated dictation software like Dragon — it gets the job done.
