How To SSH Into Raspberry Pi (And Why You Might Need To)
While the Raspberry Pi can work as a basic desktop alternative, you're probably using it for more advanced projects — most of which don't need a display, keyboard, or mouse. Perhaps it's integrated into a mobile robot, running your autonomous plant-watering assistant in the backyard, or maybe even set up on the street capturing a time-lapse video of the neighborhood activity. In such cases, it can be a pain to take the Pi out of the system every time you need to update it or tweak the code.
Thankfully, there are ways to manage the Raspberry Pi remotely without disassembling your project. This is where SSH comes in. SSH stands for Secure Shell. Compared to VNC which essentially screen shares the Pi's desktop GUI to a different computer, SSH only provides you access to the Pi's command line. This can be handy if your Pi doesn't have a GUI to begin with or if you need to quickly troubleshoot, edit code, or control the system remotely. We'll walk you through the step-by-step process of how to SSH into your Raspberry Pi.
Step 1: Turn on the SSH service
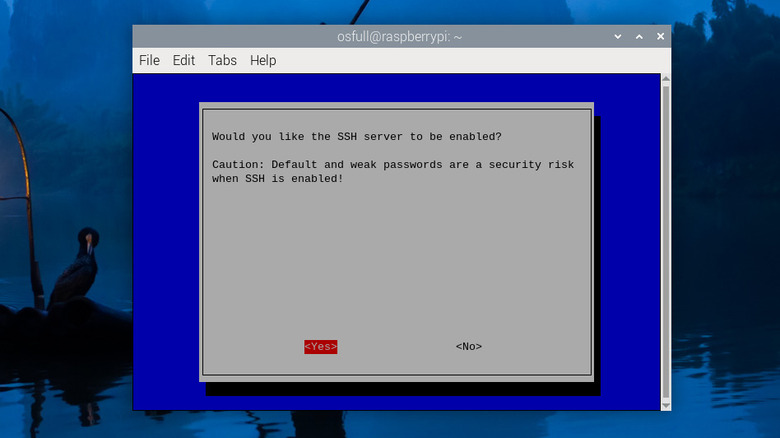
SSH is disabled on the Raspberry Pi by default. You can activate the service before you flash the Raspberry Pi OS to a microSD card, though. Simply edit the OS customization settings in the Raspberry Pi Imager and check "Enable SSH" in the Services tab. However, if you're working with an already configured board complete with the OS, follow these steps to enable SSH from the command line instead:
- Connect your Pi to a monitor, mouse, and keyboard. This is only temporary, and after the setup process, you can remove the peripherals if you don't need them in the project.
- Boot the Pi as you normally would.
- Launch the Terminal app. Or if you're running the Raspberry Pi OS Lite version, proceed on the command line interface.
- In the Terminal, type sudo raspi-config.
- Highlight Interface Options.
- Press Enter on your keyboard.
- Go to SSH.
- Hit Enter.
- Select Yes.
- Choose OK and Finish to exit.
While you're in the command line, look for the Pi's username — the green text before the @ symbol. You'll use this to connect to Raspberry Pi via SSH later.
Step 2: Connect the Pi to your network
Before you can SSH into a Raspberry Pi, you first need to connect it to your home network, so your other computer can see it. If you have the desktop version of the Raspberry Pi OS, simply hit the network icon in the upper right corner and connect your board to your home Wi-Fi just like how you would on any other computer. If you're running the Lite OS version or prefer to use the Terminal, here's how to connect your Pi to Wi-Fi instead:
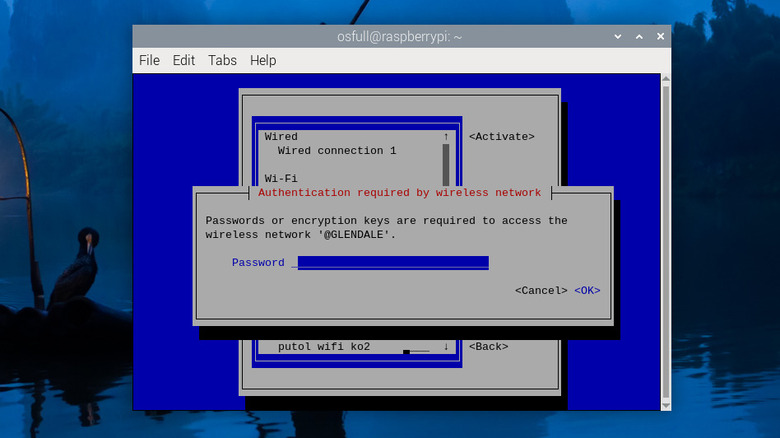
- On the Pi's command line, type sudo nmtui to open the NetworkManager Text User Interface.
- Choose Activate a connection.
- Highlight your network name from under the Wi-Fi list.
- Press Enter on your keyboard to select it.
- When prompted, type your Wi-Fi password.
- Choose OK to connect. The network name will now appear with an asterisk, indicating that you're connected to it.
- Select Back and Quit to exit nmtui.
If, however, you're yet to install the Raspberry Pi OS on a microSD card, you can configure it to automatically connect to your preferred network. On the Raspberry Pi Imager, edit the OS customization settings, specifically the "Configure wireless LAN" section under the General tab and add your network name and password.
Step 3: Set a static IP address
Aside from the username, you'll also need the Raspberry Pi's IP address to connect to it. Fortunately, it's pretty easy to find this. You can use an IP scanning tool like Angry IP Scanner on your Windows, macOS, or Linux computer to see all the IP addresses of the devices on your network. Or, you can go into the Raspberry Pi Terminal/command line and type hostname -I (as in capital letter i) to get the current IP address.
However, if your router or the Pi board reboots, your Pi will likely have a new IP address. This means you'll need to find it again before you can SSH into the system. Instead of going through this hassle, just assign a static IP address to the Raspberry Pi. This way, the Pi will have the same IP address permanently (or at least until you decide to go back to dynamic addresses). Here's a quick guide on setting a static IP address:
- In the Terminal of the Pi, type hostname -I. Take note of this current IP address.
- Enter ip route in the Terminal. Remember the gateway address, the value after "default via."
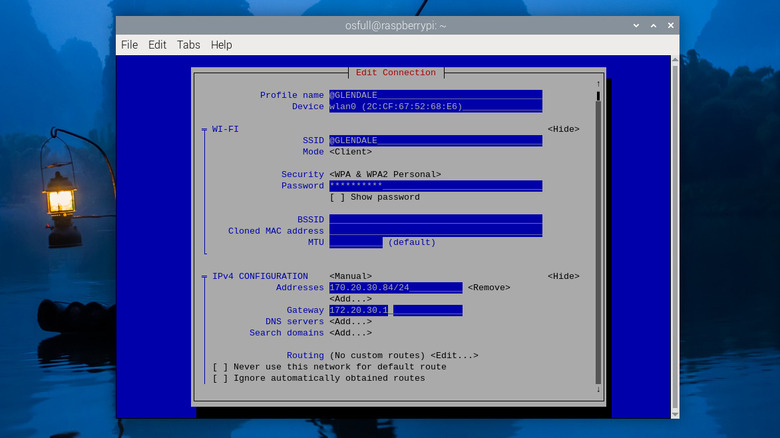
- Open nmtui with sudo nmtui.
- Go to Edit a connection.
- Highlight the network you're connected to.
- Press Edit.
- Set the IPv4 Configuration to Manual.
- Click Show next to IPv4 Configuration.
- Fill the Addresses and Gateway with your IP and gateway addresses.
- Hit OK to save the new configuration.
Once done, your Raspberry Pi should be ready for remote access. Just make sure to write down the IP address you set here as it will be your IP address moving forward.
Step 4: SSH into the Raspberry Pi
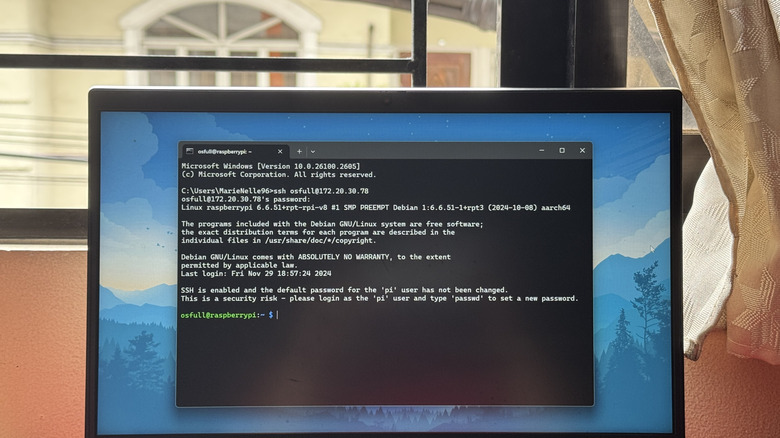
The easiest way to connect to your Raspberry Pi via SSH is by using the Command Prompt on Windows or the Terminal app on macOS and Linux. All of these come preinstalled with the OS, so you won't have to go looking for a third-party terminal emulator. Here's how to use the Command Prompt or Terminal:
- Launch the Command Prompt or Terminal.
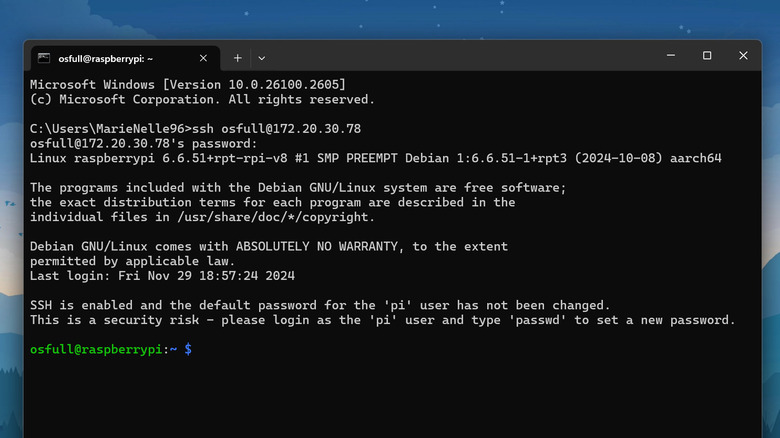
- Type ssh [the Pi's username]@[the Pi's IP address] to start the SSH session. So, for instance, if your username is pi and the IP address is 192.168.1.64, your command should look like ssh pi@192.168.1.64.
- Input yes to proceed. You will only do this once, and for the succeeding SSH sessions, you won't need to type 'yes' again.
- When prompted, type your Raspberry Pi's password, not your computer's password. The characters usually won't appear on screen (not even as asterisks), so be mindful while typing.
- Hit Enter on your keyboard.
You should now see your Raspberry Pi's command line, with the username@hostname (e.g., pi@raspberrypi) in the usual green text. From here, you can input your commands just like you would directly on the Raspberry Pi. When you're ready to end the SSH session, all you need to do is type exit to disconnect from the Pi.
