8 Developer Options Worth Enabling On Your Samsung Galaxy Device
Samsung is well known for packing its Galaxy phones and tablets with far more features than any one person can use. That feature density means there's something for everyone to enjoy, and Samsung has grown into the most popular manufacturer of Android devices. But if you think the Android Settings menu is crowded already, you ain't seen nothing yet. There exists a whole section of settings hidden from those who don't seek it out. It's called Developer Options, and while most of these settings aren't useful to non-developers, some of them enable everyday functionality to supercharge your Android experience.
Developer options are intended for those who develop or do DIY projects, but there are some game-changing ways to make your phone feel faster and more convenient buried among them. However, it can be difficult for general users to distinguish between the settings that should be reserved for professionals and those that everyone can benefit from. So, we've rounded up some of the best Developer Options to enable on your Samsung Galaxy device. From settings that let you fly through Android more quickly to those that save battery or simply give you access to useful information about your device, there's a lot to explore.
We confirmed that these settings exist on multiple generations of devices running Android 14 with One UI 6.1. However, many have been around in Android for quite a few years and are not exclusive to Galaxy phones, meaning this guide should apply to most Android devices, not just those made by Samsung.
How to enable developer options on Samsung Galaxy devices
If you head into your Samsung Galaxy Android device's settings, you won't find Developer Options there. Because they are meant, as the name implies, for developers, many of the developer settings can interfere with your device's functionality or cause unexpected issues. Therefore, they require a hidden method to enable the menu. That said, rest assured that the settings being covered in this article are completely harmless and instantly reversible. To enable Developer Options on a Samsung Galaxy phone or tablet:
- Open Settings.
- Scroll down to the bottom and tap on About Phone.
- Tap on Software Information.
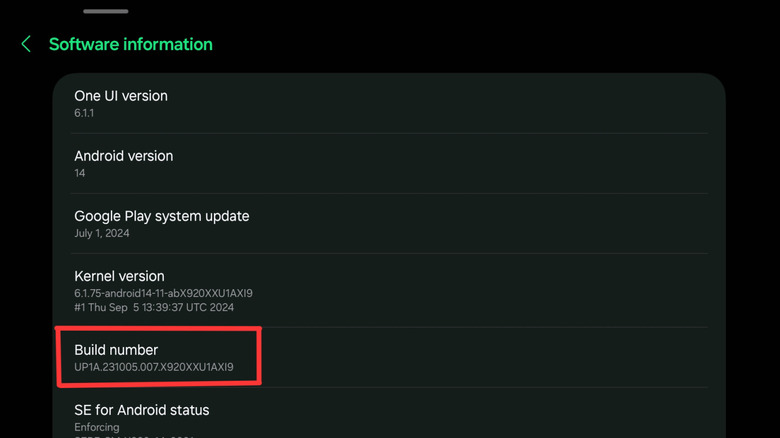
- Repeatedly tap on Build Number in a rapid-fire manner. You will begin to see a countdown appear at the bottom of the screen, which tells you how many taps you have left before Developer Options are enabled. Continue to tap until you are prompted to enter your device's password or PIN. Enter it, and tap OK. Developer Options should now be enabled.
- Back out to the main Settings page, then scroll all the way to the bottom of the page. You should now find Developer Options there.
Developer Options contains a huge number of niche settings useful for developers and DIY tinkerers. Feel free to browse them, but it's best not to change any settings unless you're confident that you know what they do. Changing certain Developer Options can cause a range of issues, from worse battery life to glitching software and more. However, continue reading, as we're going to discuss settings that not only are safe but will actually make the experience of using your Samsung Galaxy device even better. You can find each feature by scrolling the list of options or by searching using the magnifying glass icon.
Make your Samsung Galaxy device feel faster with animation scaling
Android is full of animations that make the experience of using your Samsung Galaxy device feel slick and fluid. However, animations also slow you down since you need to wait for them to finish in between interactions with the device. For example, when you open an app from the home screen, it appears to emerge from its icon until it takes up the display, and when you go back to the home screen, it appears to shrink into the icon. These animations are pretty, but they can be a nuisance when you want to quickly close one app and open another.
However, the animation scaling options in the Developer Options are a great way to make your Android phone feel faster. Think of these settings like putting a video on double speed —they'll make the animations in your phone's UI load twice as fast, enabling you to blaze through tasks on your phone without interruption.
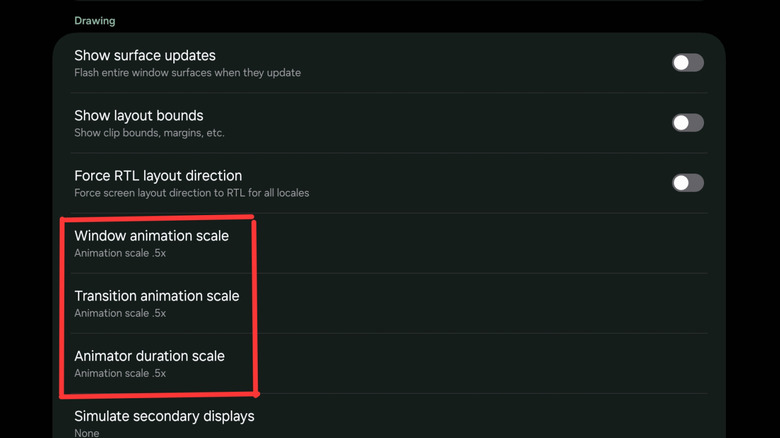
You'll find these settings in Developer Options under the Drawing header, more than halfway down the list. They are called Window Animation Scale, Transition Animation Scale, and Animator Duration Scale. The latter of these is most important, but you can set all three to Animation Scale .5x. Once you've done so, experiment with using your device to open and close apps, move through submenus in apps, and so forth to see the effects of the changes. Everything should move much quicker. If you don't care about animations at all, you can choose the Animation Off option for these settings, and although it won't be as visually pleasing, animations will be gone entirely, leaving you with a frictionless One UI experience.
Supercharge your back button with predictive animations
Every Android update over the years has come with needed improvements. In Android 14, Google added predictive back animations to the popular operating system, which were supposed to fix a long-time annoyance. The back gesture is one of the best aspects of Android compared to iOS, but it often behaves in ways users don't expect. It might take you back within the app you're using, back to the previous app you were using, or all the way to the home screen, depending on context.
Predictive back animations help you understand which of these things will happen by showing you a preview of which screen you'll land on when you use the back gesture. This gives you enough information to decide whether you'd like to cancel the gesture by returning your finger to the edge of the screen.
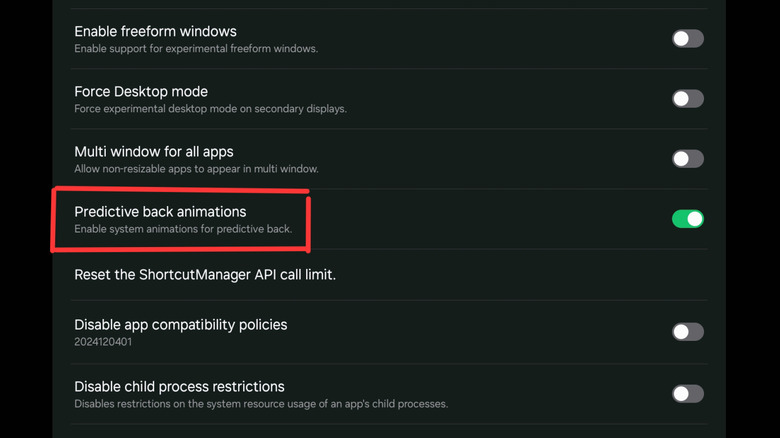
The Predictive Back Animations setting can be found toward the bottom of Developer Options, underneath the Apps header. Simply toggle it on, and you're off to the races. However, be aware that this feature must be enabled by app developers on a per-app basis, so it won't work in every app. At the time of this writing, it appears to work in a large number of Google apps and Samsung One UI apps, with other apps being hit or miss. Most apps do not support it. However, when it does work, it is incredibly nice to have.
Save battery with Wi-Fi scan throttling
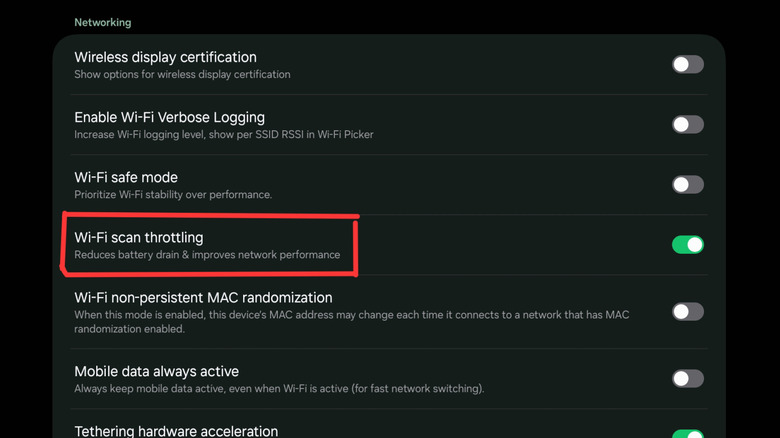
Most people think of the Wi-Fi radio onboard their phone or tablet as a means to connect to the Internet and nothing more. However, Android uses it for other purposes, including to scan for other networks and devices to help with location accuracy. Various apps may have their own individual uses for Wi-Fi scanning. While this can be useful at times and help with app functions, it can also consume an excessive amount of battery. That's because the CPU must wake in order to scan for networks, and over time, this can seriously shorten the battery life of your device. To solve this, Developer Options includes a toggle to reduce the frequency of Wi-Fi scans.
You can find Wi-Fi Scan Throttling in Developer Options about a third of the way down the page under the Networking heading. Once you toggle it on, the device will limit the rate of Wi-Fi scans, which can be especially helpful if your device is incessantly scanning and consuming excess battery. On some devices, it is enabled by default to prevent resource-hungry apps from excessive scanning. On the other hand, if, for some reason, you want your apps to have constant access to Wi-Fi scans, you can turn the toggle off. However, this will, of course, lead to an increase in battery consumption.
Take a look at your memory usage
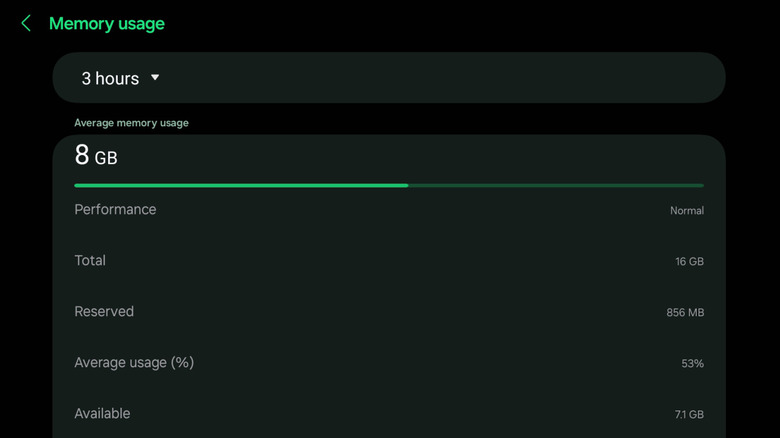
On other operating systems like Windows, it's easy to examine all your usage stats. Tools like Task Manager and Disk Management help you to know which programs or processes are hogging system resources. However, things are different on Android, which provides rather sparse information by default. While Samsung's Device Care (accessed through the main settings) can tell you about your battery usage and provide a basic look at memory management, the latter is lacking in detail, only able to tell you which apps are running in memory and how much they're using. Meanwhile, Developer Options is hiding a more powerful look at your RAM usage stats.
At the top of Developer Options, you'll tap Memory, which will open up a page displaying your average memory usage over time. You can choose from the past 3, 6, 12, or 24 hours. This can be useful to see if something is wrong with your memory overall, something you wouldn't learn from the Memory section of Device Care. Tap through to Memory Usage to see a detailed list of apps that have used memory over time. As on the previous screen, you can filter this by time.
Tapping on any individual app will show you some very detailed stats regarding its RAM usage, including frequency, average and maximum memory occupancy, and which segments of memory it has occupied. This is incredibly useful for techies who understand the inner workings of RAM, but even for the average person, it can give you a sense of whether apps are misbehaving and may need to be reinstalled or removed entirely.
See currently running app and system services
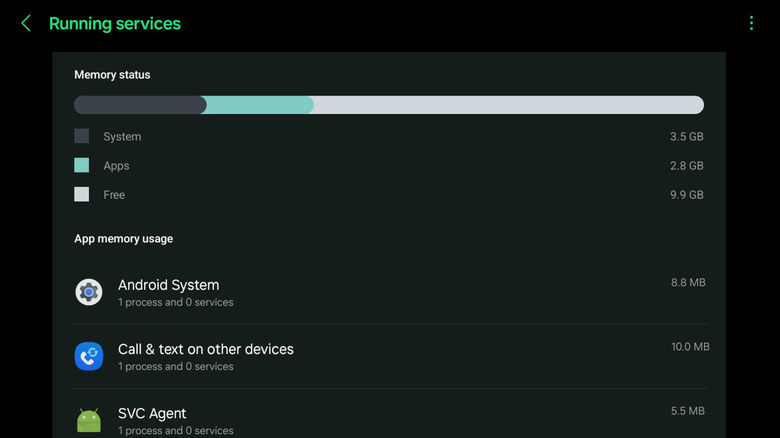
In a similar vein to the memory tools we discussed in the above section, another thing Android lacks in its main settings panel is a way to see which apps are running services in the background. What you see of an app when you use it is just the user interface, but apps run behind the scenes to make sure you get notifications, enable specific functionalities, and more. It is necessary for many apps to run in the background and not be harmful to your device in most cases. Still, there are times when you may worry that one app is having issues, and knowing whether its services are running and how aggressively it can help you determine why, for example, that app is draining your battery or slowing down your phone.
You can find Running Services somewhat near the top of Developer Options. Tap on it to see a list of all apps running processes along with some basic information, such as the number of processes. Tapping on any individual app will give you more detailed information about any active processes and will also give you a button to stop the app from running.
Stopping an app this way is not recommended unless something is seriously wrong. The best way to force stop an app is from its App Info page, which you can find by holding down on the app icon in your app drawer and tapping the small "i" that appears in the pop-up menu. Instead, the best use for the Running Services page in Developer Options is to gain a more granular understanding of app functions, mainly for use in troubleshooting scenarios.
Keep the screen on indefinitely while charging
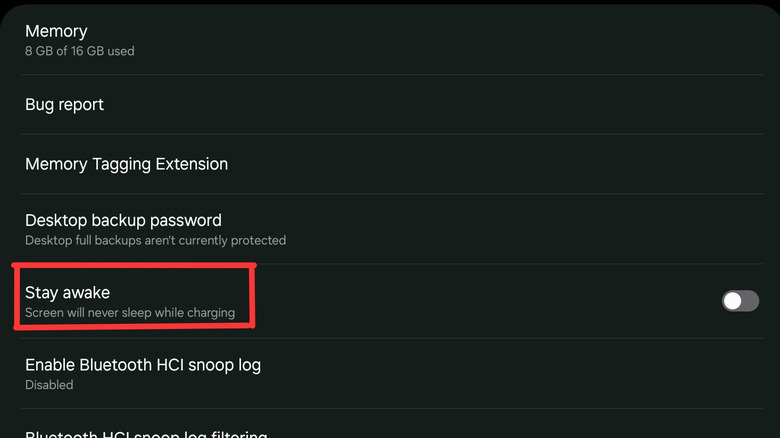
Have you ever been watching something on your Samsung Galaxy phone or tablet when the screen suddenly times out and shuts off? This can happen when the app has not instructed Android to keep the device awake, and it even happens during video playback in some apps. Or, maybe you're looking at something like a live map to track delivery and don't want to keep tapping the screen every couple of minutes to keep it awake. Well, you can solve those problems by flipping on one setting in Developer Options.
In Developer Options, near the top of the settings list, is an option called Stay Awake. When turned on, the screen will never go dark so long as the device is plugged in and charged. This is incredibly useful for those who are tracking slow-moving information, like a live sports score that updates every few minutes, allowing you to keep that information available at a glance without needing to keep the device awake manually.
One word of warning here: Don't forget you've got this setting turned on and leave your device displaying a static/unmoving image for long periods of time. Doing so can cause screen burn-in, a phenomenon in which a screen that isn't refreshed for a long time eventually leaves visible echoes of the content it was displaying in that state. For example, if you left this article up onscreen and went to bed, you might wake up the next day with it permanently etched into your screen. Though burn-in may fade over time, it rarely disappears entirely. Fixing burn-in on an OLED screen is particularly difficult, and many of Samsung's phones and tablets use OLED displays.
Take control of your gaming experience with on-screen refresh rate
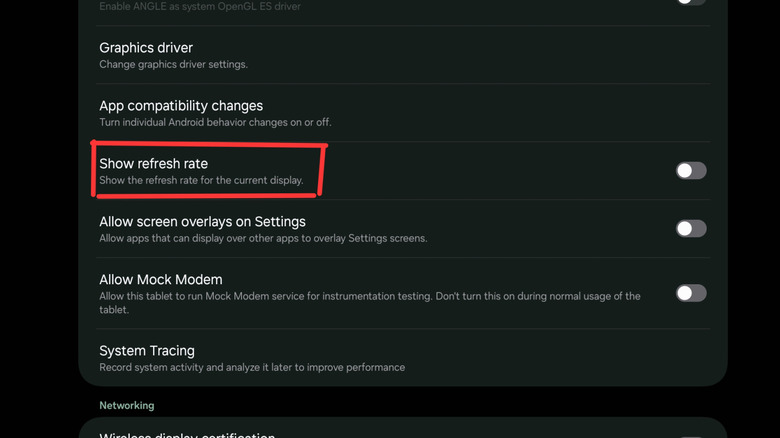
Modern Android devices come equipped with fancy displays that have high resolutions and refresh rates. Samsung, in particular, ships its flagship phones and tablets with a maximum 120 Hz refresh rate, enabling a ridiculously smooth gaming experience. But if you're the kind of person who plays demanding 3D games on your phone or tablet and loves to crank up the graphics, you'll want to ensure your frame rate can keep up with those settings. That's why it can be handy to turn on the onscreen refresh rate visualizer, which places the current refresh rate in big, green numbers at the top corner of the screen.
The option you're looking for is called Show Refresh Rate, and it can be found in the Debugging section of the Developer Options list. After toggling it, you'll see the refresh rate displayed. To make use of this, make sure your refresh rate is set to Adaptive in Display settings, then boot up a demanding game like "Genshin Impact," "Magic: The Gathering Arena," or "Call of Duty Mobile," and crank the graphics and refresh rate settings up as high as possible (if applicable in the game).
Start playing, and pay attention to the refresh rate over time. If it drops below 120 FPS (on a newer device capable of high 120 Hz refresh rate), that means you need to either drop the graphics settings or find another way to cool your device's processor, such as attaching an external phone cooler. The latter solution works because Samsung throttles processors when they get too hot, so helping to dissipate the heat will give the processor more headroom.
Add common Developer Options to the Quick Settings panel
Now that you're using some of the Developer Options provided within Samsung One UI on Galaxy devices, you may be a bit frustrated that you need to go through a bunch of settings submenus every time you want to enable or disable them. Well, you can make things much easier by just adding some of those Developer Options as toggles in your Quick Settings panel.
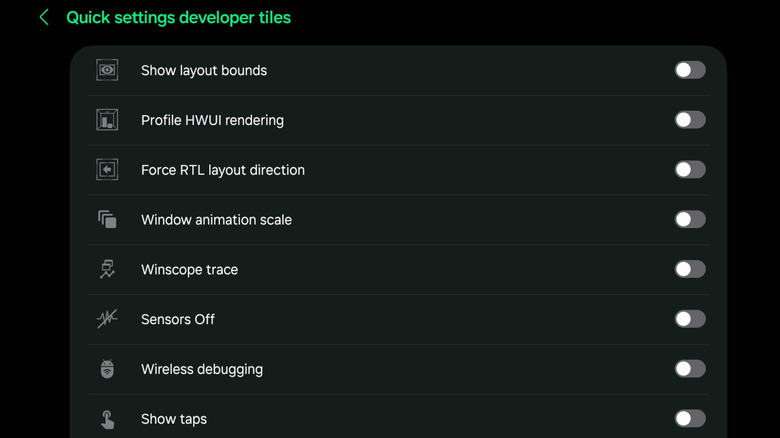
Scroll down in Developer Settings to find Quick Settings Developer Tiles. Tap on it, and you'll see a list of toggles to add different Developer Options to Quick Settings. For example, you can add Window Animation Scale, the setting we discussed at the top of this article to make your phone or tablet run animations more quickly, to the Quick Settings panel, letting you enable or disable it on the fly.
Another useful toggle is Disable Sensors. Think of this like turning your smartphone into a dumbphone. It will disable Wi-Fi, Bluetooth, and other wireless connections just like Airplane Mode, but takes things a step further, shutting off NFC, accelerometer/gyroscope, microphone, camera, proximity sensor, light sensor, and more. Essentially, the device will be unable to communicate with the world around it in any capacity. It's a perfect option to lock things down for total privacy or just to save some extra battery life when your device is running low. You can also find this setting as a standalone Developer Option.
