Can You Use AirPods On Windows Computers?
If you have an iPhone, you might own (or might have thought about buying) a pair of AirPods. And why not? Wired earphones and headphones are a thing of the past, and there's plenty of advantages to switching to AirPods.
For one, some AirPods come with noise cancellation and voice isolation for a better listening and speaking experience. They're also pretty long-lasting at a maximum of 30 hours of listening time. Plus, AirPods are packed with hidden features, such as automatic switching to another Apple device you're signed into, customizable touch gestures, and notification announcements.
However, AirPods are originally designed to work seamlessly with Apple products. So what if you have a Windows computer instead? Can you still use AirPods with your PC? The short answer is yes — AirPods definitely work with Windows computers too. There are some caveats, though. We'll cover what these are and how exactly you can connect your AirPods to Windows.
Using AirPods on Windows computers
AirPods run on Bluetooth connectivity, so they can pair with your Windows PC just as easily as any other Bluetooth-enabled audio devices. They're designed to work best with a macOS computer, so you won't be able to get the most out of them, but you can still enjoy all the controls that are built into the hardware and thus, automatically work without any software setup. The control sensor's location varies depending on the AirPods variant, though: at the top of the stem in AirPods 1 and 2, on the stem itself in AirPods 3 and 4 plus AirPods Pro 1 and 2, and on the right ear cup in AirPods Max. AirPods 1's sensor only activates Siri by default, so it wouldn't be useful in Windows.
As for the controls, each model works a little differently. For AirPods 2, double tap the sensor to play/pause the audio or skip to the next song. For AirPods 3 and 4 plus AirPods Pro 1 and 2, squeeze the stem — once to play or pause the track, twice to switch to the next song, and thrice to move back to the previous song. For AirPods 4 ANC and both generations of AirPods Pro, you also have an extra control gesture: hold down the stem to toggle between Active Noise Cancellation (ANC) and Transparency modes. AirPods Pro 2 adds another convenient feature: volume adjustment by swiping up or down the stem. For AirPods Max, push the digital crown one time to play or pause your music, two times to jump forward, and three times to skip back, turn the crown to change the volume, and click the noise control button to alternate between modes (ANC and Transparency).
Using AirPods on macOS computers
As you might have already guessed, there's a night and day difference between using AirPods on Windows and macOS. macOS users get more functionality from their AirPods as they benefit not only from the hardware features but also from the software capabilities. For instance, on a macOS computer, your AirPods automatically pause the media playing once you take an earbud out (thanks to in-ear detection). Plus, the AirPods easily switch from your iPhone to the computer whenever you start listening there. If you have them paired with macOS instead of Windows, you also get to manage features like customizing the hardware controls, renaming the AirPods, changing the location of the mic, and even turning off automatic ear/head detection.
There are several other conveniences AirPods on macOS provide. You can readily find your missing AirPods via the Find My app on your computer, play soothing background sounds to help you relax, and check the AirPods' battery percentage right from your laptop/desktop — no need for a third-party app. In terms of audio features, some are exclusive to Apple devices, so you won't get to enjoy them on Windows. Personalized Spatial Audio, which makes your listening experience more immersive, only works with macOS, tvOS, iOS, iPadOS, and visionOS. The same goes for Mono Audio — which delivers identical audio in both earbuds in case you just want to use one. If you're on macOS, you have access to more noise control modes too. For the AirPods Pro 2 or AirPods 4 ANC, on top of the Noise Cancellation and Transparency modes, there is also the Adaptive Audio mode, which dynamically adapts to changes in your surroundings.
How to pair your AirPods to a Windows computer
Connecting your AirPods to a Windows computer is as easy as using the AirPods with Android or any other Bluetooth-enabled device. Just make sure to have your AirPods charged before doing so to avoid any interruptions. Here's the step-by-step guide to making them work with a PC:
- Enable Bluetooth on your Windows PC if you haven't already done so. To do so, open Settings from the Start menu, navigate to Bluetooth & devices, and toggle on Bluetooth.
- On the same page, click on Add device.
- Choose Bluetooth from the dialog box menu.
- Put your AirPods in pairing mode:
- For AirPods 1 to 3 and all generations of AirPods Pro, place the earbuds in the charging case. Then, open the case and press and hold on the back button for five seconds. Release once the status light begins flashing white.
- For all models of AirPods 4, put your earbuds in the charging case and open the lid while the AirPods are close to your PC. Then, tap twice on the front of the case. Watch for the status light to start flashing white.
- For AirPods Max, hold down the noise control button for five seconds until the status light flashes white.
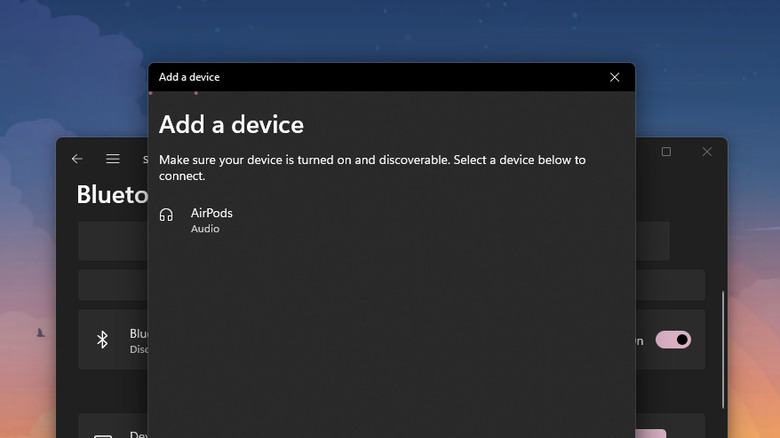
- Wait for the AirPods to appear on the device list.
- Click on it.
The two devices should then be paired automatically. You can now take the AirPods out and use them as you normally would. As long as your Windows PC has Bluetooth enabled, the AirPods will automatically reconnect as soon as you pull them out of the charging case. If they don't, go to Settings > Bluetooth & devices and hit the Connect button on the AirPods at the top of the screen.
Troubleshooting your AirPods and Windows connection
If you're running into issues getting your AirPods to work with the PC, it may be because they're already paired to your iPhone or iPad. AirPods automatically connect to a nearby Apple device signed in to your account, and once it does, it will no longer establish a connection with your Windows computer. To fix this, simply disconnect your AirPods from your other Apple device. Here's what you need to do:
- In your iPhone or iPad, launch the Settings app.
- Go to Bluetooth.
- Tap the info icon next to your AirPods.
- Hit the Forget This Device option.
- Press Forget Device.
- Tap on Forget Device on the popup that appears to confirm.
Your AirPods will then be removed from that device. Some users also have success connecting their AirPods to Windows by removing the AirPods drivers from the Device Manager. Follow these steps:
- On your PC, open the Device Manager.
- Expand the Bluetooth and "Sound, video and game controllers" options.
- Uninstall all drivers with the "AirPods" label.
- Remove AirPods from Settings > Bluetooth & devices.
- Set your AirPods to pairing mode.
- On your PC, go to Settings > System > Sound.
- Under Output, click Add device.
- Choose Bluetooth.
- Click on AirPods from the list to start pairing.
If all else fails, you may need to reset your AirPods.


