How To Convert HEIC Images To JPG On Your Mac
HEIC (High-Efficiency Image Container) is a common file format used for storing images and image sequences; it is widely used on Apple devices like iPhones and iPads, and is primarily associated with the HEIF (High Efficiency Image Format) standard. You may have noticed that when you AirDrop an image from your iPhone to your Mac, the format will usually be sent as a HEIF file, yet its file extension will be .heic. Unfortunately, this format may not be compatible with all of the devices or applications you use — for example, although you can view and edit HEIC images on your Mac, you won't be able to upload them to most platforms. In such situations, you will need to convert your HEIC images to a more widely supported format like JPG/JPEG.
When you AirDrop images, they're typically sent in the original format each photo was captured in. So, one step you can take before sharing images from your iPhone or iPad is change the format you shoot your images in. You can do so by going to Settings > Camera > Formats, and then selecting Most Compatible. This way, all images you take and share moving forward will be sent as JPEGs instead. With that said, what do you do if you already have images in the HEIC format on your Mac that you'd like to convert to JPG? Thankfully, you don't need to spend time hunting for free third-party image converter websites– the Preview and Photos apps on your Mac are more than enough to help you accomplish this.
Converting HEIC images to JPG using Preview on Mac
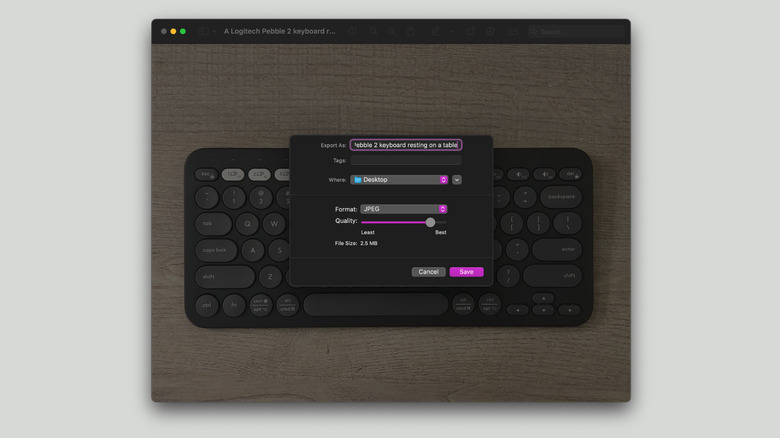
The quickest way to convert HEIC images to JPEG/JPG on a Mac is using an application that comes pre-installed on every Apple computer: Preview. Contrary to popular belief, the Preview app on macOS is packed with features that go beyond just viewing images. The app can open various formats, including JPEG, PNG, GIF, GMP, TIFF, PSD, HDR, and a lot more. Converting images from one format is extremely simple. To do so, locate the HEIC image in the Finder app, and double-click it to open it. Alternatively, you can also Control-click the image, then select Open from the pop-up menu. Once the image opens in Preview, you need to:
- Click File in the menu bar.
- Select Export from the drop-down menu. A new window will open.
- Expand the Format dropdown menu.
- Choose JPEG.
If you'd like to change where the converted image is saved, expand the Where dropdown menu and select your desired location. You can also adjust the quality of your image by moving the Quality slider toward the right for better quality or left for lower. Once you are done, click the Save button.
There's also a simpler way to do this — you can use the Quick Action menu to convert images within seconds. To do so, locate the image you would like to convert in the Finder app, then Control-click it and select Quick Actions > Convert Image from the pop-up menu. Simply expand the Format dropdown menu and select JPEG. If you would like to retain all the information of your image, make sure to check the box next to Preserve Metadata. You can also change the size of the image by expanding the image Size dropdown menu, and then select Small, Medium, or Large.
Converting HEIC images to JPG using Photos on Mac
You can use the steps above to convert HEIC to JPG if the image you would like to convert is saved in Finder. But, what if the image is stored in the Photos app on your Mac? One option is to export the image to Finder and then follow the steps detailed above. However, that can be too much of a hassle. Instead, you can convert images from HEIC format to another, like JPEG, directly within the Photos app. To do so, you should:
- Locate and select the image you want to convert in the Photos app.
- Click File in the menu bar.
- Select Export.
- Choose Export 1 Photo from the dropdown menu.
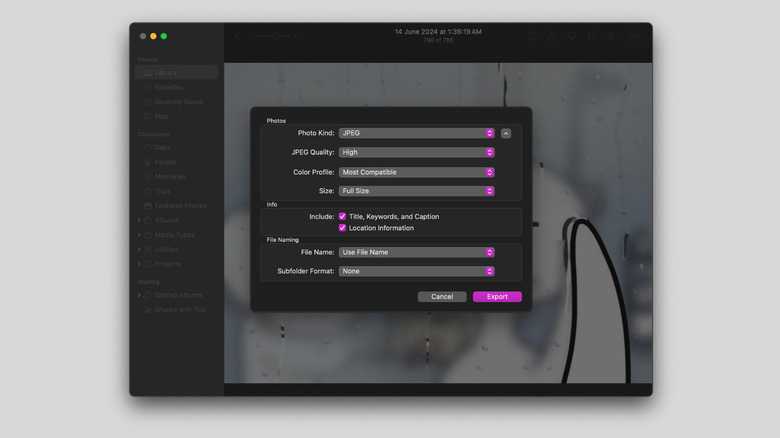
- Expand the Photo Kind dropdown menu.
- Select JPEG.
- Click the "Photo Kind" downward arrow button to modify the JPEG Quality, Color Profile, and image size.
- Click Export.
A Finder window will open, allowing you to select the location where you'd like to save your converted JPG image. Select your desired location and hit the Export button again. If you would like to convert multiple images simultaneously, simply select multiple images in the Photos app, then select File in the menu bar, and then Export. Finally, choose Export [Number of Images] Photos. From there, follow the same steps as above.