6 Apple tvOS 18 Features You'll Want To Start Using ASAP

Everybody raved about the release of tvOS 17 last year, as it brought about major changes to how you use your Apple TV. For starters, FaceTime was added into the system, allowing you to use your iPhone or iPad as a camera and start calls right from the TV. tvOS 17 also made it possible to find your lost Apple TV remote with your iPhone – no more digging through couch cushions or turning the entire living room upside down. Then, there's the Control Center with its new design interface, a more helpful Siri, support for third-party VPNs, and new screen savers in the form of Memories from your photo library.
This year, tvOS 18 has been rolled out, and while the changes are arguably not as huge as in its predecessor, it still comes with a host of exciting new features. Here are six of the best tvOS 18 updates you should start using on your Apple TV as soon as possible.
No more What did they say? moments with Automatic Subtitles

You know you've been there — you rewind the movie a couple of seconds back just because you missed what the character said. But then, even after returning to the exact scene, you still can't make out the words. Their voice is too muffled, the background music too loud, or you simply can't understand what they're saying. tvOS 18, fortunately, solves this issue for you with Automatic Subtitles.
Automatic Subtitles are exactly that — they're subtitles that automatically turn on when you do one of two actions. First is when you skip back to the previous ten to thirty seconds. Press left on your remote one time for ten seconds, twice for 20 seconds, or thrice for 30 seconds. On the scene that you land in, the subtitles will automatically pop up to help you decipher the characters' dialog. Automatic Subtitles also appear when you put the movie or show on mute. Press once on the mute button on your silver remote, or press and hold the minus button on the volume pad to mute the video playing. You should see the subtitles for the scene almost immediately. Once you turn off mute, the subtitles disappear from the screen. Subtitles also show up automatically if you're watching a show or movie that isn't in English, no need to enable it by yourself.
In our tests, Automatic Subtitles work system-wide, so you can enjoy this feature even while you're on Netflix or Hulu. If, however, you don't want any subtitles cluttering your screen automatically, you can turn them off from the Settings. Open Settings and go to Video and Audio. Under Automatic Subtitles, press on an option (Show for Different Languages, Show When Muted, and Show on Skip Back) to disable it.
Hear the dialogue better using Enhance Dialogue
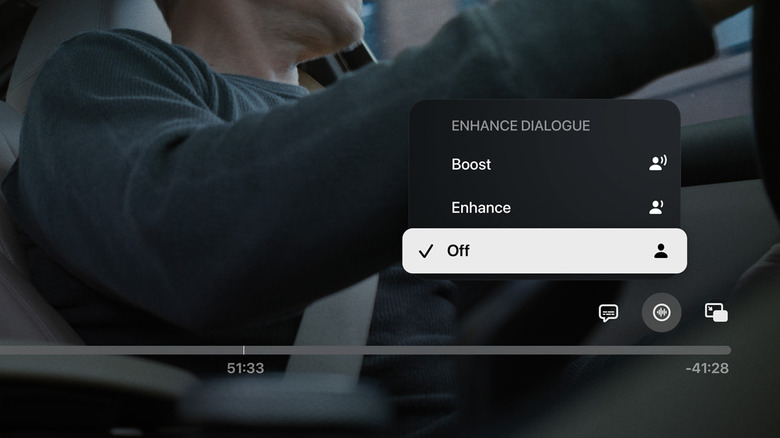
In many contemporary movies and shows, there are scenes where you just can't make out what the characters are saying. This happens regardless of the streaming app you're using on your Apple TV. Sure, adding in subtitles can help, but hearing the characters speak is an entirely different experience from simply reading their lines. This is where you'll appreciate tvOS 18's new Enhance Dialogue feature.
This feature helps the vocals stand out more from the action sounds, music, or background noises in the scene with the help of machine learning. It makes the dialogue clearer and easier to understand. Enhance Dialogue was initially introduced in tvOS 17 but was limited for use with only HomePods and HomePod minis. In tvOS 18, Enhance Dialogue works for any Bluetooth or HDMI device connected to your Apple TV, whether they're Apple products like HomePod and AirPods or third-party ones, such as your favorite Bluetooth speaker. You can turn on Enhance Dialogue by doing the following:
- While a show or movie is playing, press up on your remote to display the playback controls.
- Go to the soundwave icon.
- From the popup menu, click on "Enhance Dialogue" under Audio Adjustments.
- Select "Enhance" to make the vocals only a bit louder than the other sounds, or "Boost" to make it considerably more noticeable.
If you want to turn off Enhance Dialogue, go to the same soundwave icon in the playback controls, choose "Enhance Dialogue," and press "Off."
Get information about actors and music in the scene using InSight
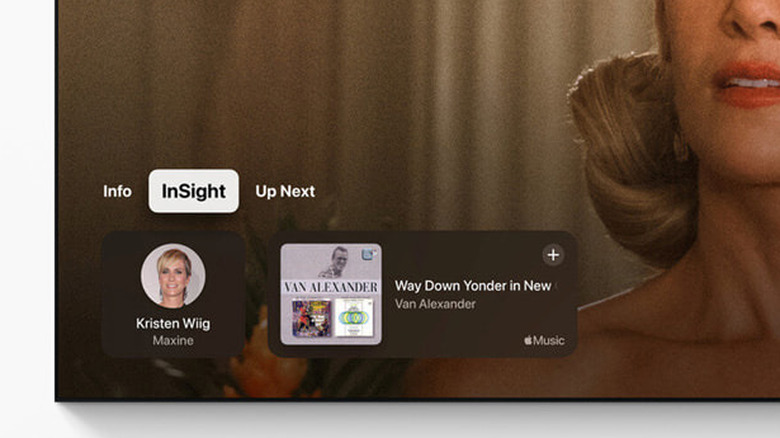
How many times have you paused a show or movie because you wanted to look up where you've seen the actors before or figure out the name of the song playing in the background? With the new InSight feature on tvOS 18, this won't be a problem.
InSight is similar to the "Info" feature, which shows up when you press the down button on your remote during playback. However, instead of giving you details about the show/movie you're watching, InSight tells you about the actors and music currently shown and heard in the exact scene where you pulled it up. This means you can still feed your curiosity without picking up your phone and taking your eyes off the TV screen. However, InSight is currently only available for movies and shows from Apple TV+ and not anywhere else.
The tiles displayed in InSight are interactive. You can select any of the actor's profile, and it will pull up a short biography, along with the movies and shows they were in. If music is playing in the scene, InSight will also show you the song title and artist name. Tapping on the song will automatically save it to a new playlist called Saved Songs on Apple Music (if you're using the same Apple account). If you decide to stay in the InSight panel as the show/movie plays, you'll notice that the actors and music details automatically update as the scene changes. To use InSight, all you need to do is play a show or movie from Apple TV+, swipe/press down on the clickpad, and select InSight from the menu.
Live Captions for better communication over FaceTime

Since the release of tvOS 17, you can start making FaceTime calls on your Apple TV. This upgrade not only made group calls a lot easier to manage (no more crowding around the small-screen iPhone!) but also allowed you to talk to your family and friends hands-free. However, the tvOS 17 FaceTime version wasn't an exact replica of the iOS versions, as it was still missing some features already available for iPhones and iPads. One of those features is Live Captions, introduced back in iOS 16. This year's tvOS update, though, filled this gap.
With tvOS 18, Live Captions have been integrated into FaceTime, making communication a lot better. It works similar to the Live Captions on your iPhone and iPad: when enabled, you'll see a real-time speech-to-text conversion of anything the other person says during the call. To turn on Live Captions on your Apple TV, here's what you need to do:
- From the Settings:
- Open the Settings app.
- Navigate to Accessibility.
- Press on "Live Captions in FaceTime" to enable it.
- From a FaceTime call:
- While in a call, press the up button on your remote's clickpad ring to bring up the playback controls.
- Choose the info icon.
- Go to "Live Captions" to turn it on.
It's important to note, though, that Live Captions for FaceTime is currently only accessible to users in the United States and Canada and those with at least a second generation Apple TV 4K.
Party it up with SharePlay for Apple Music

If you typically host parties at home and use Apple Music on your Apple TV to listen to music, then you already know the struggle of dealing with multiple people wanting to play DJ for the night but only having one remote. It can be quite chaotic. That, however, is no longer an issue in tvOS 18.
The new upgrade introduces SharePlay for Apple Music on your TVs, so anyone can control the playback and song queue right from their own devices. You'll need an Apple Music subscription to access this feature, but for your guests, no Apple Music account or subscription is required as they'll only be using your Apple Music account. To share the Apple Music SharePlay on your Apple TV, here's what you need to do:
- Launch the Music app.
- Play any song you'd like.
- Press the up button on your remote's clickpad ring to show the playback controls.
- Choose the SharePlay icon in the playback control panel.
- Set up your SharePlay profile if you haven't already.
- Ask your guests to connect to your Apple TV by scanning the QR code displayed on your screen, entering a name they want to use, and pressing "Connect."
- On the SharePlay notification that shows on your Apple TV, hit the green checkmark to allow the participant to join the session.
The connected guests can now start controlling the playback from their devices and add or remove songs from the queue. If you need to disconnect anyone from the session, click on the SharePlay icon on the Music app on your Apple TV and hit the red X next to their name.
Customize your screen saver with personal portraits
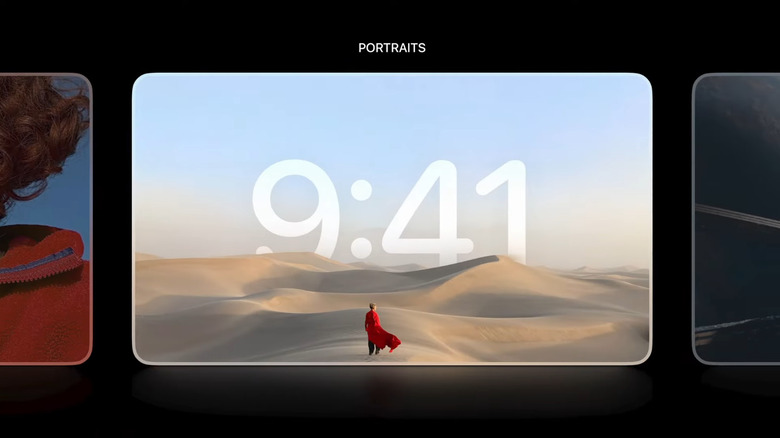
Apple TV has been letting you set personal photos as screen savers since tvOS 12, and tvOS 18 is no exception. However, this time around, the photos get an upgraded look. Instead of simply showing a slideshow of the images you have on your Photos app, you can opt to display it with a clock using the new Portraits options. This feature automatically pulls some good-looking portraits from your library and adds a stylized clock over them. It's available on second-generation Apple TV 4K or later. Follow these steps to configure Portraits screen saver on your Apple TV:
- Go to the Settings app.
- Open Screen Saver.
- Under Screen Saver Preferences, choose "Portraits."
- To stop using photos with people, press on "People" and select "Hide." Otherwise, choose "Favorites" to include only the photos with people that you marked as Favorites on the Photos app, or "All" to include everything.
- To use your photos with pets, nature, and cities, make sure they're labeled as "Show." If you prefer not to include them, press on the individual options to hide them.
- To change the interval between portrait changes, click on "Change Every" under Update Frequency and select between two, five, ten, or 15 minutes.
Once your screen saver shows up (or if you do the hidden Apple TV featured shortcut to activate it manually), press the right button on the remote to switch to the next portrait or press up to choose a different screen saver (Aerials or Memories & Slideshows).