Microphone Not Working On Windows 11? Here's How To Fix It
A microphone is one of the most essential PC peripherals, particularly if you rely on it for work, gaming, or content creation. However, when it stops working, it can disrupt your video calls, online meetings, or gaming sessions, resulting in frustrating communication breakdowns. Further, it can prevent you from utilizing Windows 11 features like voice typing and voice commands.
Whether you're having issues with the built-in microphone or one connected externally, there can be several reasons for it. Common culprits usually include improper connections, missing app permissions, or driver-related issues. Sometimes, problems with an app can also make it seem like there's an issue with Windows.
Whether your Windows 11 microphone sound is too low, producing distorted audio, or simply not being detected at all, there's no need to panic. Below, we'll walk you through some useful tips for getting your microphone working again on your PC, so you can communicate smoothly and without interruptions.
Start with basic fixes

It may seem obvious, but it's crucial to ensure that your microphone isn't muted. Some headsets or external microphones come with physical mute buttons or switches. If yours has one, make sure it's toggled to the unmuted position. Additionally, many communication apps, such as Zoom and Microsoft Teams, allow you to mute the microphone via their in-app settings, so be sure to double-check that the audio input isn't disabled there.
A loose or improper microphone connection can also cause problems. If you're using a wired microphone, try disconnecting it and plugging it back in securely. If it's a Bluetooth microphone or headset, it's worth unpairing and re-pairing it with your Windows 11 PC. To do this, navigate to Settings > Bluetooth & devices > Devices, click the three-dot icon next to your Bluetooth microphone, and select Remove device. After that, pair the microphone again and see if that resolves the problem.
Sometimes, microphone issues can stem from an outdated or buggy Windows build. Hence, it's best to keep your Windows 11 system up-to-date. Head to Settings > Windows Update and click the Check for updates button to download and install pending updates.
Check the default audio input device and test it
Another reason your microphone may not work is if it's not set as the default audio input device on Windows 11. This can happen if there are multiple audio devices connected to the system. To resolve this, you'll need to ensure that the correct microphone is selected as the default input device and then test it to confirm that it's functioning properly. To do so:
- Right-click on the speaker icon on the taskbar and select Sound settings from the resulting menu.
- Make sure that your preferred microphone is selected under the "Input" section.
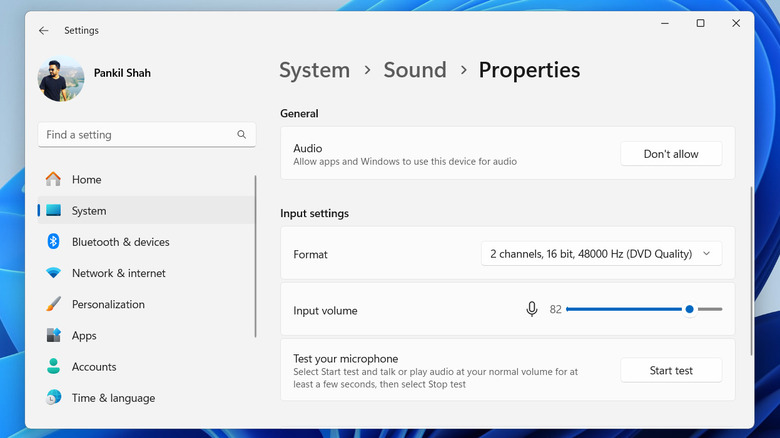
- Next, click on your audio input device.
- Drag the "Input volume" slider to the right to increase the volume.
- Click the "Start test" button and speak into the microphone for a few seconds. Once you're done, click "Stop test."
Windows will show you the volume of the microphone captured. If the test fails, try using your microphone with another computer or phone. If it doesn't work on those devices either, the microphone may need to be repaired or replaced.
Allow apps access to the microphone
Apps on your PC can't detect and use the microphone if you've inadvertently disabled its access via the Windows 11 privacy settings. Here's how you can fix that and allow microphone access for individual apps in Windows 11.
- Press Windows + I to open the Settings app.
- Select the Privacy & security tab in the left pane.
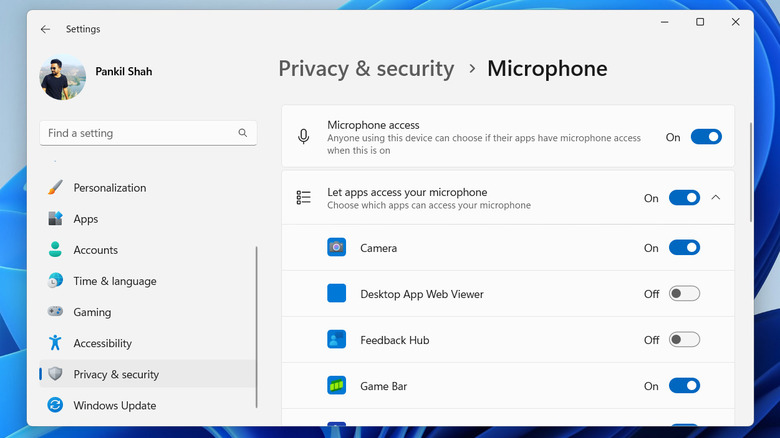
- On your right, scroll down to "App permissions" and click on Microphone.
- Enable the toggles next to "Microphone access" and "Let apps access your microphone" if they aren't already.
- Scroll through the list and use the toggles next to your preferred apps to enable microphone access for them.
After granting microphone access to your favorite apps, it's a good idea to restart them. Also, check that the correct input device is selected in the app's settings to ensure everything is configured properly. Then, test the microphone again to see if it works.
Update or Reinstall Microphone Drivers
Drivers are essential software that allows Windows to communicate with hardware components, such as the microphone. So, if your microphone is still not working or if Windows fails to detect it, updating its drivers can help. Here's how to do that:
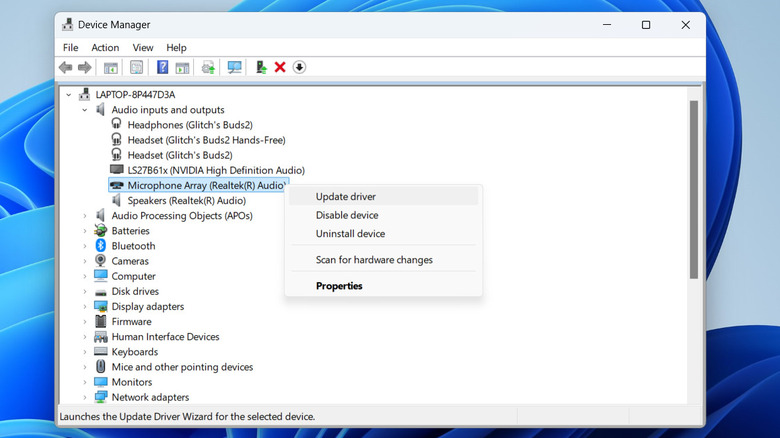
- Right-click the Start icon on the taskbar and select Device Manager.
- Expand the "Audio inputs and outputs" section.
- Right-click on your audio input device and select Update driver.
- Select "Search automatically for drivers" and then choose the "Search for updated drivers on Windows Update" option to update the driver.
If the issue remains even after this, it's likely that the microphone drivers are corrupted. In that case, open the Device Manager again, right-click on the microphone driver, and select Uninstall device. Then, select Uninstall to confirm. Restart your PC after that, and Windows will automatically reinstall the removed driver while booting. Following this, your microphone should work fine.