6 Safari Features On iPhone You Should Be Using

When reading news, personal blog posts, or feature articles on iPhone, your go-to app is most likely Safari, and for good reasons. First off, it already comes pre-installed on the device, so there's no need to go out of your way to download and set up a browser. If you're in the Apple ecosystem, you can also view Safari tabs across your Apple devices with ease. Plus, the app has some other solid advantages over other browsers like Google Chrome, such as more efficient performance, better privacy, and a host of tools for interacting with online photos.
And that's just the beginning. There's more to Safari that meets the eye. You'll be surprised that this simple native app can actually be a productivity powerhouse and help you accomplish much more with its often overlooked features. If you're looking to make the most out of Safari on your iPhone, here are six of its functionalities you should consider using.
Focus better on the content with Reader

Other than doom-scrolling on social media, you may spend a lot of time reading online blogs and articles on your iPhone too. Maybe you're doing research on Spanish colonization for your college essay. Or perhaps you just want to know the best spots in Japan to go to before you book your flight. But while it is quite convenient to be able to read on your phone, the interface isn't always the most reader-friendly. Some web pages have annoying navigation menus that stay fixed to the screen even as you scroll down. Others have empty spaces that break up your reading flow. Fortunately, Safari comes with a feature that makes reading on your handset a lot easier on the eyes.
The Reader tool converts a supported web page into a more readable format without the distracting menus, empty spaces, and extraneous images. What it only shows on the screen are the text and photos relevant to the content you're consuming. To make the interface even more visually appealing, Reader allows you to change the background color of the page, switch to a different font style, and increase or decrease the font size. There's an option to automatically enable Reader mode for all the web pages from that specific site as well. If you're on iOS 18, Reader also includes a highlights section containing a summary, table of contents, and other handy information extracted from the web page. Here's how you can turn on Reader on your iPhone's Safari:
- In Safari, open the web page you want to read.
- Tap on the Page Settings icon (a rectangle with two lines underneath) located to the left of the URL at the bottom of the screen.
- Select "Show Reader."
- To customize the interface, press the Reader icon.
You can now start scrolling through the page without all the unnecessary distractions.
No more manually closing unused and forgotten tabs with the Close Tabs feature
Admit it — you don't have just one tab open in Safari at this very moment. You probably have at least five, maybe even more. As you scroll through your long list of Safari tabs, you'll realize you don't even need them anymore. Most of them were just random, one-time searches, like that dictionary tab where you checked the meaning of inimical (it's hostile, by the way) or the one where you read the news about the cute therapy dog at your local hospice. More often than not, you just exit Safari after getting the information you need and don't even bother closing the tab. That's why the next time you open the app, you're greeted with multiple unused tabs that have been sitting in your browser untouched for weeks. They're not only an eyesore but can also potentially slow down your browser.
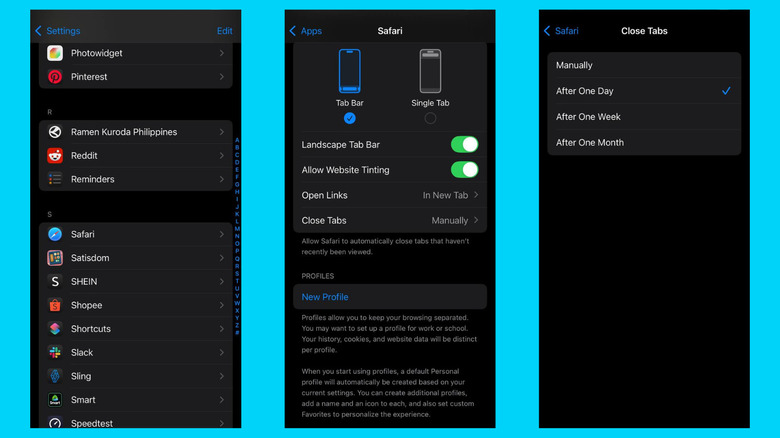
If you want to declutter your browser tabs without putting in a lot of effort, Safari can automatically close the tabs for you. You can choose to close all the tabs after you don't view them for a day, a week, or a month. This way, you won't have to worry about manually closing the tabs you use for one-time searches. Follow these steps to enable this feature:
- Launch the Settings app.
- Scroll down to the bottom of the page.
- Tap on "Apps."
- Select "Safari."
- Under Tabs, choose "Close Tabs."
- Pick the period you want to use (After One Day, After One Week, or After One Month).
- Exit Settings.
After doing so, Safari will start automatically closing any active tabs you haven't opened in the period you chose.
Group your tabs and share them
Whenever you're working on a research paper or group project that involves a lot of online reading, you'll typically end up sharing a bunch of links through messaging apps. One teammate will send an article for everyone to read, then someone else sends a different blog, and before you know it, your conversation thread is filled with nothing but links. Safari for iPhone offers a much more ideal way to collaborate — using its Tab Groups and collaboration features.
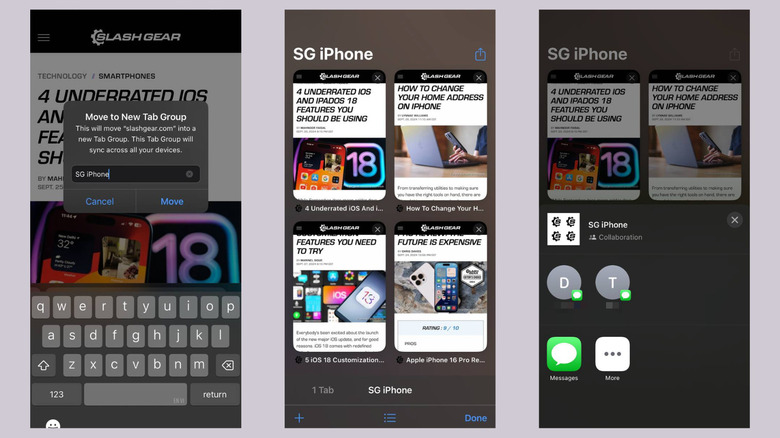
Tab Groups are exactly that — they're groups where you can add individual tabs to keep them organized. You can create these Tab Groups for your personal use, or you can share them with others. When you share a Tab Group, your collaborators can see all the tabs you've added and even add or remove tabs themselves. You'll be notified in Messages regarding any changes made to the Tab Group. It's important to note, though, that you can't add just anyone to a Tab Group. They need an Apple Account with two-factor authentication enabled and have Safari synced with their iCloud. To create a Tab Group and share it with others, here's the quick guide:
- In Safari, visit the web page you want to add to a Tab Group.
- Tap the Page Settings icon > More (three dots).
- Under Tab Actions, select "Move to Tab Group."
- Press "New Tab Group."
- Enter a name for the group.
- Hit "Move."
- Repeat the same process for your other tabs.
- To view the created Tab Group, tap on the tab icons at the bottom-right of the screen.
- To share the Tab Group, press Share > Messages, enter a contact, and press the send icon.
Your contact will then receive a link to the Tab Group. Once they tap on it, they'll be prompted to open the group in Safari, and doing so automatically adds them to the group.
Write your thoughts on the web page itself

Every time you're reading on Safari and need to jot down your thoughts or extract some information from the online article, you usually have a separate note-taking app like Apple Notes, Bear, or Notion open on your iPhone. But using both your browser and notes app on such a small screen can be quite the hassle. You'll have to switch between them all the time. Not only will the constant back and forth break your focus, but it'll also be hard to remember where you left off on the web page before the switch.
However, you actually don't need another app just to take notes of what you're reading on Safari. The browser already includes built-in markup tools for your annotation needs. You can use these tools for a wide range of things, such as highlighting and underlining text, overlaying text, signature, and stickers, and adding text form boxes. The annotated web page is then automatically converted to a PDF and can be saved to your device. Here's how to use the markup tools on your iPhone:
- Go to the web page you want to annotate on Safari.
- Press the "Share" button.
- Choose "Markup."
- To draw or highlight on the page, select any of the pens. You can pick the ruler to make your lines straight or the eraser to remove any lines.
- (Optional) Change the color of the current pen by tapping on the colored circle at the bottom. Here, you can also opt to modify the opacity of the lines drawn.
- To add a sticker, text, signature, or shape, press the plus icon.
- To insert a text form box, tap on the text form icon at the top and press the blue plus icon on the text form interface to add a text form box or signature.
After annotating the web page, hit Done > Save File To... > [your chosen folder].
Change how Safari looks
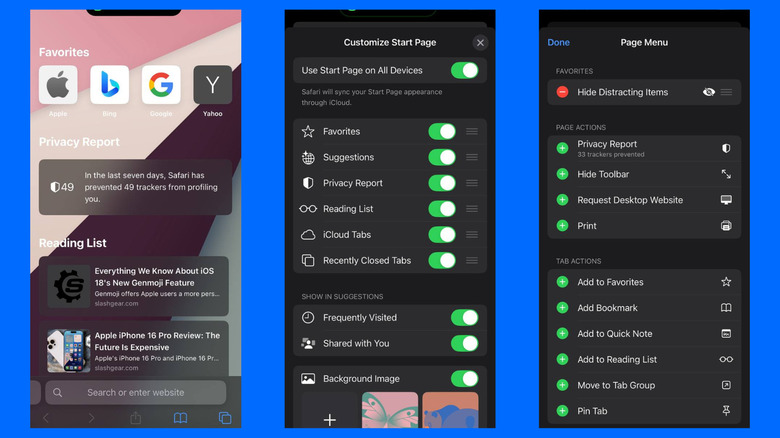
You can customize the layout of Safari on your iPhone to better suit your needs and preferences. Here's a step-by-step tutorial on personalizing the start page on Safari:
In Safari, go to the start page by pressing the tabs icon and selecting the plus sign at the bottom.
- Tap on "Edit."
- Rearrange the sections (Favorites, Suggestions, Privacy Report, Reading List, iCloud Tabs, Recently Closed Tabs) by holding the hamburger handle and dragging it to your desired position.
- Disable the sections you don't want to see on the start page by tapping on their toggle.
- Under Show in Suggestions, hide Frequently Visited (websites you often visit) and/or Shared with You (pages shared with you from other apps like Messages and Calendar).
- Change the background image by selecting one of the available images. Alternatively, press the plus icon under Background Image to use your own photo.
- Press the X icon at the top to save your changes.
You can also edit the layout of the tabs and page menus. To change the tab layout, open the Settings app and navigate to Apps > Safari. Then, under Tabs, choose whether to use the Tab Bar (a bar at the bottom of the page that you can swipe to switch to the other tabs) or Single Tab (displays only one tab with no swipe-to-switch functionality). There's also an option to turn on the Landscape Tab Bar. When enabled, all your tabs will be visible at the top of the screen when you use Safari in landscape mode (much like how it looks on Safari for Mac). Meanwhile, to change the page menus, here's what you need to do:
- Go to any web page on Safari.
- Press the Page Settings icon > three dots > Edit.
- Add any option to the Page Menu by tapping on the green plus icon next to it.
- Hit "Done" to save.
When you open the Page Settings, you should immediately see the options you've added on the popup.
Boost Safari with handy extensions
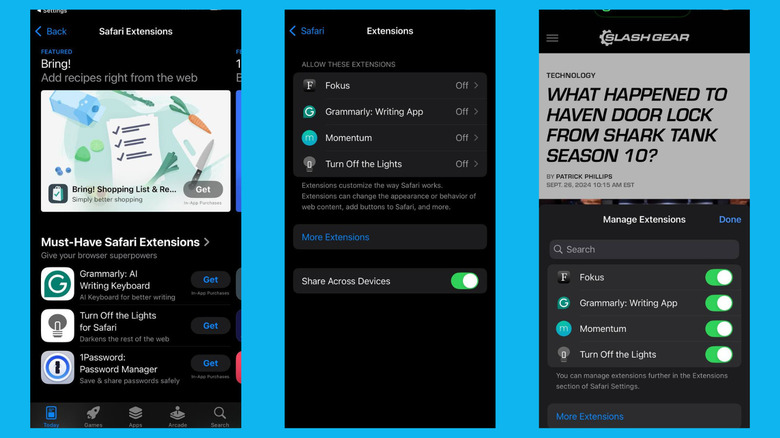
Safari is already packed with a multitude of features, but there are instances when you may need a specific functionality, such as a more advanced translator or a grammar checker, that is, unfortunately, not built into the app. In that case, you can use Safari extensions on your iPhone. These extensions are similar to Google Chrome extensions on your desktop — they add extra features to Safari that meet your needs better. Some extensions change the browser's appearance, while others integrate another app's features into the web page. To install and use extensions on Safari for iPhone, follow this guide:
- Open the Settings app.
- Navigate to Apps > Safari > Extensions.
- Tap on "More Extensions" to view the available extensions for your device.
- From the App Store page that opens, download your preferred extensions by pressing "Get."
- Go back to the Extensions page in the Settings app.
- Enable your downloaded extensions by tapping on them and toggling on the option "Allow Extension."
- (Optional) Turn on "Allow in Private Browsing," so you can use the extension even while you're in incognito mode.
- Under Permissions, enable the extension on the websites you want to use it in.
- Open the app for the extension you downloaded.
- Follow the on-screen instructions to set it up. You may need to create or log in to an account and configure additional settings before you can use the extension in Safari.
- Launch Safari on a web page (not the Start Page).
- Tap on the Page Settings icon at the bottom.
- To use an extension, simply select it from the list. Depending on the extension, there may be other configurations you need to set up.
If you want to remove a Safari extension, all you need to do is uninstall the app from your iPhone.