6 Security Settings To Change On Your New Mac
When you set up a new Mac, security may not be the first thing on your mind, but it should be. While Macs are known for their strong built-in defenses, it's just a myth that they're immune to threats. Cybercriminals are constantly evolving their tactics, and even Mac users aren't entirely safe from phishing scams, ransomware, or unauthorized access. That's why it's crucial to make sure your device is properly configured to protect your data and privacy.
Thankfully, macOS offers several customizable security settings you can tweak to beef up your system's defenses. We'll go over six key settings you should consider for better protection. By configuring them appropriately, you'll keep your data safe and reduce the risk of breaches. Keep in mind that not every setting will be necessary for everyone, so you can select the ones that best align with your usage and lifestyle.
Set a lock screen passcode
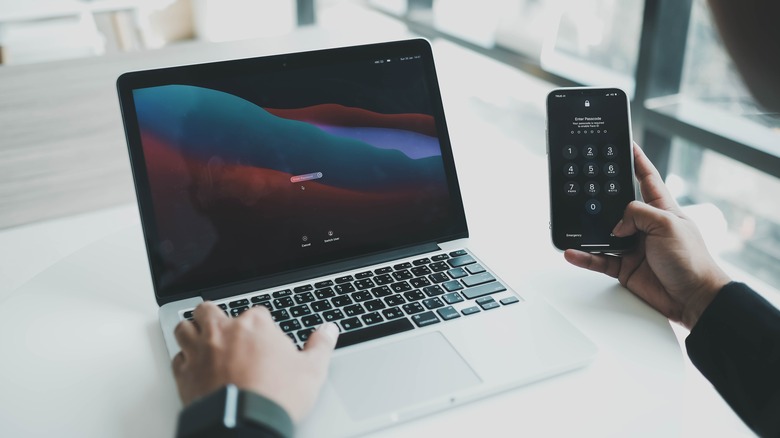
One of the most important steps to secure your Mac is setting up a lock screen passcode, especially if you often use it in public or shared spaces. To set your Mac to require a password, open System Settings by clicking the Apple logo in the top-left corner. Go to Security & Privacy > General, then select Require password after sleep or screensaver begins. Choose how soon you want the password to be required, either immediately or after a short delay (e.g., 1-5 minutes). You can also add a lock screen message with your contact info in case it's lost.
Finally, set a strong password. Stay away from common password mistakes like pet names or birthdays, and opt for something unique but easy to remember. If you're using a model with Touch ID, make sure to enable that for extra security.
To make sure your Mac's lock screen settings work as intended, you should also tweak your sleep settings so that your display does not stay on for too long after inactivity. Head to System Preferences, open Energy Saver, and set a shorter time for the screen to turn off when it is idle. For even quicker access, consider setting up a Hot Corner — a handy macOS shortcut that can lock your screen instantly when you move the cursor to a designated corner. We have a how-to guide on setting up a Hot Corner and other game-changing Mac features to make your device easier to use.
Turn off automatic login
When automatic login is turned on, your Mac logs you in at startup without asking for a password. It sounds convenient, but it's actually quite risky. If your Mac is lost or stolen, anyone could turn it on and instantly access your files and personal information without hitting any security roadblocks. That's why you'll need to disable the feature, so that your Mac always requires a password before anyone, including you, can access it. This is especially important if you use your Mac in shared spaces or work in public places where someone else could easily get hold of it.
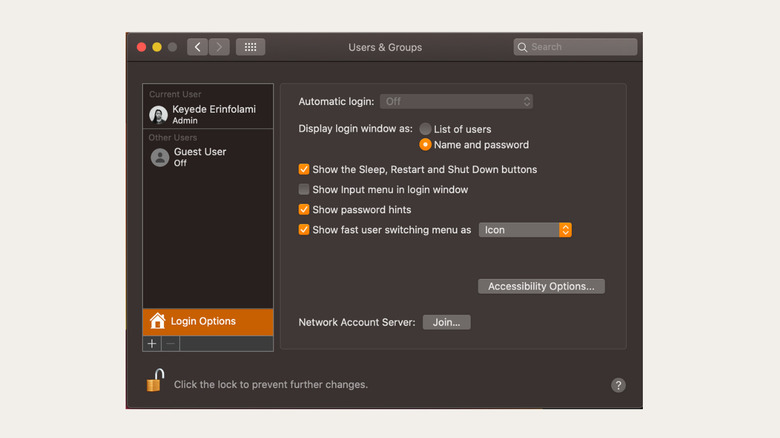
To turn it off, head to System Preferences > Users & Groups. Next, select Login Options at the bottom left (you might need to unlock it first by clicking the lock icon and entering your password), then choose Off from the Automatic login menu.
While you're in this window, you might also want to set the login screen to require both a username and password. This adds an extra layer of security if someone else tries to access your device. And if you're worried about forgetting your Mac's password, consider enabling the password hint feature, so your Mac can give you a helpful reminder after a few incorrect attempts.
Turn on FileVault
If your device gets stolen, a password alone isn't foolproof. A thief could remove your hard drive and access your data by connecting it to another Mac. That's where FileVault comes in — it's a powerful security feature that encrypts everything on your hard drive, so your files remain protected and can only be accessed with your password.
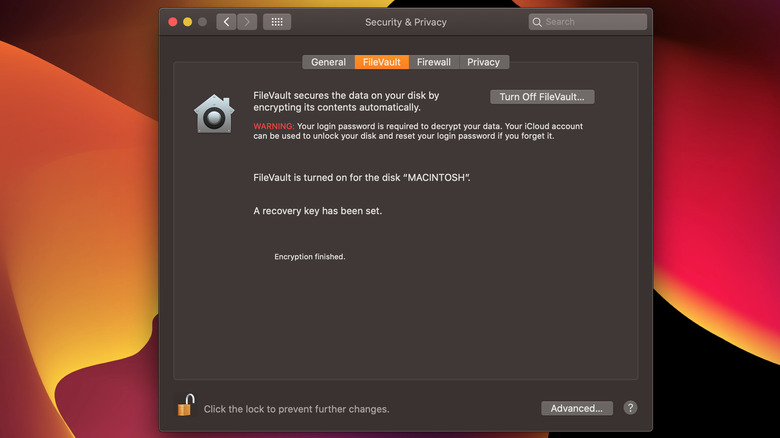
To enable FileVault, go to System Preferences > Security & Privacy and select the FileVault tab. Click the lock icon to make changes, enter your password, and choose "Turn On FileVault." Next, you'll be required to set up a backup recovery option in case you forget your login password. You can use your iCloud account to reset and unlock your disk, or you can use a recovery key, which is a unique string of characters generated by your Mac. Just make sure to keep that key safe; you won't be able to retrieve data from your hard drive without it.
Once you've made your choice, click Continue to start the encryption process. You'll have to keep your Mac plugged in until it's finished, and you can track the progress with the bar in the tab.
Disable automatic connection to Wi-Fi networks

Your Mac keeps track of every Wi-Fi network you've connected to so that it can automatically reconnect when you're in range. This feature can expose your device to malicious activity, especially if you've used public Wi-Fi. Public networks are notoriously unsafe (although you can safely work from a coffee shop or public location with some precautions), and hackers can exploit them to identify your device through its saved network name (SSID). From there, they can intercept your traffic and potentially access sensitive data. The risks are especially high if you've been browsing private accounts or personal information, which is one of the big mistakes people make while connected to public Wi-Fi.
To avoid this vulnerability, it's safer to turn off the automatic join feature. Just go to System Preferences > Networks, select the network, and uncheck "Automatically join this network." It might be a little annoying to connect to public Wi-Fi manually, especially if you use the same ones often, but the extra layer of security you get is well worth it.
Turn on Find My Mac

Find My is a useful tool that uses GPS and Wi-Fi to track your Mac if it gets lost or stolen. If your device goes missing, you can easily view its location on a map and take steps to retrieve it. But Find My does more than just help you find your Mac. If you realize it's gone for good, you can remotely lock it to protect your data, display a custom message, or even erase all your information to keep it safe from prying eyes. This extra layer of security is really important, especially if you're often on the go or working in shared spaces.
To enable Find My, you'll have to first grant the feature permission to determine your location — open System Preferences > Security & Privacy > Location Services, then click the padlock and enter your password to authorize the changes you're about to make. After that, check the box for Enable Location Services and select Find My from the app list.
Next, you'll need to allow Find My to sync and store data to your iCloud. In System Preferences, start by clicking on Apple ID, then select iCloud from the sidebar. You'll see the option for Find My Mac — just check the box to enable it. Make sure you also enable Send Last Location so that your Mac will send its last known location to Apple when the battery is low, giving you one last chance to track it down.
Turn off Network File Sharing
File Sharing is an older Apple feature that lets users share files and folders over a local network. It can be really useful if you're collaborating with a team or need to access files from another device, but it has become increasingly obsolete with tech advancement and the rise of cloud storage options.
With that considered, keeping file sharing enabled comes with potential risks and no real benefits. When the feature is on, you essentially allow other users on your network unauthorized access to your files, especially if your network isn't properly secured. You can also expose your device to malware — attackers often target shared networks for vulnerabilities.
There's also the risk of accidentally sharing something you didn't intend to, which can lead to some pretty awkward situations. All in all, the best way to ensure your data remains private is to turn off network file sharing if you're not actively using it. While it's not a major security risk, it can still be a potential weakness. To disable it, just go to System Preferences > Sharing, then uncheck the box next to File Sharing.
In addition to these settings, it's also a good idea to update your device regularly. One of the most common mistakes Mac owners make is overlooking updates. New software versions not only fix bugs but also address vulnerabilities that could be exploited, and keeping your device up to date helps it stay secure and run smoothly. And to help keep it running for long, here are some settings to preserve your Mac's battery life.