11 iOS Settings You Need To Enable ASAP
The long-awaited iOS 18 is finally here. It's Apple's "biggest-ever update," the answer to all the cool AI stuff Android has been enjoying since the Google Pixel 6 in 2021, and... Apple Intelligence doesn't arrive until iOS 18.1. It doesn't even ship with the new iPhone 16. Awkward. Still, the update added some needed — even if not life-changing — features. As with most smartphone-related software these days, the additions are small and incremental things that refine an already great iOS. Apple users can now move icons around anywhere on their home screen, add third-party controls to Control Center, and find their passwords in the new Passwords app rather than dive into the Settings.
A lot of the best parts were understated, and sometimes not even mentioned in the WWDC presentation. Some are enabled by default, but most aren't. Today we'll take a look at 11 settings you need to change once you upgrade to iOS 18, and how to change them.
Customize and Reorder the Photos app
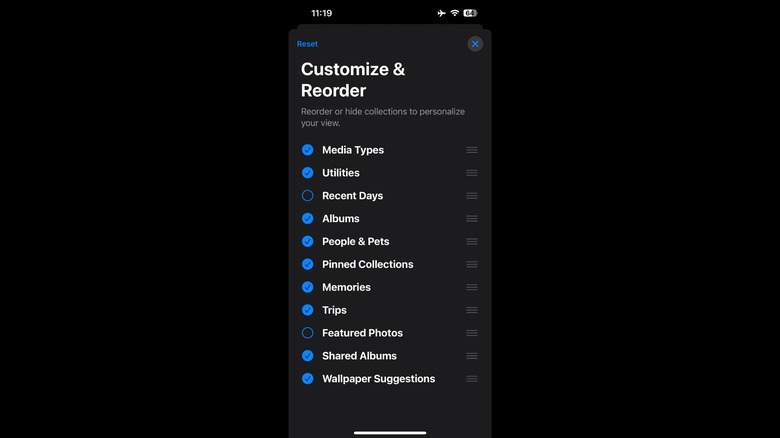
Not every change introduced by iOS 18 was welcome. The Photos app got a complete overhaul which has been almost universally poorly received. Instead of using tabs at the bottom of the screen to navigate, it's one continuous scroll. Sadly, you can't revert to the previous version, but Apple did at least had the presence of mind to let you rearrange things and get something resembling the previous configuration. You'll find the option at the very bottom of the Photos app, labeled Customize & Re-Order.
Once selected, you'll see a list of items: media types, utilities, albums, and so on. You can change the order by holding down and dragging the three lines on the right, or disabling a category entirely by unticking the circle. We recommend disabling features you probably don't use, such as Featured Photos, and sifting up the ones that you do, such as Media Types and Utilities. You can further modify certain categories, such as Pinned Collections, refining the items that should appear within it. Some improvements to the Photos app were good; you can now filter out screenshots, find QR codes, and see photos grouped by day. Otherwise, here's to hoping Apple was right and we'll all agree this was a needed change after we get used to it in a couple of months.
Zoom in on Calendar
The iOS calendar app was already good enough to be a contender in our top recommendations for iPhone calendar apps. For iOS 18, it added a few thoughtful improvements, like the ability to see and tick off reminders through the calendar, and fixed an old paint point. Scanning events from the month view used to be difficult; you had to either switch to the day view or the list of upcoming events, but there was no way to just see the items day-by-day without leaving month view. In iOS 18, that frustrating limitation is finally gone.
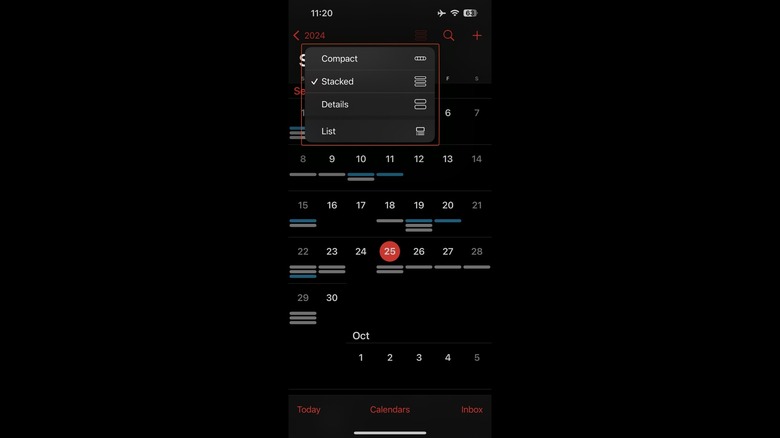
You have two options here. You can tap the view button (left of the search icon) and change from Compact or Stacked to Details; the latter gives you a tiny snippet of each day's events, rather than dots and pills that only tell you how many events there are. You can also simply pinch and zoom. Zooming shifts you gradually through the above three categories until you get to the Details setting. It's convenient, precise, and faster than toggling the setting on or off when needed. The rest of the calendar app, aside for a few tweaks, is virtually identical, so this won't be a major adjustment like with Photos.
Use one keyboard for two languages
Bilingual people, listen up. iOS 18 is finally catching up to Android. iOS 17 and prior supported multiple keyboards, to be clear, and in some cases one keyboard could be used for two languages. However, you relied on autocorrect or holding down a letter to add non-English characters and accent marks, like the Spanish "ñ." iOS 18 expands the feature with improved two-language keyboards.
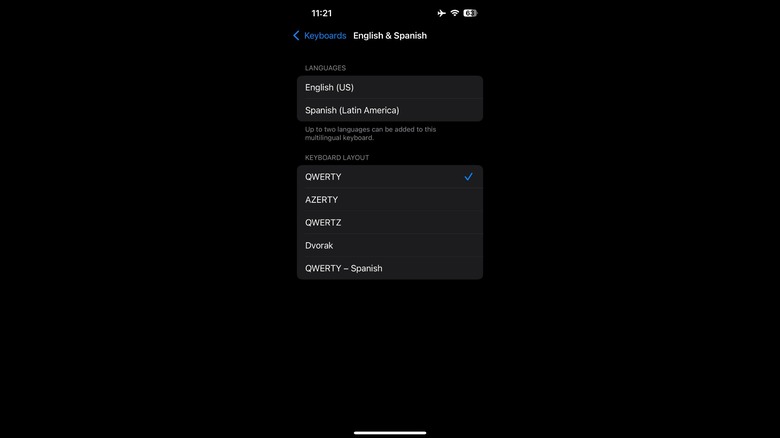
The first needed improvement here is that two-language keyboards are actually two merged keyboards, not one keyboard with support for typing in another language. This is now labeled clearly on the space bar, but you'll first have to go to Settings and add a second language to an existing, supported keyboard in General > Keyboards. It's a small improvement over iOS 17, where your primary English keyboard was grouped automatically with other Roman-alphabet languages (like Spanish). Now, you can choose specifically which two languages you want each keyboard option to support, including non-standard ones like Dvorak.
When changing keyboards with the globe icon, you can now clearly see the two languages supported for one keyboard. There's also a better indicator of priority, so if it's an English > Spanish keyboard, it'll default to English spellcheck until you start typing in Spanish. There'll be no more of that pesky spellcheck defaulting to another language and tripping you up at the beginning of a message. If you've been avoiding the iOS keyboard and using Google (or another) because of this, now may be the time to go back.
Enable RCS
If you were tired of the silly blue-bubble green-bubble debacle and Tim Cook telling people to buy iPhones if they were bothered by it, worry no more. Apple has reluctantly admitted partial defeat. RCS messaging is now supported on iOS 18. That means almost everything iMessage will work with your Android friends: message encryption, read receipts, typing indicators, high-quality photos, and more. Gone are the days of reactions being sent as separate text messages and group chats with Android users being an absolute nightmare.
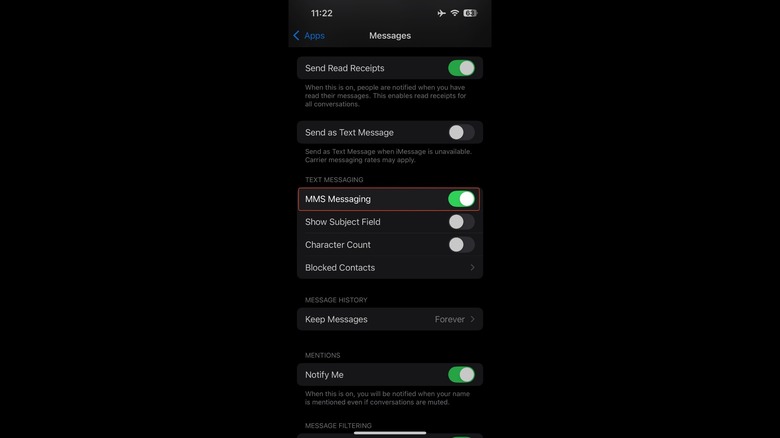
Sadly, RCS is not available across the board. It will depend on whether or not your carrier supports it. If you're not sure, go to Settings > General > About > Carrier and tap on it. If it doesn't have RCS in the messaging support list, then unfortunately you'll have to wait. The ball is in your carrier's court to get it working. If you do see RCS, then congrats. Go to Settings > Apps > Messages > RCS Messaging. Enable the toggle and Bob's your uncle. Don't fret if your carrier limits you to SMS or MMS (like in the picture above); just as with the transition to Apple Silicon, we probably just need a year or two before smaller carriers join in on the fun.
Use head gestures with AirPods to respond to Siri
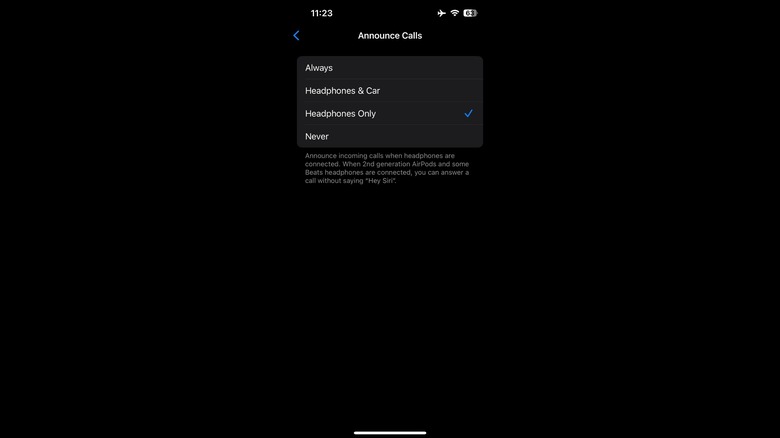
Apple's AirPods 4 now almost match the AirPods Pro 2 hardware-wise, with noise cancellation, an earbud redesign reminiscent of the Pros, better sound quality, Find My speakers, and more. And they almost have complete software parity, too. If you were on the fence about grabbing a pair, this one feature might be enough to push you over: nodding or shaking your head to answer Siri. For this to work, you need to enable the Announce Calls and/or Announce Notifications features. Go to Settings > Siri > Announce Calls/Announce Notifications, then enable it to work with headphones.
Now, anytime you receive a call with your AirPods in, all you have to do to accept it is nod your head; if you want to reject the call, shake your head. It's that simple. It also works for opening and dismissing notifications. So, no more awkwardly repeating yourself with a confused Siri in a public setting where your hands aren't free. So far, those who have used the feature praise it for working quite well. Early testing in the iOS 18 beta said you needed a pretty aggressive head shake before Siri would recognize it, so luckily they got it ironed out.
Rotate Wi-Fi addresses
Rotating Wi-Fi addresses has been a security feature outside the Apple ecosystem for a while now, and for good reason. Regularly changing IP addresses on a network makes your browsing experience smoother and protects your privacy. Ad and tracking companies also have an harder time harder differentiating you from everyone else when your IP address doesn't remain static. This is different from randomized MAC address generation, where a device is assigned a unique hardware address that changes at intervals. In typical Apple fashion, the company took its a sweet time implementing rotating Wi-Fi addresses — better late than never, right?
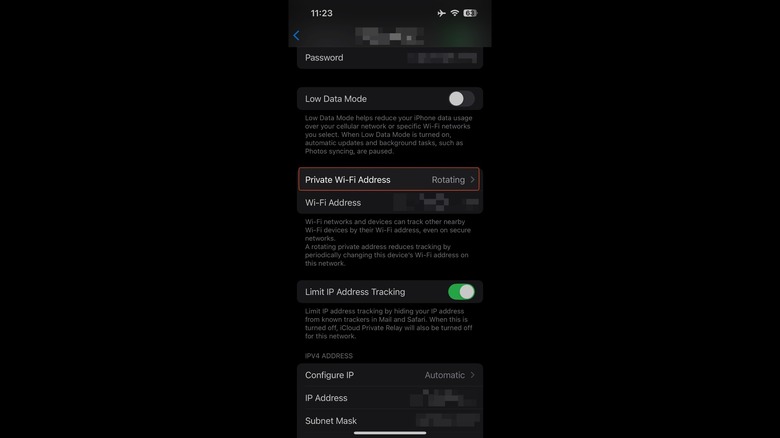
To check if this function is enabled, go to a specific Wi-Fi network and tap the More Info icon (the i with a circle), then make sure that it says Rotating in the Private Wi-Fi Address section. It should be enabled automatically, but definitely double-check if that's the case on your home and work network, or anywhere you spend a lot of time connected. Unfortunately, there's no way to enable this by default for every network, or to change the setting for all remembered networks on your devices. At the time of writing, you will have to do either thing manually.
Limit access to contacts
In iOS 17, Apple introduced a much-needed privacy feature: limiting photo access to apps that request it. Before this, letting apps see your photo gallery was an all or nothing affair; hiding photos in your camera roll was the only way to keep them off an app's radar (besides denying it access outright). With iOS 17, you could pick and choose which photos each and every app can see from your album, and now iOS 18 is doing the same exact thing for contacts.
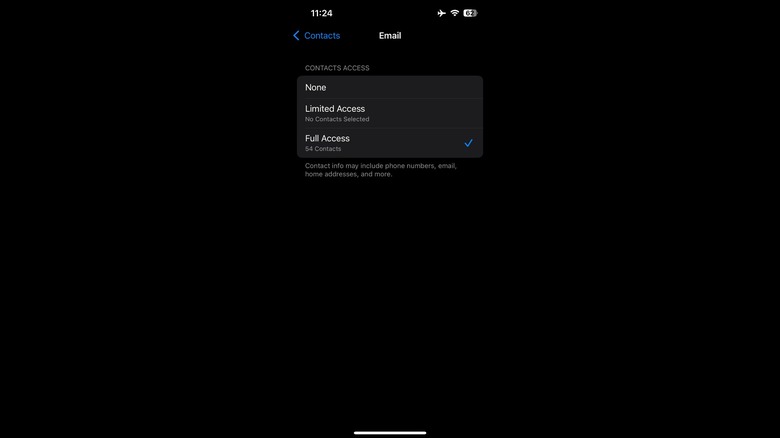
Any time an app asks for permission to see your contacts list, it works just like the photo access permission. You can give them full or limited access. The latter lets you then choose by hand which contacts it can see. For apps that already have contact access, go to Settings > Privacy & Security > Contacts and add or remove contacts as needed.
It's a small privacy feature with huge implications. Your contacts list includes the names, phone numbers, emails, and more of everyone in your personal and professional circles. That's a gold mine for unscrupulous companies that would sell that information, one they can no longer profit from once you enable this setting. Limiting contact access also serves as a buffer against apps that require contact permissions to work, but which you don't fully trust; now, you can safely grant those permissions and then allow some — or no — contacts to be seen by it. The app won't be able to tell the difference and should work just fine.
Reduce motion sickness with Vehicle Motion Cues
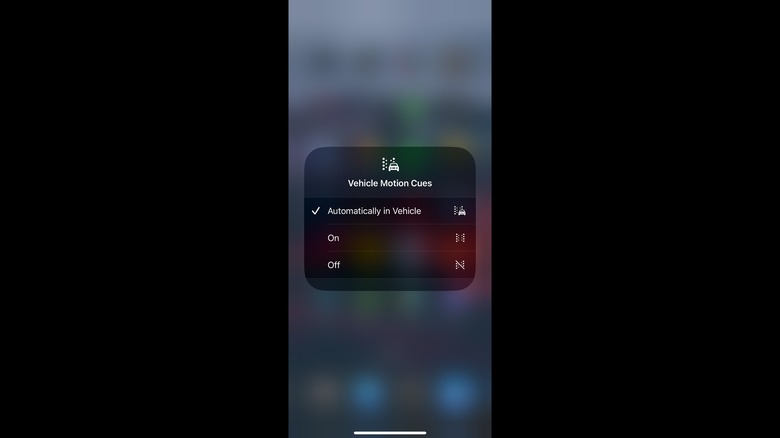
Motion sickness can be incredibly debilitating, whether you're trying not to hurl chunks while playing VR or simply using your phone in the car — even the prospect of a simple road trip challenging. The only way to stop the motion sickness is to not use your phone at all — so, no entertainment for the ride. That may change with Vehicle Motion Cues in iOS 18. Edit your Control Center and add Vehicle Motion Cues to your control panel, then enable it to work automatically; it should switch on when it detects that you're in motion. If not, enable it manually.
You should now see a series of dots on the sides of your screen that move slowly up and down the screen (and side to side, when turning) according to your vehicle's speed. In theory, this should help because it mitigates the sensory conflict that causes motion sickness. Rather than being totally stationary, the screen now has a semblance of movement relative to the road outside the window. It remains to be seen whether this is an effective deterrent against motion sickness, but it is further proof that Apple is at the top of its game when it comes to the iPhone's accessibility features. As someone known to go green in the face far too easily, I certainly appreciate the thoughtfulness.
Grant a guest access to your smart home
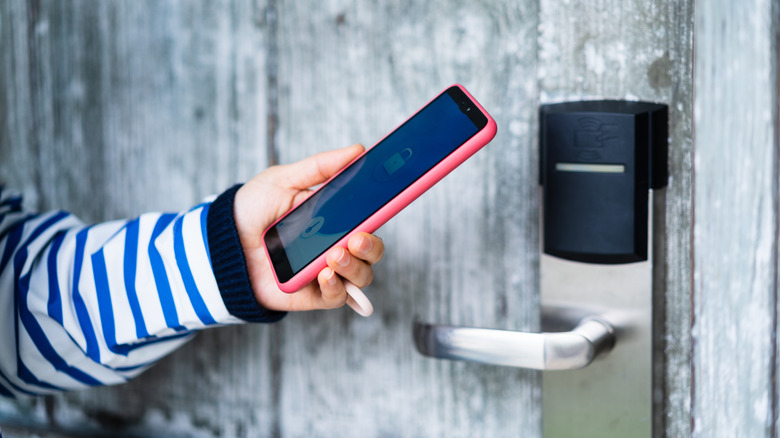
There's not always an easy way to temporarily grant someone access to your home via the smart lock or smart garage door opener. Many smart locks — like the SwitchBot Lock Pro — allow you to set up temporary or one-time passcodes, but this can be a bit of a hassle if you have people regularly staying over for short periods while you're not there. Instead of dishing out your own passcode or trying another problematic security workaround, iOS 18 now allows you to easily grant temporary access to another iPhone user.
It all works from your HomeKit and the Home app. All you have to do is invite people, choose which access to give them, and decide for how long — with the option to revoke access as needed. Importantly, your chosen guests cannot control your smart home unless they are physically present. There's no chance a visiting family member will accidentally butt-dial open the front door while on the go. So, your home stays locked down and you don't have to rely on people who may be a bit lax on the security side of things. It may also prove to be a helpful feature for those who run an Airbnb.
Save hikes offline
Ever since the iPhone 14 debuted crash detection and SOS via satellite, the iPhone has become the best device to have in a collision. Just Google "iPhone saves crash victim" and you'll find all kinds of stories where someone (left unresponsive after a huge crash) was saved thanks to their iPhone hailing emergency services automatically. Now, iOS 18 may soon be a lifesaver in a very different kind of emergency: getting lost during a hike. All it takes is one wrong turn or a quick detour off the beaten path to be stranded far beyond the reach of cell networks. Thanks to the ability to save hikes offline, users with a poor sense of direction have better peace of mind.
You'll have to use Apple Maps for this one. Navigate to the hike you plan on taking, and if Apple Maps has it, tap Add to Library. If a particular hike isn't supported by Apple Maps, you can simply make your own; create a starting point and then draw out your route. Double-check that it's saved offline before hitting the trailhead. Later, you should be able to get fairly accurate GPS directions even when in a no-service area. Better yet, Apple Maps will give you turn-by-turn walking directions so you can enjoy the view rather than be staring at your phone the whole time.
Change up the lock screen buttons
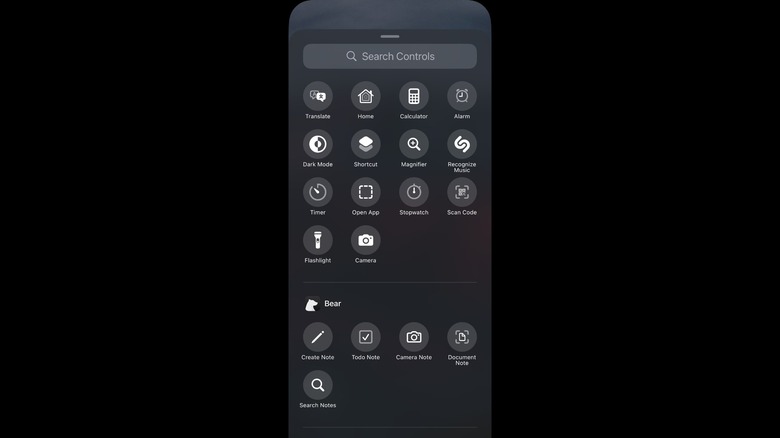
For far too long, the lock screen had only two buttons on the bottom corners: the flashlight and the camera. The camera button was redundant since swiping left from the right edge of the screen would bring up the camera much easier, but you had no option to change that button. iOS 18 has finally deigned to let us swap it out and choose a control we like for both buttons. To do this, open the lock screen customization menu by long-pressing on your lock screen and tapping customize. You can then use the minus icon to remove the controls you don't want and the plus icon to replace them with those you do.
There are quite a few controls to choose from. You can quick open Home, the calculator, your alarms, Shazam, a specific app, and many more. There's even support for accessibility features and shortcuts. Really, you can do just about anything now from your lock screen controls. And if you never used them — or you prefer the action button introduced on the 15 Pro — you can remove them entirely.
