5 Easy Ways To Free Up Storage Space On Windows 11
Using a Windows 11 computer is a great experience, but the accumulation of files, apps, and system updates can lead to storage space issues over time. Running out of storage is never ideal, as it not only prevents you from downloading new apps, files, and essential Windows updates, but can also lead to a Windows laptop or PC with slow performance. This problem is particularly common on devices with smaller hard drives, and while upgrading to a larger drive is a good option, it's not always practical or feasible.
Fortunately, there are several things you can do to fix this particular issue, and you can do so without using any third-party storage cleanup tools. Windows has built-in features like Disk Cleanup and Storage Sense, or you can manually delete unwanted apps and files from your PC. Below, we'll walk you through some practical ways to clear storage space on your Windows 11 system, helping to boost performance and keep your device running smoothly.
Run the Disk Cleanup tool
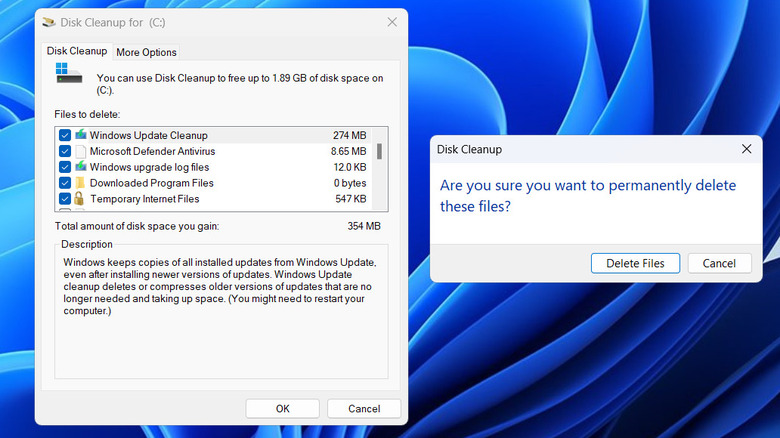
Your Windows 11 PC may have various unnecessary files, such as cached data, recycle bin contents, temporary files, and even old Windows update files. Running the Disk Cleanup tool in Windows 11 is a simple and effective way to remove these files. This will allow you to free up storage space without deleting your apps or personal files. Here's how you can run the Disk Cleanup tool on Windows:
- Press Windows + S to open the search menu.
- Search for disk cleanup in the search bar and select the first result that appears.
- Use the drop-down menu to select your primary drive and click OK.
- Click the "Cleanup system files" button, select your primary drive again, and hit OK.
- Under Files to delete, use the checkboxes to select the temporary files you want to remove. You can click a file type to view its description.
- Click OK and then "Delete Files" to confirm.
Enable Storage Sense
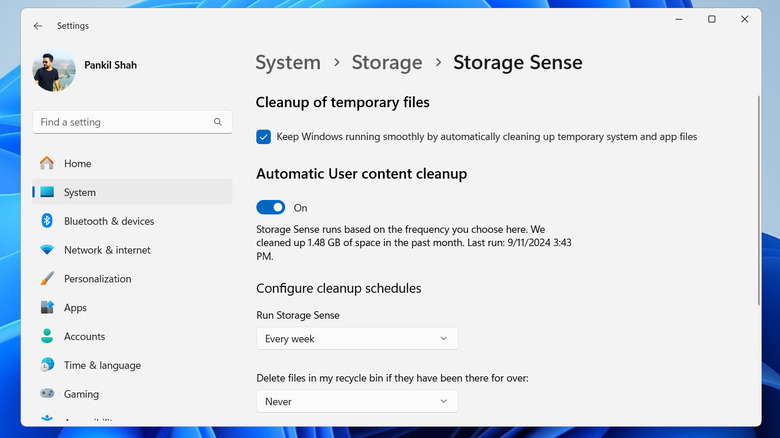
Storage Sense is a useful feature in Windows 11 that automatically frees up disk space by deleting temporary files, emptying the Recycle Bin, and removing old files from the Downloads folder. Once set up, Storage Sense runs at specified intervals to clear unnecessary files and free up storage space. To enable Storage Sense in Windows 11:
- Press Windows + I to open the Settings app and head to System > Storage.
- Under Storage management, enable the Storage Sense toggle.
- Click on Storage Sense to open configuration options.
- Tick the "Keep Windows running smoothly by automatically cleaning up temporary system and app files" checkbox.
- Turn on the "Automatic User content cleanup" option.
- Click the drop-down menu under Run Storage Sense to choose one of the following options: Every day, Every week, Every month, or During low free disk space.
- Configure Storage Sense to automatically delete files from the Recycle Bin and the Downloads folder at your preferred intervals by selecting the appropriate options from the drop-down menus.
- Click the Run Storage Sense now button to run the tool manually.
Delete unwanted apps and user accounts
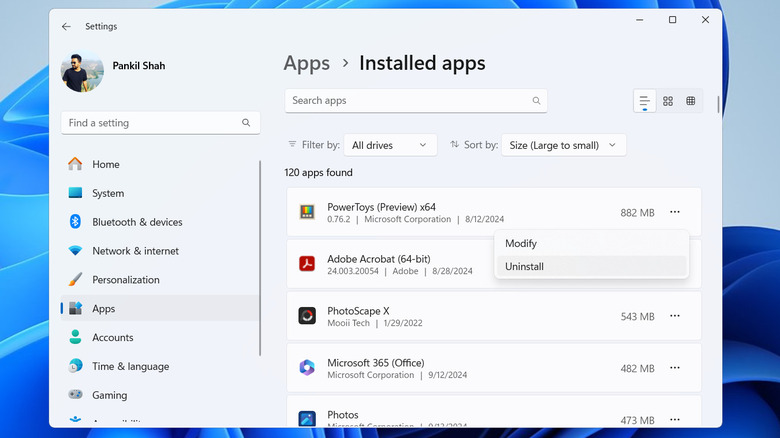
Apps you've downloaded from the Microsoft Store, along with preinstalled ones, can often take up a significant amount of storage. Many of these apps run in the background and consume valuable space without you even noticing. Deleting the apps you no longer use or need is a quick way to clear storage. To uninstall apps from your Windows 11 PC:
- Press Windows + I to open the Settings app.
- Head to the Apps tab and click on Installed apps.
- Use the Sort by drop-down menu to select Size (Large to small).
- Go through the list to find apps you don't need.
- Click the three-dot icon next to an app and select "Uninstall."
- Select "Uninstall" to confirm.
Another useful step is to remove any user accounts you no longer need. To do this, open the Settings app and head to Accounts > Other users. Select the account you don't need, click Remove, and hit the "Delete account and data" button to confirm.
Find and move large files to the cloud or an external storage
A quick way to free up storage on your PC is by locating large files and moving them to a cloud storage service like OneDrive, Google Drive, or Dropbox. Alternatively, if you prefer offline storage, you can transfer files to an external hard drive or USB stick. Just connect the storage device, drag and drop the files, and you're all set.
This approach is particularly useful if your PC has a large number of videos, photos, and other media files, which can take up significant hard drive space in Windows. To find large files on your computer, press Windows + E to open File Explorer and navigate to This PC. In the search box, type "size:Huge" (without quotes) and hit Enter to find files that are 1 to 4 GB. You can also enter "size:Gigantic" (without quotes) to find files that are larger than 4 GB. Once identified, move these files off of your PC.
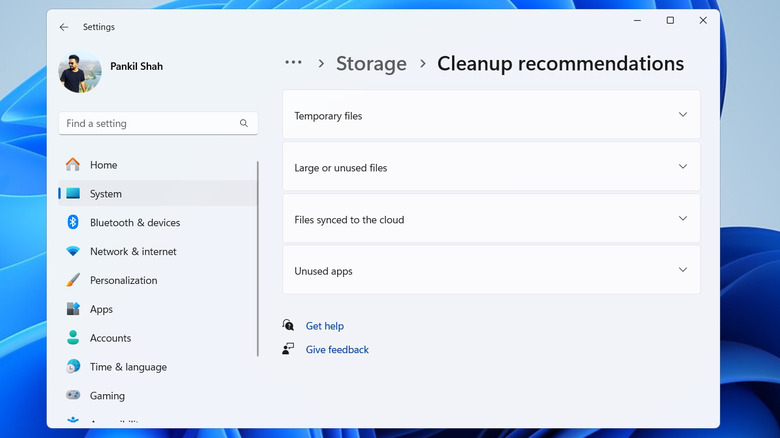
You can also use the Settings app to remove large files or those already backed up to the cloud. To do this, open the Settings app and head to System > Storage > Cleanup recommendations. Here, expand the "Large or unused files" and "Files synced to the cloud" menus. Then, use the checkboxes to select the files you don't need and click Clean.
Use the Compact OS command-line tool
Windows 11 includes a built-in feature called Compact OS, which compresses system files and apps to reduce the overall space occupied by the OS. This tool is especially useful for devices with limited storage capacity, such as tablets or laptops with small HDDs or SSDs. The best part is that Compact OS compresses system files without impacting system performance, so it's worth trying if you need additional storage. Here are the steps to follow:
- Right-click on the Start icon on the taskbar and select Terminal (Admin) from the list.
- Select Yes when the User Account Control (UAC) appears.
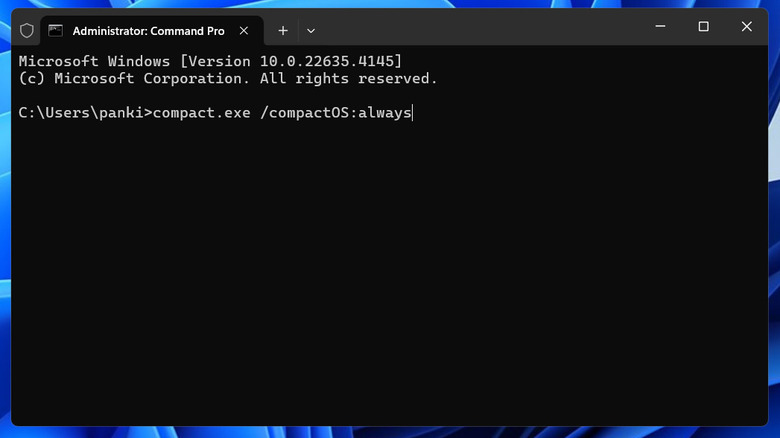
- Type this command and hit Enter: compact.exe /compactOS:always
The Compact OS command is reversible, so if you ever need to undo the above changes, simply open the Terminal app again and run this command: compact.exe /compactOS:never
While this method may not free up a significant amount of space — typically around 2-3 GB — it's a quick and effective way to gain extra room, especially on computers where every gigabyte counts.