How To Format A USB Drive To FAT32 On Windows And Mac

Amid the widespread shift to subscription-based cloud storage solutions, relying on good-old physical drives can be a reassuring sense of independence. Whether you're trying to repurpose an old hard drive, or utilize a new one as external storage for your Android phone, picking the right file system format can help with optimization and alleviate any compatibility issues later down the road.
While most modern hard drives make use of the NTFS file system on Windows and APFS on macOS, both of which offer a wide array of features — when it comes to compatibility, FAT32 reigns supreme. Despite its limitations, it is the go-to format for smaller capacity USB drives, and is relied heavily upon for various applications, including firmware upgrades, or quick file transfers.
If you own a USB thumb drive that you wish to format to FAT32, doing so is quite straightforward. However, it's good to note that this aged file system comes with a few glaring downsides. Individual files stored on a FAT32 drive cannot be larger than 4GB each, and come with no encryption by default. Still, its simple file structure makes it great for reliability across different platforms.
Format a drive to FAT32 on Windows
Hard drives formatted to NTFS work best with Windows and enjoy advanced features like encryption and better performance. The operating system still provides a built-in way to quickly restructure a USB drive to FAT32, if required, and the steps are identical for both Windows 10 and 11. A fresh format is also a handy solution if your USB drive is not showing up on Windows, or is acting unreliable.
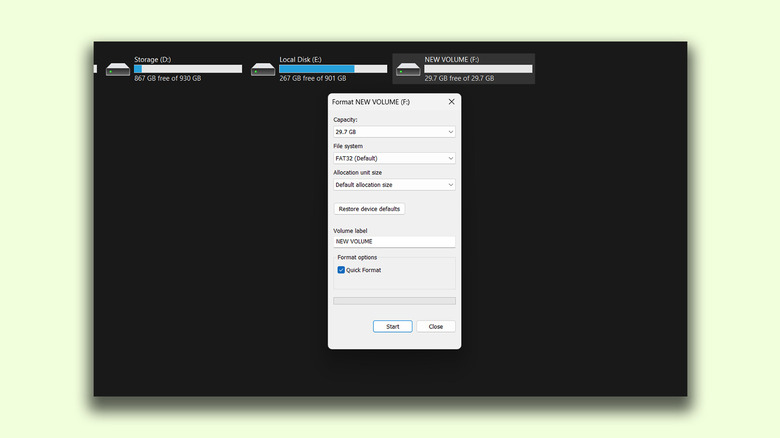
- Plug in your USB thumb or hard drive to your Windows computer.
- Open File Explorer and navigate to "This PC". You should be able to see a list of all available disks on your machine, including the one you just connected.
- Right-click on your USB drive, and click on "Format".
- Expand the "File system" dropdown menu, and select "FAT32" from the list.
- You can change the allocation size, or select "Default allocation size" if you are unsure.
- Click on "Start" to proceed with the format.
Leaving the "Quick Format" option selected will perform the wipe much quicker, but is less thorough than a complete wipe that scans for any bad sectors and makes sure the deleted files are not recoverable. Regardless of which option you select, your USB drive should now be formatted as FAT32 and ready for use.
Format a drive to FAT32 on macOS
Much like on Windows, you can format an external drive on Mac with just a few clicks. You can find the "Erase" option by either locating the USB drive in Finder and right-clicking it, or through the dedicated Disk Utility app preinstalled on macOS.
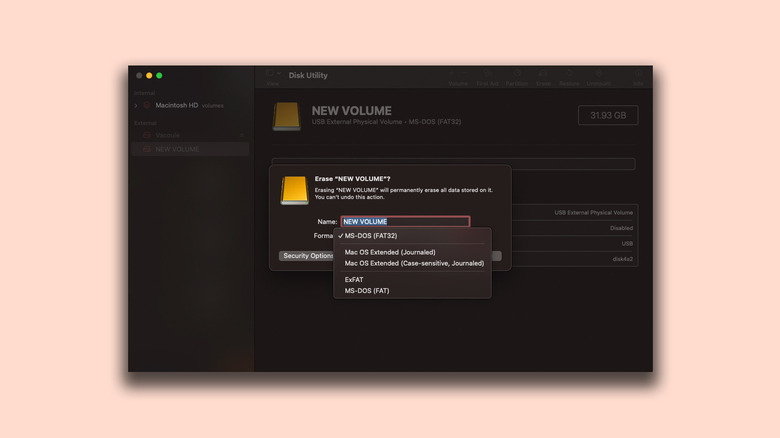
- Connect your USB drive to your Mac.
- Open the Disk Utility app. You can do so by initiating a Spotlight search using Command + Space, and then searching for the program.
- On the app's left pane, select the name of your USB drive.
- From the options at the top, click on "Erase". A new window will pop up displaying settings for formatting the drive.
- Select "MS-DOS (FAT32)" from the "Format" dropdown menu. You can rename your drive at this stage if you wish to.
- Confirm by clicking on "Erase".
Depending on the size of the drive, the formatting process should be completed momentarily. You can now write and read files to and from this drive on any Mac computer. Don't forget to safely eject the hard drive on macOS, since the operating system doesn't play well when it comes to force ejecting external media.