5 Adobe Lightroom Features That Will Level Up Your Photo Editing

Adobe Lightroom is one of the best mobile apps for photo editing. It's packed with features that allow professionals to do in-depth editing on the go, all within an intuitive interface that amateurs can also navigate easily. You can edit RAW files, apply preset filters to change the feel of your photos, remove blemishes or unwanted objects, and get inspiration from other photographers in the Lightroom Community.
This range is impressive, of course, but there's a drawback. Several key features in the app can be easily overlooked because they've been tucked away to minimize clutter. If you're an amateur or hobbyist photographer looking to improve your shots, we've put together a guide to these tools, including where to find them and how to use them. Even if you've already discovered some of these features, this guide will help you understand their functions and how to make the most of them for your photography.
Color Grading
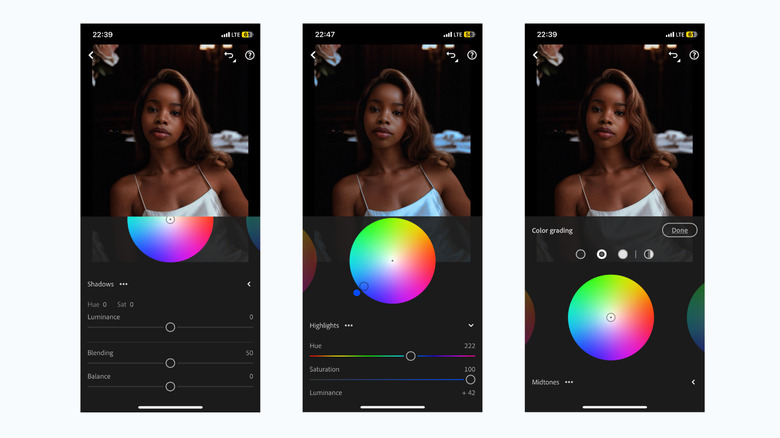
Color grading is like creating your own filter from scratch. It's a technical process that allows you to add color tints to the tonal values in your photo: the shadows, midtones, and highlights. If you're a new-ish photographer and these terms sound like Greek, here's a quick breakdown: shadows are the darker areas of an image, midtones are the shades of gray, and highlights are the brightest parts. Tweak these three to change the mood or vibe of your original photo, or to create a new focal point. Adding more light can make the image feel more vibrant and positive, reducing the exposure will give it a more dramatic feel, and adjusting midtones will change its warmth or coolness.
Because you can adjust the lighting and colors of your photos beyond what was originally captured, color grading offers significantly more creative flexibility. It's especially useful for visual projects like portfolios or social media feeds, as it helps you create a cohesive, personalized aesthetic across all your images.
To get started, import a photo into the app, then select Edit > Color > Grading. Use each of the three color wheels to change the tint of its respective tonal range. Two small circles will pop up on a color wheel when you make an adjustment. Drag the colored one outside the circle to adjust hue, and the hollow one in the center of the wheel to adjust saturation. Scroll up to use the sliders below to get a seamless blend of all the areas you're editing.
If you want to try your hands at pro-level color grading, you can explore one of the thousands of in-depth tutorials available on YouTube. Don't be afraid to practice, experiment, and make mistakes. You can always undo any changes you're not happy with.
Presets
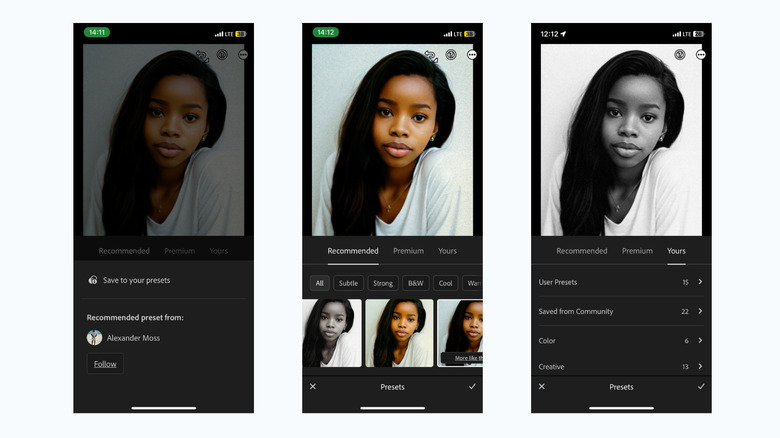
If you'd prefer to skip the hassle of editing your photos from scratch, presets are a great solution. These are essentially pre-made color grades or filters that can be applied to your photos or videos with just one click. They adjust multiple settings — like exposure, contrast, and color tones — simultaneously, giving you a quick, polished look without needing to fiddle with all the bells and whistles. While you can tweak the results of a preset, you can experiment with different presets until you find one that best matches the vibe you're aiming for.
In the Lightroom app, open the Presets menu by selecting the first icon at the bottom left — the one with overlapping circles and a shaded intersection. Adobe offers some free options in the Yours tab, and you can also download free Lightroom presets from third-party sites or upgrade to Premium for AI-recommended presets and entries from the community.
If you find a preset you like in the Recommended section (Premium only), tap the three-dot menu and choose Save to your presets, or select More like this to explore similar effects. You can also follow the preset's creator to see their posts in your Community feed and stay updated with their latest content.
When you apply a preset in the Premium or Yours sections, you can tap its thumbnail and use the Amount slider to adjust its intensity to better fit your photo. Also, if you make a manual edit that you're happy with, you can save it as a custom preset for future use by clicking the three-dot icon at the top right and choosing Create Preset.
The Remove tool
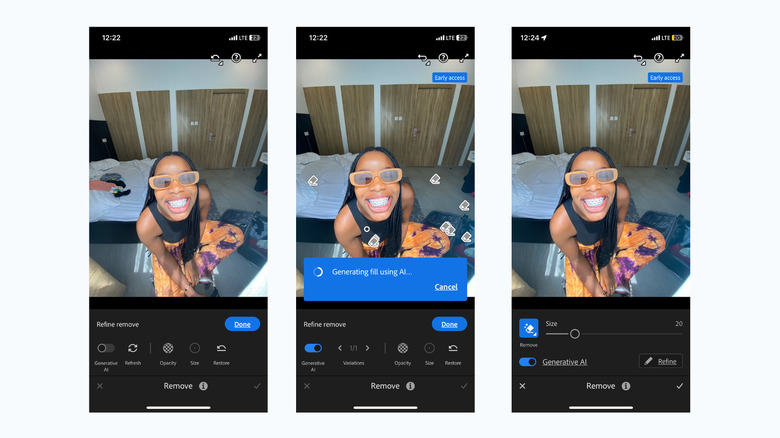
We've all taken those near-perfect pictures that are held back from greatness by a stray trash can or a random stranger in the background. Lightroom's Remove tool makes short work of removing intruders or intrusions from photos.
There are three manual methods for doing this: you can Remove, Heal, or Clone parts of the photo to mask the unwanted object. All three options work by replacing the selected area with another part of the image. You can also use the Generative AI Remove feature, which smartly removes objects and fills in the space seamlessly, giving you much cleaner results — especially with tricky placements or patterns. However, all the features in the Remove tool are only available on Lightroom Premium, but if you don't want to shell out ten bucks a month for the subscription, here are some other apps you can use to remove unwanted objects.
To access the Remove tool, tap the eraser icon on the far right of the bottom menu. You can select one of the three manual modes by tapping the blue icon next to the brush Size slider. With the Remove option selected, you can toggle on the Generative AI button to use the AI remover and then completely paint over the object you want to remove. After it processes the image, you'll also get a Refine feature that lets you pick from three different variations of the generated fillers.
Optics
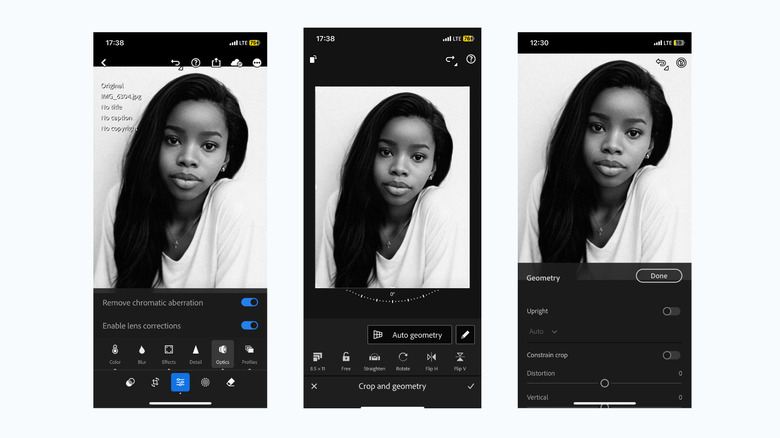
Lightroom is full of tools to help fine-tune the perspective and composition of your photos, which can be tricky to perfect, especially after you've been staring at the same image for too long and start to lose track of what looks right.
Start by exploring the Optics tab, located under the Edit menu (just swipe left). Here, you can toggle switches to Remove chromatic aberration, which corrects lens focus issues that create unwanted color fringing along high-contrast edges, and Enable lens corrections to fix distortion in angles or perspective. These distortions aren't always about technique — they often come from the camera or settings themselves, so it's super convenient to fix them with just a tap.
For better framing, head to the Crop tool. One tap on the Straighten icon will set a wonky photo straight, while the Auto Geometry feature (Premium only) resets the horizontal and vertical lines, adjusting both perspective and balance. This is particularly handy for architectural shots, but it works great for portraits and selfies too. If Auto Geometry doesn't give you the look you want, you can always tap the pen icon to manually tweak it yourself.
Background Blur
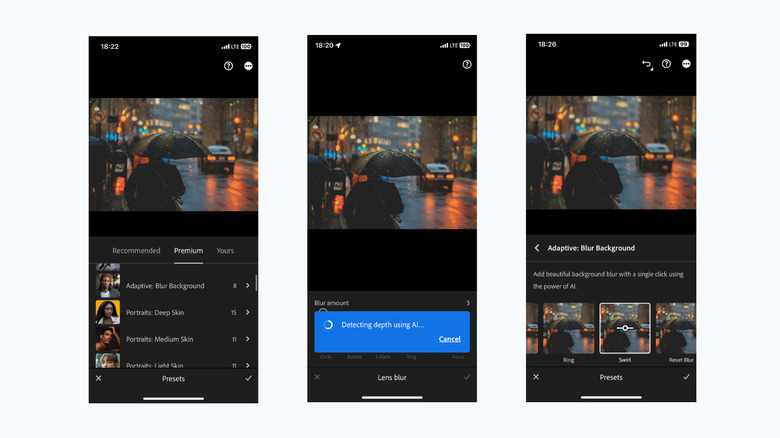
The bokeh effect is a great way to elevate your photos by creating depth and drawing attention to the subject, and Lightroom makes it simple to achieve. It enhances the background blur while sharpening the focal point, giving your photo that "pop" effect. Plus, it adds a nice touch to how light reflects off the blurred areas, improving the overall quality.
There are two ways to access the Lens Blur or bokeh effect in Lightroom. The first is through the Blur tool in the Edit menu, available only in the Premium version and powered by AI (you can preview the effect without Premium, but you can't apply it). You can choose from five bokeh styles — Circle, Bubble, 5-blade, Ring, and Cat eye — each offering a different way of refracting light to create unique blur effects. Once you've selected a style and applied it, you can fine-tune the focus with the Focus tool, adjusting which areas remain sharp and where the blur is applied.
The second option is to use the Adaptive Blur Background presets, which work similarly to the Lens Blur tool but with fewer steps. Also AI-powered and exclusive to Premium users, you'll find this feature under Presets > Premium > Adaptive: Blur Background. This option offers seven different blur effects, so you have more to work with than the Lens Blur tool. After selecting an effect, you can tweak the intensity with the Amount slider. If you're not satisfied with the outcome, there's a reset option at the end of the row to revert to your original image.