How To Create A New User On Windows 11

If you use a Windows 11 device in a multi-user environment, for example, in a large family, or in a small office setup with multiple workers, there's always a risk to your privacy. Other users can access your personal information and files, such as search history or your documents. However, this problem can be avoided by creating a separate profile for every user. That way, you can customize Windows 11 according to your preference and secure your personal data by adding a password to your profile.
Depending on the type of account you want, there are several ways to create a new user on Windows 11. You can create a new user with a Microsoft account, a local account, or a family account. The Microsoft account profile is created when the user wants to sync settings across devices or access Microsoft services like Xbox One, Office 365, OneDrive, and more. The local account is best for users who want privacy but don't need synchronization. The family account is used to add a child user and apply parental controls.
Creating a new user in Windows 11 is easy and can be done within a few steps. Remember, you need to have administrative rights on your current account to create a new one.
Add a Microsoft or local account user from Settings
The most straightforward way to add a new user to Windows 11 is through Settings. Here are the steps:
- Click the Start button and select Settings.
- Switch to the Accounts section on the left and select the Other users option on the right pane.
- Click the Add account button next to the Add other user.
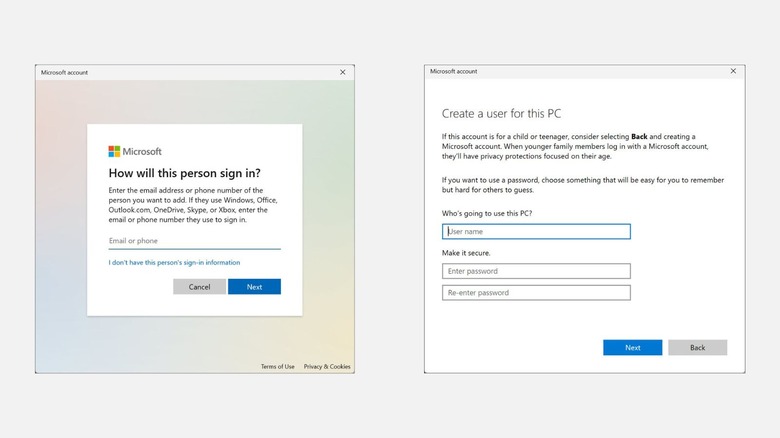
- From here, you have two options: to create a Microsoft account or a local account.
- To create a user with a Microsoft account:
- Enter the Microsoft account's email or phone number, and click the Next button.
- Next, click the Finish button, and that's it.
- When the user logs in with this email or phone number for the first time, they must enter the password to access their profile.
- To create a user with a local account:
- Click the "I don't have this person's sign-in information" option.
- Next, select the "Add a user without a Microsoft account" option.
- Then, enter the username for this account. You can skip entering the password if you are creating a profile for someone else, so that they can create their own password.
- If you decide to choose a password, you need to select three different security questions and answer them. This will be helpful in recovering the account if you forget the password.
- Finally, click the Next button to finish the process.
After the account is created, you can change its type, i.e. make it an Administrator. Look for the newly created account under the Other users section, expand it, and click the Change account type button. A new window will pop up. Expand the Account type drop-down and select Administrator.
Add a user as a family member from Settings
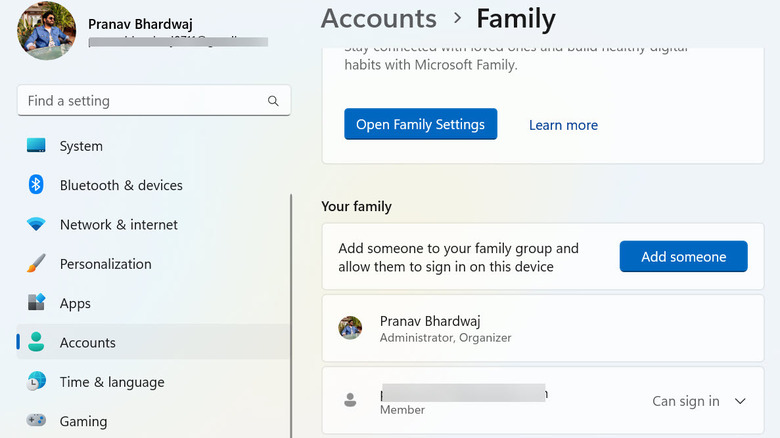
You can create a new user on Windows 11 by adding them to your family group under a Microsoft account. This is especially useful if you want to set up parental controls to track your child's activities on a Windows 11 device. You can set screen time limits, restrict content, and even monitor your child's online activity.
Here are the steps:
- Press Windows + i to launch Windows Settings.
- Switch to the Accounts tab on the left pane, and on the right, choose the Family option.
- Scroll down and click the Add someone button under the Your Family heading.
- Enter the email you want to add. If there's no email, click the "Create one for a child" option.
- Next, you'll be asked whether the new user will be an Organizer or a Member. Choose the appropriate option and click the Invite button to finish.
You can manage this added user from the Microsoft Family Safety web page.
Create a new Windows 11 user through Computer Management

Computer Management is a Windows utility that offers various tools, such as Task Scheduler, Disk Management, Event Viewer, Device Manager, and more. If you are in a professional environment and need to create multiple new users on Windows 11 quickly, the best way to do that is through Computer Management.
Follow these steps:
- Right-click on the Start button and select Computer Management from the list.
- Under the Computer Management window, expand the Local Users and Groups section on the left pane.
- Right-click on the Users folder and select the New User option.
- Enter the username, and an optional full name and description of the new user.
- Next, you can set the password if you like and enable the option that users must change the password at the next login. If you want more control, you can check the "User cannot change password" option.
- Finally, click the Create button. The window to create a new user will still be open. You can either close it or create another new user.
Computer Management is an efficient way to add a large number of users. However, you can only create local users through it.
Add a new user using Netplwiz command
Netplwiz, or Network Places Wizard, is another way to create a new user on Windows 11. It's a valuable tool for creating, deleting, and managing user accounts on the Windows system.
Here is how to create a new user using Network Places Wizard:
- Right-click on the Start button and select Run from the menu to open the Run dialog box.
- Type the command "netplwiz" and hit enter.
- Under the Users tab, click the Add button. You will be given two options: create a Microsoft account or a local account.
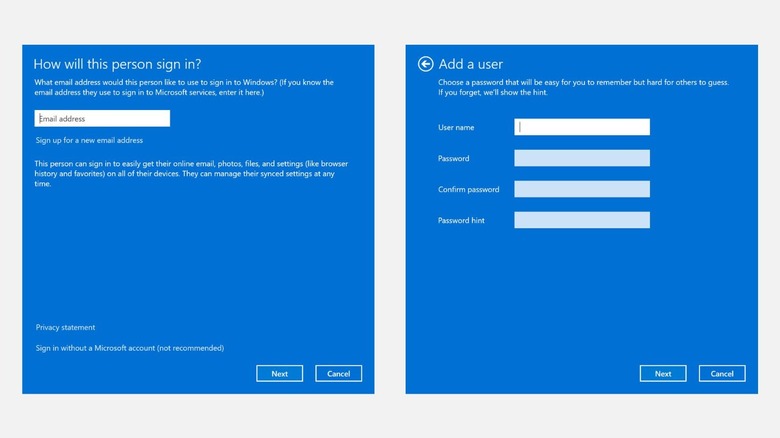
- If you want the new user to utilize the Microsoft services:
- Enter the email address associated with Microsoft and click the Next button.
- Follow the onscreen instructions to finish setting up the account.
- Use the same email address when the user logs in for the first time.
- If you want to create a local account:
- Click the "Sign in without a Microsoft account" option at the bottom.
- Next, click the Local account button.
- On the next window, type the username of the user and enter a password. Entering a password is optional.
- Click the Next button to create a new user, and finally, click the Finish button.
Add new users using Command Prompt
Command Prompt is one of the most efficient ways to create a new user on Windows 11, with further functionality beyond this simple process. You can create a new user with a single-line command, which is especially helpful when you have to add a large number of users. This approach is also helpful in situations when other methods don't work, for example, when you boot your system in Safe Mode with Command Prompt.
Here is the process:
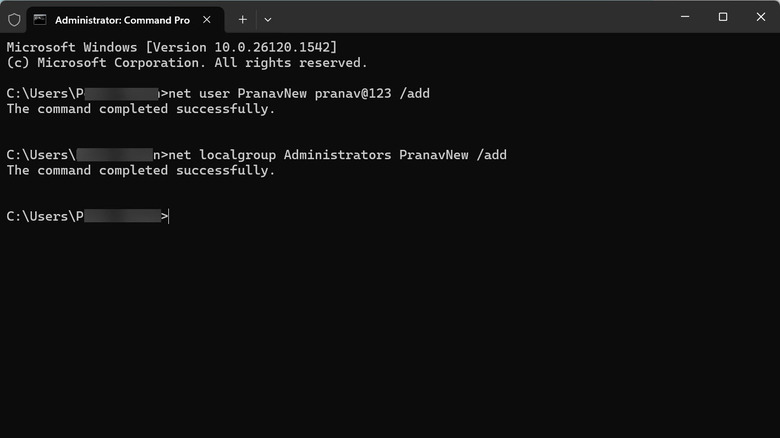
- Search for Command Prompt in the Windows search box, right-click on its icon, and select Run as Administrator.
- Now, type the command "net user [username] [password] /add." Replace [username] and [password] with the new user's desired username and password. Finally, press the enter key.
- If you need to add the user to a specific group (e.g. Administrators), use this command: "net localgroup Administrators [username] /add" and hit enter.