5 Night Mode Tips Every iPhone Photographer Should Know
We may receive a commission on purchases made from links.
While night photography was once reserved for professionals, the inclusion of Night mode on iPhones has changed the scenario. With this feature, your iPhone can capture poorly lit scenes with exceptional brightness and clarity without the hassle of carrying bulky fill lights or softboxes. All you have to do is point and hold your iPhone to capture a Night mode shot, and computational photography takes care of the rest.
For the uninitiated, an iPhone's Night mode takes multiple shots (over a longer duration), processes them to reduce noise and maintain natural colors, and combines them to generate one high-quality picture. Even though you don't get manual controls, you can tweak a few settings to get the best results, granted you know exactly what you're doing.
Night mode is available on iPhone 11 or newer models. It kicks in the moment you point your iPhone at a poorly lit scene. Depending on how dark the environment is, your iPhone's Night mode changes the exposure time between one and several seconds. The duration appears in the yellow Night mode icon at the top-left corner of the Camera app's screen. While this was a basic overview of the Night mode, we've compiled a list of five tips that will help you click the best night-time photographs.
Keep the iPhone steady for a crisp picture
As mentioned, Night mode clicks several pictures to capture as much light and information as possible. However, in the process, even the slightest movement can disturb the alignment of frames, leading to unclear pictures that are useless. To avoid this, remain completely still while clicking the photo in Night mode. If your phone is too heavy, hold it with both hands for added stability. To avoid any movement, consider leaning your body against a wall or a pole and holding the phone as close as possible. With iOS 14 and newer versions, your iPhone detects any movements and displays two crosshairs to help you maintain the alignment.
You can get even better results by setting the timer on your iPhone Camera and resting your phone against a solid surface, like on a bench, against a backpack, or a water bottle. However, before you do that, ensure that you lock focus on the subject by tapping and holding on it on the iPhone's screen.
If you're a professional photographer who can invest in accessories, consider getting a tripod. It not only helps keep your iPhone stable, but it also allows you to adjust the height and angle. You can get the Amazon Basics 50-inch Lightweight Tripod for $16.99, or if you want more height, the Sensyne 62-inch Phone Tripod is an excellent option. Using a tripod, you can capture exceptional photos of the setting sun on a beach.
Control the exposure
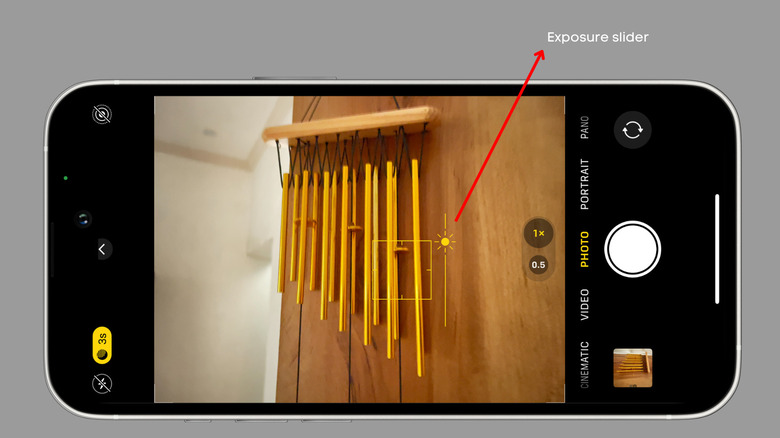
You can take even better pictures if you adjust the exposure manually, something we've also talked about in our article on 5 iPhone photography tips every iPhone owner should know. Once you tap on the screen to focus on a subject, adjust the exposure through the vertical slider to the right of the yellow square. Dragging up the slider increases exposure, thereby increasing the time your iPhone would take to click the picture aka capture time. Similarly, dragging the slider down lowers the exposure, which in turn, decreases the capture time.
Alternatively, you can tap on the upward-pointing arrow at the top middle of the viewfinder (or on the left if you're holding the iPhone horizontally) to reveal additional settings just above the shutter button. Hit the Night mode button, and then use the slider that appears above the shutter button to adjust the capture time, which ultimately controls the image's exposure.
Although the maximum exposure time isn't always the same, it usually results in a considerably bright image that increases visibility of the subject. However, if there are more than a few light sources in the scene, such as multiple streetlights, billboards, or fairy lights, a longer capture time could result in a grainy picture with blown-out highlights that doesn't look good. In such scenarios, consider clicking a test shot. If there are no details in the brighter areas or too many grains in the darker ones, decrease the capture time. On the other hand, if the subject isn't exposed properly, increase the capture time.
Leverage the available lights
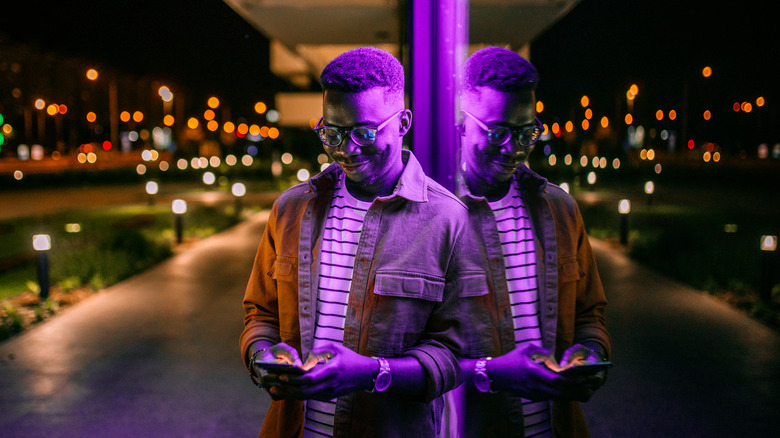
This trick will elevate your Night mode pictures to another level. While clicking pictures in darker surroundings, look for sources of light no matter how dim they are. It could be a streetlamp, a night lamp, overhead lights in the parking lot, or a neon poster in a cafe; just look for sources that are brighter than the rest of the space. Then, compose the frame in a manner that the placement of the subject and the light source complement each other.
Next, decrease the capture time by sliding down the exposure slider to the extent that the darker areas are just visible. Now, hit the shutter button and wait for your iPhone to click the picture. More often than not, such shots have higher contrast and a natural vignette effect, giving it a cinematic feel. If the subject isn't bright enough, consider using another phone's screen or flashlight at the dimmest setting to help light it.
Similarly, you can capture silhouettes by placing the subject in front of a larger, brighter light source, such as a car's headlights or a TV screen. The key is choosing a light source that is bigger than your subject or immensely bright. Once you find it, place the subject in front of the light source and click the picture.
Include reflections and leading lines in your frame
While clicking pictures at night, look for reflective surfaces like glass on windows, polished metal on vehicles, or water. Now, frame the picture in such a way that the reflections from one or more of these surfaces add the illusion of depth. For instance, you can capture a city skyline reflection in a puddle to capture a surreal image. Similarly, you can click captivating pictures of the street, especially after it has rained, wherein the reflections on the road add striking patterns and textures. While you try these methods, don't forget to click a test shot using the Night mode and then adjust the exposure (or the capture time) accordingly.
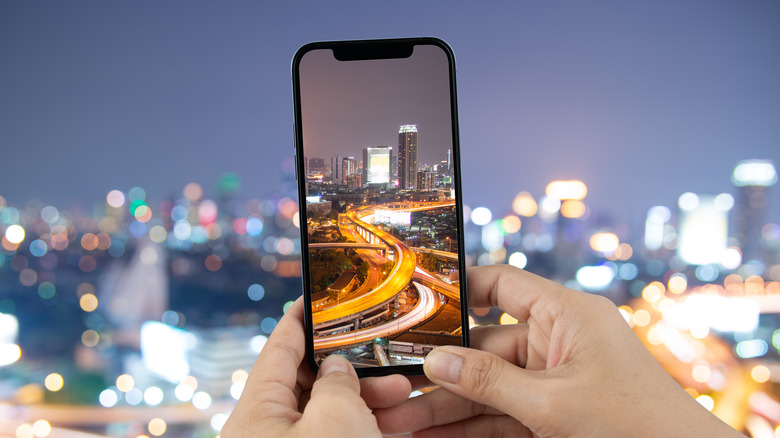
Have you ever heard about leading lines? It's a key smartphone photography tip wherein the photographer captures visual elements that help guide the viewer's eye through the image. While the method applies to almost all forms of photography, you can use it in the Night mode to capture amazing cityscapes with bright streetlights and the shadows they cast. It doesn't matter whether you're clicking the high-mounted streetlights or the grounded pavement lights as long as they form a pattern and help guide the viewer's gaze. This trick helps you add a sense of direction and drama to your Night mode picture.
Edit your Night mode pictures using iPhone's Photos app
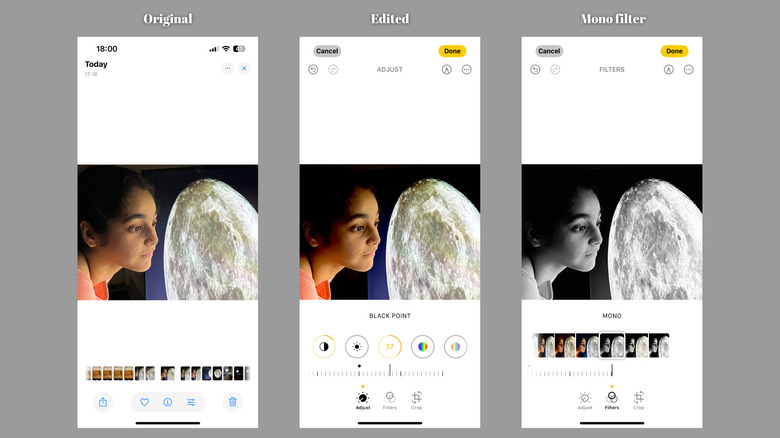
Yes, the iPhone does an excellent job of capturing Night mode pictures, but you can always elevate them using the editor in the Photos app by tweaking specific settings like Shadows, Contrast, and Black Point. The Shadows setting lets you adjust the brightness and details in the darker areas. You can uplift the darker areas by increasing the setting, or you can achieve a more dramatic or moody feel by decreasing it.
While the Shadows setting focuses specifically on the darker parts of the picture, Contrast helps you control the difference between the lighter and the darker parts, which determines the overall definition of the image. You can also experiment with the Black Point setting, which impacts the darkest portions of the image. Depending on the photo, increasing this setting can create a natural vignette effect. You can also adjust other settings, such as Exposure and Brilliance, to achieve the desired results.
Our last tip for you is to apply the Mono filter available in the Photos app. As the name suggests, the filter applies a black-and-white theme to your picture, giving it a classic, retro look that turns the viewer's attention to the form and texture in the image. You can also select Mono from the available filters before clicking a picture. If you don't like how the picture turns out, you can remove the filter in the Photos app and edit it manually.