How To Digitize Your Film Negatives Using Your Smartphone Camera

Film cameras may have revolutionized the photography landscape, but it's probably been a few years since you last came across one. Given the unmatched convenience digital cameras offer, many photography enthusiasts simply prefer to use digital gear instead of their analog counterparts. However, while film cameras have become a thing of the past, you might still own a lot of film negatives. They contain too many precious memories to be thrown out, but at the same time, it's hard to fully enjoy them since they're in negative form and stashed away in dark drawers.
Thankfully, there are many ways to digitize film negatives and keep them on your phone or displayed in smart picture frames. Professional digitizing companies provide high-quality results but at an equally high cost, with some priced at over $500 for 500 photos. You can also buy a high-quality scanner, but they can cost as much as $500 too. If you're after a more affordable method and are fine with lower-quality photos, you can also try digitizing your film negatives using your smartphone. We'll walk you through the process step-by-step.
Set up a DIY mobile film scanner
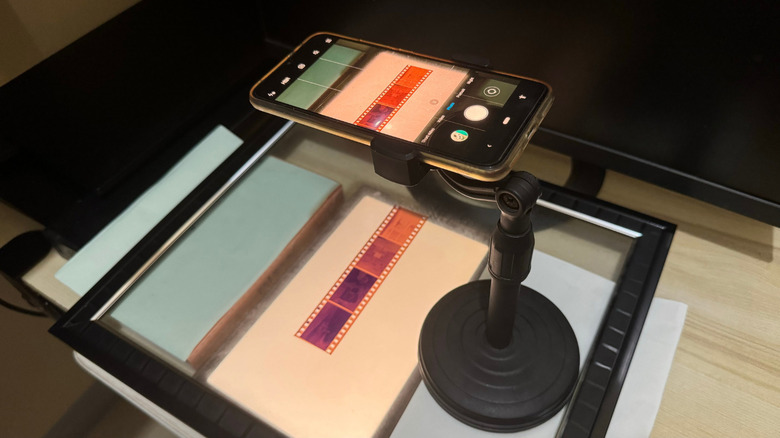
Before you take photos of your film negatives with your smartphone, you should first assemble a DIY mobile film scanner. Here's how to get that done:
- Get your phone ready. It's best to use iPhone or Android models with great cameras to achieve clear and crisp results.
- Acquire a light source. This will serve as the background for your negatives, making the film easier for your phone camera to see. You can use any cheap light pad or a large-screen device like your iPad, Android tablet, or convertible laptop. If you're using the latter, set your device's brightness to maximum, and either install a lightbox app like Lightbox for Android or Lightbox Trace for iPad, or open an online white screen on your device's browser (Photomyne's Backlight and LEDR's pure white screen test are excellent options).
- Lay your light source on a flat surface in a dark room.
- Place a separator on top of the light source. This can be as simple as two pillars of books with a transparent glass in the middle. A separator ensures your film is a bit elevated from your light source to prevent the light from washing out your photos. How high your separator is depends on the brightness of your light source. You can test out different heights, but about an inch or two away provides just enough light without the film being too washed out.
- Put your film on the separator. Make sure the image you want is in the middle of the glass.
- If your film isn't flat, use a film holder like pixl-latr, a picture frame glass, or a transparent sheet to keep it in place.
- Set your phone parallel to the film. You can simply hold it or use an adjustable phone stand or gooseneck phone holder.
Once you have this all set up, you're ready to digitize your negatives using three options.
Option 1: Scan your film with FilmBox

FilmBox is a highly rated negative film scanner app available for iOS and Android. This app makes digitizing your negatives easier as it automatically scans them for you and outputs images requiring little to no editing. Follow these steps to use FilmBox on your smartphone:
- Install FilmBox by Photomyne on your iPhone or Android.
- Launch the app.
- On the homepage, tap on Start scanning.
- Grant the app access to your camera when prompted.
- Line the edges of the FilmBox camera with the edges of the negative (the two sides with holes).
- Long-press on the capture button for three seconds. FilmBox will then automatically crop and digitize your photo.
- Repeat for the rest of your film roll.
- Once you're done snapping photos, hit Done in the upper right corner.
- (Optional) Edit the digitized negatives in-app:
- Back on the homepage, tap on your digitized negative to open it.
- Select the Edit button on the left.
- Modify the image to your liking. You can rotate the photo, crop it, flip it, and apply a filter (e.g., black and white, warm, dynamic).
- Press Done to save your changes.
- To sharpen your image with faces, tap on the diamond icon at the top and select Apply Sharpy.
- Save the digitized images to your device:
- Tap on the photo on the homepage.
- Go to Share at the top.
- Select your photos from the FilmBox library.
- Press Save selected photos.
- Skip the email prompt.
- Choose whether to save in good or print quality.
- Give FilmBox permission to access your photos.
It's important to note that FilmBox isn't entirely free of charge. Only your first few scans are free, so this might not be the best option if you have dozens of film rolls to digitize.
Option 2: Edit your negative in Image Toolbox
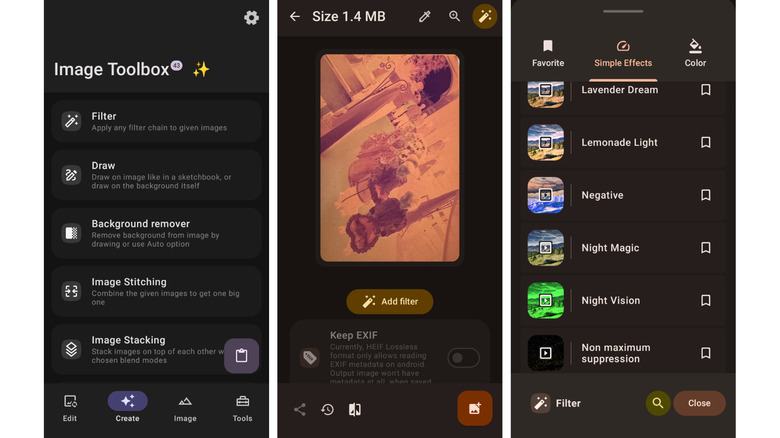
Image Toolbox is a photo editor app for Android, but what makes it stand out is that it's open-source (so it's completely free of charge) and it works completely offline with no accounts required. While it isn't a dedicated film scanner app, you can still use it for digitizing your film negative. Here's how:
- Use your Android's native camera to take a photo of your film negative.
- Install Image Toolbox from the Google Play Store or get the latest version from its GitHub page.
- Open Image Toolbox.
- Allow the app access to your media and storage.
- (Optional) If you captured parts of other negative frames in the photo, crop them out so only your preferred frame is seen:
- On the Edit tab, go to Crop.
- Tap on Pick Image.
- Select your picture.
- Hit Pick to import it to the Image Toolbox.
- Drag the sides and corners of the crop box until you have the desired section in frame.
- Tap on Crop to finish.
- Select the Save button on the bottom right.
- Apply Image Toolbox's negative filter on your photo to invert its colors:
- Switch to the Create tab.
- Open the Filter option.
- Select Full Filter.
- Choose your photo from the library.
- Press Pick to go back to the editor interface.
- Tap on Add filter.
- Under Simple Effects, scroll down to Negative.
- (Optional) Favorite the Negative effect for easier access.
- Wait for the processed photo to appear.
If the output after applying the filter is still too far from the colors you expect on the photo, you can add more filters to edit it further. Image Toolbox lets you add white balance, brightness, and sharpen effects to the image, along with color filters like Saturation, Color Matrix 3x3, and Color Balance. When you achieve your desired colors, press Save to save your edited photo.
Option 3: Use Adobe Lightroom to process your film
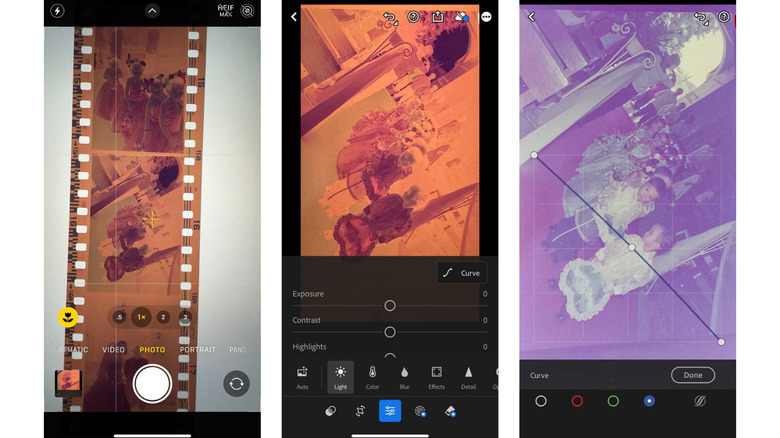
Adobe Lightroom is one of the best photo editing apps on iPhone and Android and comes complete with a tone curve feature that allows you to manually adjust the colors of the photo as you see fit. This gives you more control over how the image will look. You can access this feature for free, so there's no need to avail yourself of any of Lightroom's in-app purchases. Here's how to use Lightroom for digitizing your film:
- Open your preferred camera app (either the native app or any third-party cameras you use).
- Snap a photo of the negative.
- Crop the photo to leave only the frame you want to digitize.
- Download and install Adobe Lightroom on your iOS or Android phone.
- Launch Lightroom.
- Sign into Lightroom.
- Allow the app to access your photo library.
- Import the cropped photo by going to the Device tab and selecting your image from the album.
- In the Lightroom editor interface, tap on Light at the bottom.
- Press Curve.
- Adjust the red curve by dragging the top-right point down and the bottom-left point up.
- Do the same for the blue and green curves. This inverts the colors of the negative.
- Once you have the colors inverted, continue adjusting the points of each curve to get the colors you desire. You can create new points on the curve by holding on a certain section and then dragging it to your preferred position. You can also delete points on the curve by double tapping on them. This step might take a lot of time and trial and error, though, so just be patient.
- After getting the right blend of colors, hit Done.
- Save the edited image by clicking the three-dot menu at the top and tapping on Save copy to device.
You should now see your image in your photos app.
Option 4: Do the film inversion on GIMP
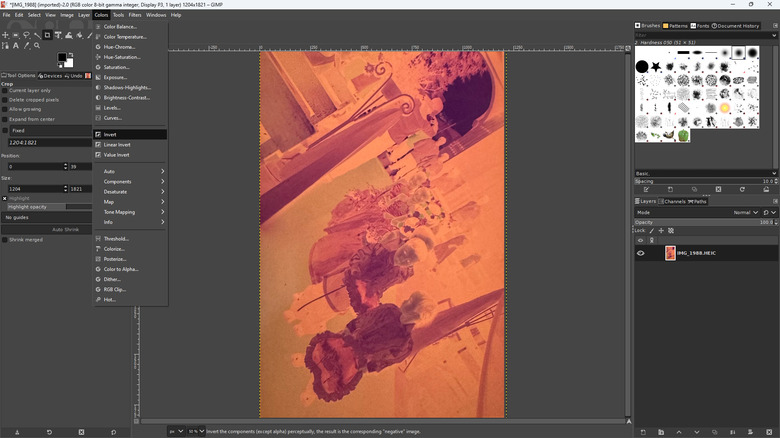
If you find processing the photos of your film negatives in Lightroom too tedious and technical, you might be better off with a desktop alternative. GIMP is an excellent option for this, not only because it's completely free to install and use on Windows, Mac, and Linux, but also because transforming raw photos of negatives in GIMP is pretty much a walk in the park, unlike Lightroom. Here's what you need to do to post-process your images on GIMP:
- Take a picture of your film negative with your native smartphone camera.
- Download and install GIMP on your computer.
- Open GIMP.
- Import the photo to GIMP:
- Go to File at the upper-left corner.
- Select Open.
- Locate the image of your negative.
- Hit Open to import it.
- (Optional) Crop the photo if needed:
- Navigate to Tools > Transform Tools > Crop. Alternatively, press Shift + C.
- Click and drag the crop tool to cover the section you wish to save.
- When necessary, adjust the individual borders of the crop box by hovering over a border and dragging it to your desired position. You can also opt to move the entire box itself by pressing and holding the inside of the box and dragging it around.
- Click anywhere inside the crop box to proceed with cropping the image.
- Correct the colors of your negative:
- Select Colors at the top.
- Choose Auto > White Balance.
- Go to Colors again.
- Click on Invert.
Feel free to play around with the other options available in the Colors menu to get your photo closer to the real colors. Once you're happy with the image, save it to your computer. Press File > Export As and hit Export.
Option 5: Capture the negatives with an Instagram story filter
One thing you probably didn't know you could do on Instagram is scan film negatives. Yes, the app comes with a nifty story filter that digitizes the negatives for you. So if you're looking for an easy and unlimited way to scan your film without having to deal with complicated photo manipulation, then Instagram might just be what you need. Here's how to use it to digitize your negative:
- Launch Instagram.
- Tap on the plus button on your profile at the top to create a story.
- Select Camera.
- In the filter options, keep scrolling left until you get to Browse effects at the very end.
- Open Browse effects.
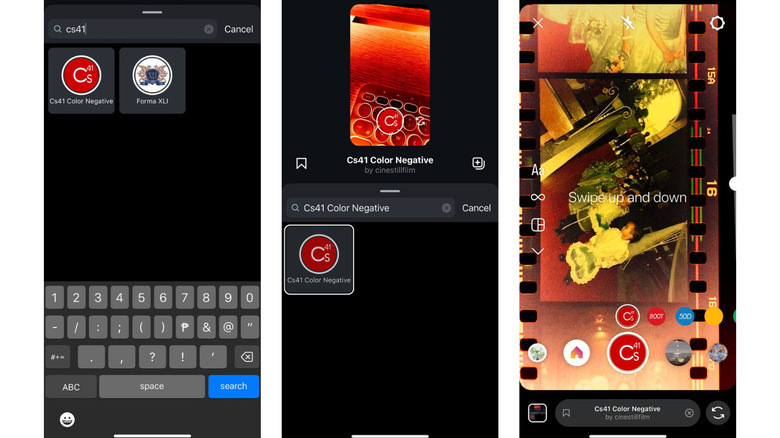
- Search for Cs41 Color Negative by cinestillfilm.
- Press the save icon to save the filter to your library for easy access later.
- Tap on the preview to use the filter.
- Point your camera at the negative. Keep it as centered as possible.
- (Optional) Change the filter to the other options (800T, 50D, yellow, green), whichever suits your negative better.
- Snap a photo by tapping on the capture button.
- Save your image. Open the story menu in the upper right corner and press Save.
- (Optional) Import the image to a photo editor if you want to crop it and do other basic editing like rotate, sharpen, and adjust brightness, contrast, and hues.
Although Cs41 Color Negative does a decent job of scanning your film negatives, the photos may not have colors as true to their original ones. If you're not satisfied with the results, you can just use the filter to view your negatives and pick your favorites before you scan them using a limited-scan app such as FilmBox.