12 Meta Quest Hidden Features That Will Change How You Use Your Headset

Silicon Valley has been telling us for over a decade that VR will become the next big thing. And, well, it still isn't. While certainly much more affordable than it used to be, it's still an extra device you have to buy — $500 for the Meta Quest 3, or $200 after the Meta Quest 2's price drop. With the exception of party essentials like "Beat Saber," and rare AAA titles like "Half-Life: Alyx," there are fewer games to play, and fewer still that keep you coming back. The Metaverse was so bad even employees avoided it, and practical applications for headsets like virtual workspaces are cool in theory, but flawed in practice.
None of this has deterred Mark Zuckerberg and his trillion-dollar Meta from making Meta Quest the best headset out there. Despite the slow adoption and lack of interest, you can feel that dedication the second you put on a Meta Quest for the first time.
If you decided to take the plunge and buy one these headsets, levelling up your VR experience could be an attractive idea. The Quest lineup has a fairly easy learning curve, but tons of easter eggs and lesser-known features crop up the longer you use it, and some may escape your notice altogether. In that spirit, here are 12 hidden features on the Meta Quest you need to try right now.
Cast your gameplay to an external screen
Back in the Oculus Rift days sharing your VR experience was easy; the headset was connected directly to the computer, so all your friends and family could just watch the monitor to see what you were seeing. Not anymore. The Meta Quests can be totally cable-free. Those hilarious moments where you windmill your arms to keep balance walking the plank in "Richie's Plank Experience" will still be funny, sure, but it'll be a lot better if you cast your gameplay to an external device.
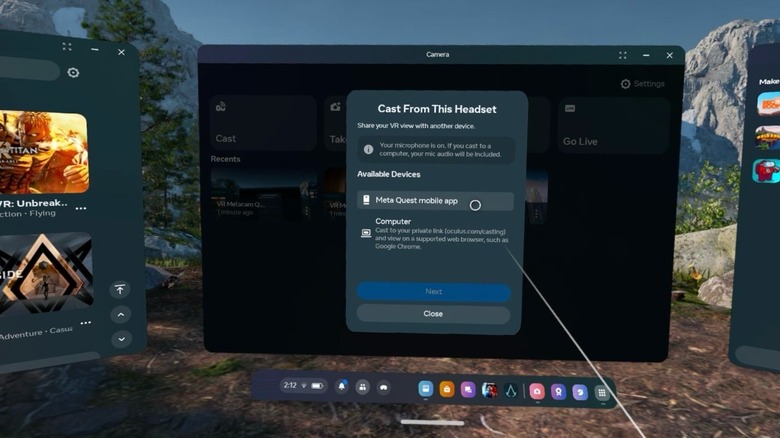
To do so, Meta requires you to download its Meta Quest mobile app first. Connect to the same Wi-fi network on your headset and external device, then log in into the Meta account on your headset. Then, you can either initiate casting from within the headset, or from your phone/computer. From the headset, open the universal menu, then go to Camera > Cast and choose a device; or go to Menu > Casting from your phone, choose your headset, and press start.
If you want to do so from a computer, go to oculus.com/casting and log in with that same Meta account. From your headset, use the same steps above to find your computer. Meta says that Chromecast isn't fully supported, but it doesn't hurt to try.
Count your calories
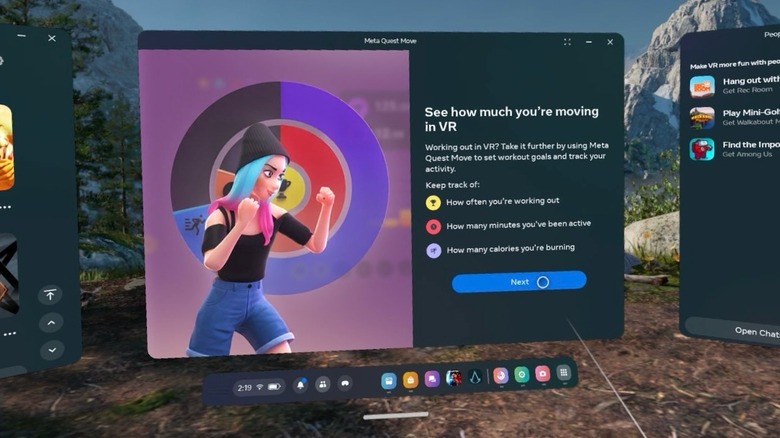
One of the biggest arguments in favor of VR is that lets you play video games while off the couch and moving. Meta has an entire page dedicated to "fitness" experiences. Now, you probably won't be reaching your weight loss goals flailing your arms with a pair of featherweight controllers, but you will burn at least a couple of calories. However few, they're worth keeping track of and there's an easy way to do so automatically.
The feature is the aptly named Meta Quest Move. You will find the move app in your default app library. To start, it will ask you for the typical information you would expect of a fitness app — age, gender, weight, and so on — although you are free to give no information at all. These details help establish accurate estimates of your basal metabolic rate (BMR), or caloric burn. If you do provide this information, rest assured that it is stored locally on-device and will not be shared with Meta in any way.
So how do you use the app? After setting it up, just play and it will track your activity across apps and games, regardless of whether they are fitness-oriented or not. If you want to go even further, you can set goals and keep track of your progress. A floating window keeps track of your calories and time playing as you rack them up. Later, you can share these activity stats with your Apple Health or Android Health Connect on mobile.
Double-tap for passthrough
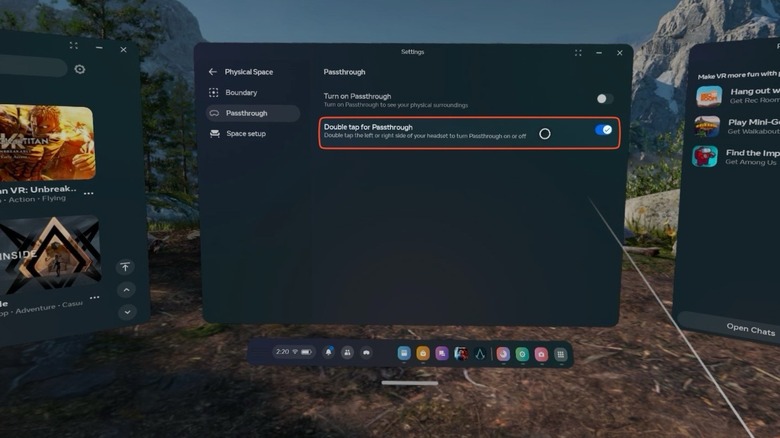
Standing too close to a person playing a sword-fighting game in VR used to be a great way to get an accidental bloody nose. Now, thanks to boundary safety features, you can keep track of when you're about to punch a hole through your TV or accidentally clothesline somebody. An added safety (and convenience) feature is the excellent Meta Quest passthrough mode. Users can go grab a drink of water or have a face-to-face chat with somebody without taking the headset off. Normally this would be somewhat tedious since you have to open Quick Settings and manually enable or disable it. Instead, set up Double Tap for Passthrough.
Open Quick Settings from your universal menu, and then the Settings app. Navigate to Physical Space > Passthrough > Double Tap for Passthrough. To activate it, quickly double tap one side of your headset. It's a bit slow — taking at least two seconds, from personal experience — but it works well, and is essential if you need a quick peek at your surroundings for whatever reason.
Control VR with Voice Commands
You'd think that VR provides the ultimate control scheme compared to mice and touchscreens, since you can physically reach out and manipulate things. From personal experience, the opposite is true. Even after you get used to it, VR adds a layer of difficulty to even the simplest of endeavors. A task like pinching and moving a screen on the Meta Quest is always deceptively easy. The point is, using your hands may (counterintuitively) not always be the best option. So try Voice Commands instead.
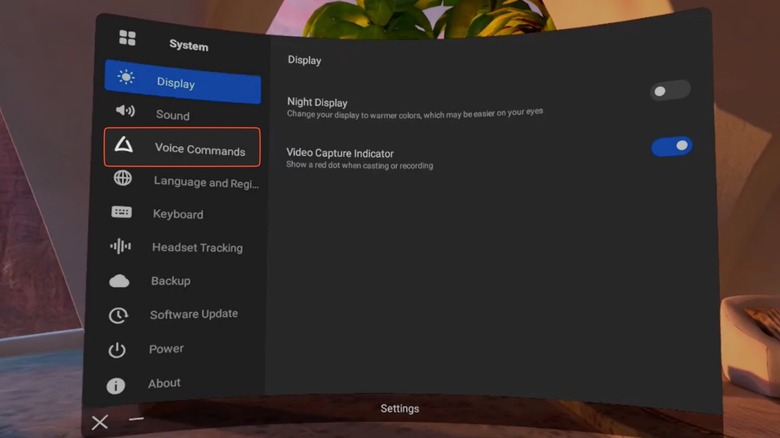
From our testing, this setting was located in System > Voice Commands, but Meta's official support page lists it as a separate item in Settings > Voice Commands > Controller Shortcut. Activate the feature in Quick Settings with the Voice Commands option. Alternatively, go to Settings > Experimental and enabling the wake word — which, on our test unit, was not yet an option. Then you can say "Hey Facebook" and use your headset like you would a virtual assistant a la Google Assistant or Siri.
While you can't do everything, Voice Commands does quite a lot. You can tell your device to power on or off, control the volume settings, ask for your battery life, open a specific app or game, close it, and so on, and it's usually faster than motion-based alternatives. Only two downsides of note here: one, this feature is only supported in English; two, Meta processes your voice data and anything else the microphone picks up. However, you have to opt-in to allow Meta to keep recordings.
Play Steam games via Steam Link

While the Meta platform is great, it has to answer one question before PC gamers will even touch it: can they access their Steam library and play games on the Quest? Valve's Steam is the mac daddy of PC gaming; being a PC gamer without a Steam account is like being a Pope without the robes. Most games release on Steam, and the platform is beloved for its frequent deep sales and discounts. Some titles (like the quintessential "Half-Life: Alyx") are only available through Valve. To Meta's credit, its platform is very open and plays nicely with third parties. You can download the Steam Link app directly from the Meta Quest store.
You will have to do a tiny bit of setup, but nothing too egregious. You'll need to install the Oculus desktop app, allow unknown sources in the settings, and install SteamVR from within Steam. Then, connect either with a USB cable or Meta's proprietary wireless Air Link and launch into Steam Link. It works surprisingly well when you consider that Steam is competing against Meta with its own Valve Index headset. This rare instance of compatibility between direct competitors would be unheard of with the likes of the Vision Pro, which is a shame since a lack of apps has been one of the biggest complaints about Apple's headset.
Stream games via Xbox Game Pass
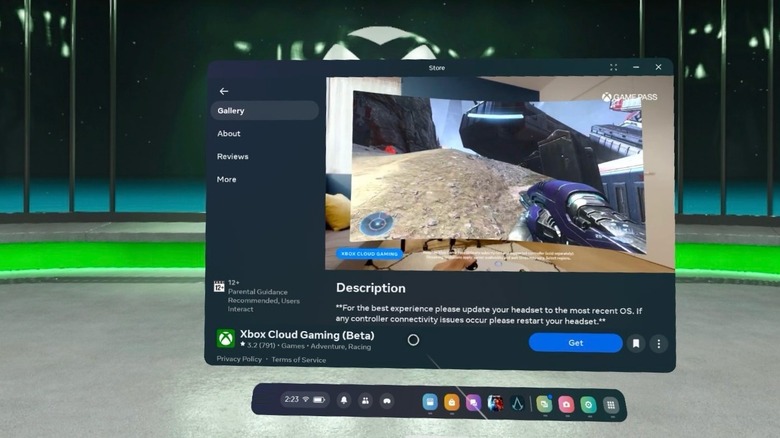
The Xbox Game Pass is an excellent way to play a huge, revolving catalog of games without paying full price for them. The Meta Quest lets you create absolutely massive virtual screens for a digital home theater experience. Why not combine these two things and play your Xbox titles on a screen that's bigger than you are tall?
First, you will need the premium tier Xbox Game Pass Ultimate subscription. Sadly, it appears cheaper options like Xbox Game Pass Core are not supported. You'll also need a controller; it probably wouldn't be convenient to play on mouse and keyboard in VR anyway. Grab the Xbox Cloud Gaming (Beta) from the Meta store then follow the setup instructions to pair your controller, adjust the display size, and sign in with your Microsoft account. Then play.
The app only supports 1080p resolution at 60 FPS, with a choice of four different screen sizes. There will be a bit of latency due to both the streaming of the game and your Bluetooth controller. That said, all the typical features like Passthrough are supported, so it really does feel like you're kicking back on the couch to play like normal.
Use your palms and wrist button for extra control
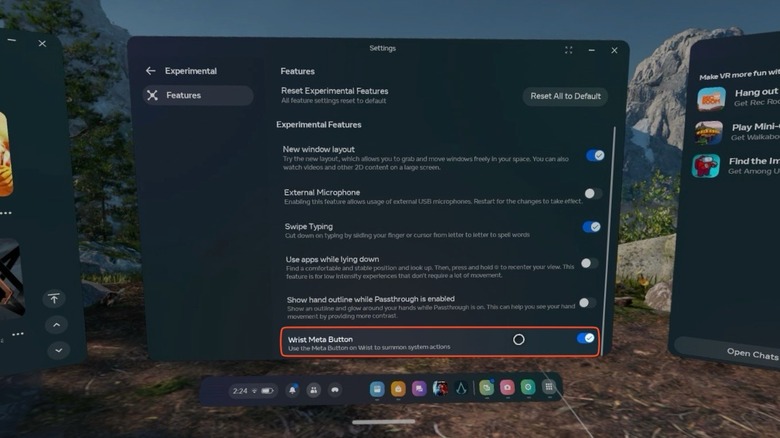
The complete lack of controllers on the Apple Vision Pro felt like divine revelation at its unveiling, but many people didn't realize that the Quest had already been doing this since 2019. All the same pointing and pinching features are there, and there's even more if you want extra control.
Take Palm Pinch, where you look at the palm of your hand and pinch your index and thumb; a quick pinch brings out the universal menu, and holding your fingers together re-centers your perspective based on the direction you are looking in. Direct Touch takes things a step further with the Quick Actions menu; pinch and hold those fingers, then move your hand around to select the options that appear.
More recently, Meta introduced Wrist Buttons. This is an experimental feature you'll need to enable in Settings > Experimental. Bear your wrist, and a button will appear that you can tap or hold for extra control. The upshot here is avoiding any misfires with Palm Pinch, although it will require both hands.
Quick-record gameplay footage
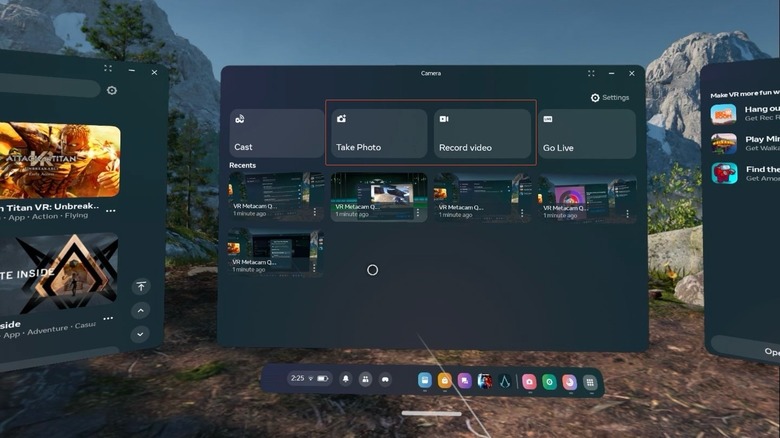
Want to record your gameplay to share later online or with friends? The Quest supports this, but to start and end a recording, you have to open the Camera app and choose record video. Easy enough, but it presents an issue if you need a quick-draw way to start recording something. In the time it takes to reach the camera app, you'd probably miss it. For some odd reason, Meta doesn't advertise the lightning-fast (and easier) way of capturing video on its support pages: You can simply hold the right-controller Meta button and trigger until video starts recording.
For still images, you can hold the Meta button and pull the trigger once. Downloading the pics and videos is easy once they sync to the Meta app. You can further tweak video compression quality, frame rate, and image stabilization in the Camera's Quick Settings if you want a more detailed image, or one with a smaller file size.
Note, these pictures may show up automatically in your Facebook and Instagram photo galleries. Nice, if you plan to share them. Not so nice if you have privacy concerns. You can disable this setting in Meta Accounts Center > Connected Experiences > Meta Cloud Albums and change the toggles for your Meta Horizon profile media access.
Play your Quest on a plane or lying down
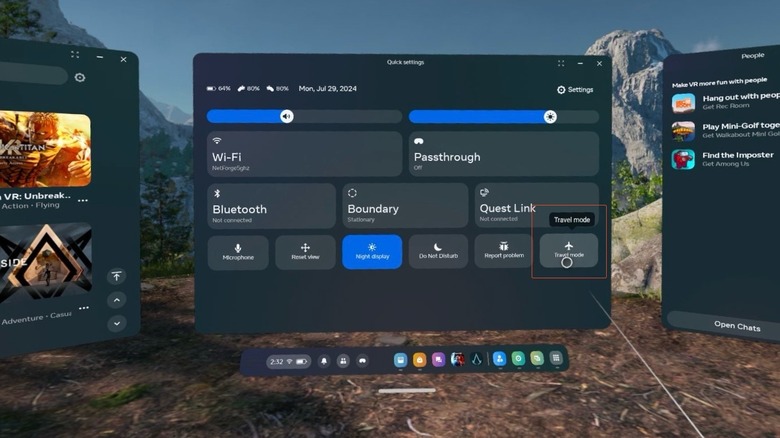
Since the latest two Quest iterations run perfectly fine away from the computer, it makes sense that you'd want to take yours along to kill time during a flight. The problem is, these chaotic environments have a ton of movement and obstacles that aren't ideal for using a headset. If you plan to take the Quest on a flight, use travel mode — only available for update v65 and later.
To use it, you may have to go to Settings > Experimental and enable the travel mode toggle. It was already available on our unit in Quick Settings. It's only supported on airplanes, and though it probably goes without saying, you should be a lot more careful playing VR in such a confined space. Use apps that feature minimal movement, and try to stick with passthrough mode so you don't accidentally backhand the person sitting next to you.
If you've ever tried to play VR in bed, you know it's a nonstarter; the headset will get very confused when (it seems) you're staring straight up. Since update v63, you can go to Settings > Experimental and enable the "Use Apps While Lying Down" setting. Perfect if you want to relax, or if playing in the normal configuration isn't an option for you.
Type easier and faster with swipe type
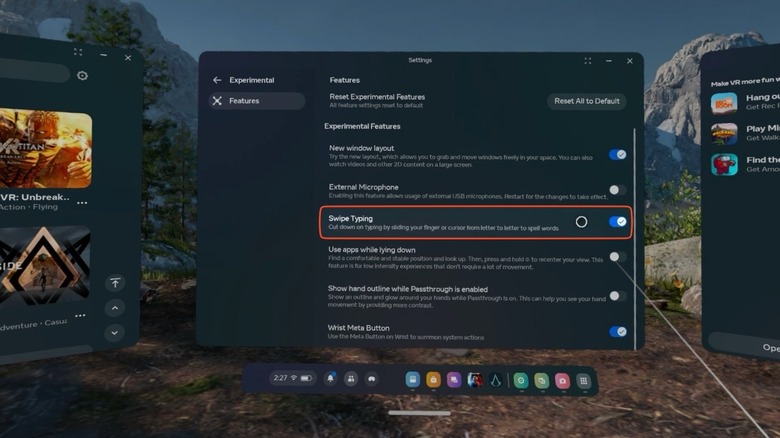
Typing is another one of those things one would assume is much easier in VR, but again, the opposite is true. You are forced to hunt and peck for keys with only your index fingers — probably a good thing, since if you had access to all your digits, you'd type pure gibberish. The only indication you have of the distance between your fingers and the keyboard is a shadow that appears over the UI. There's no tactile feeling, no key travel, and without an armrest or wrist rest, it gets tiring holding your hands out in front of you. There's only an autocorrect to make up for the many, many mistakes you will make. Like the popular swipe typing on smartphones, swipe typing on the Quest should (hopefully) make it a tad easier.
You can find the option in Settings > System > Keyboard > Swipe Typing — or in the case of our testing, Experimental > Swipe Typing. It works exactly the same as it does on your smartphone: press and hold, then drag your finger around from key to key. It's not perfect, but it is a small improvement. However, if you really want to alleviate your frustrations with VR typing, it's far easier to just pair a supported "tracked" Bluetooth keyboard.
Share a link to your headset
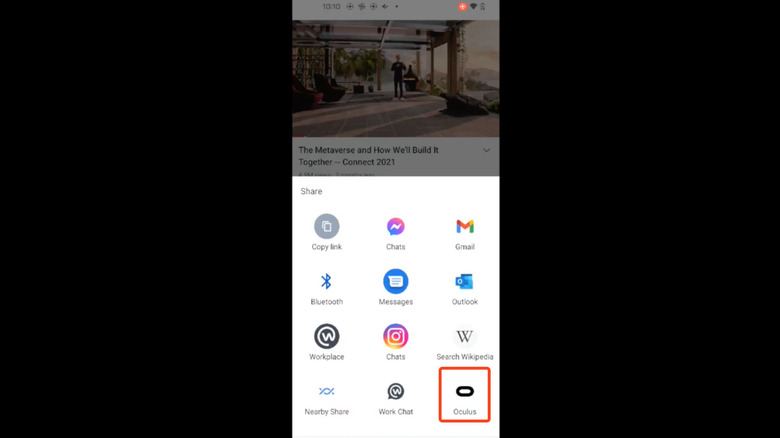
The Meta Quest app on your phone does a lot to bridge the gap between your physical devices and the VR realm. But what if, for example, you want to grab a link from one device and bring it into your VR workspace? Given how bad the typing is, it's unthinkable to bang out that mishmash of letters and numbers on a virtual keyboard. Using a browser extension or third-party app could probably pull it off, but would prove a convoluted way to procure a simple link. Instead, you can share it directly.
On your phone, find a link that you want to share and tap the share button. From the share menu, tap the Meta Quest app. You'll be presented with two options: Either open it directly in the headset, now, or save it for later. Saved links will be kept in your Explore app. This is great if you are on the go and want to take a look at something in VR later when it's more convenient. Passthrough mode is good enough that you can pick up your phone and do the same if you need to quickly pass something over to your headset.
Increase the refresh rate to 120Hz
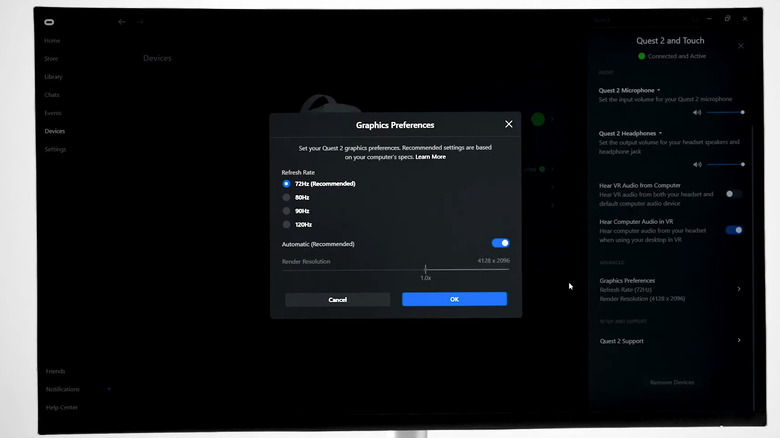
A high refresh rate is a must have on a phone these days, but it's even more essential on a VR headset. You want the smoothest, highest frame rate so the experience feels as immersive and lifelike as possible. There's an added benefit, too: It may also limit the degree of motion sickness (aka cybersickness) you experience. A study published by IEEE Xplore found that a high frame rate and a high refresh rate (at least 120Hz) goes a long way to keep your gut from rioting while playing VR. Both the Meta Quest 2 and 3 support a 120Hz refresh rate, so here's how to enable it.
You used to be able to change the setting directly from your headset (and may still be able to, although we were not) but you now need to download the Oculus app on your computer. Go to Devices, choose the active headset, then Graphic Preferences. Adjust the Refresh Rate to 120Hz. The increase will be a night and day difference.
Just keep in mind that the increased refresh rate will tank your battery and lead to performance degradation. Also be aware that if you are playing a game off your PC via Steam Link, your computer needs to be able to push 120 FPS for the 120Hz refresh rate to be worth it. Either lower the graphics preset from your PC, or use upscaling set to performance mode to squeeze out a few more frames.