How To Create And Save Custom Hiking Routes In Apple Maps

While planning a journey, especially long trips or those taking you to far-off destinations, early planning is important. For the past few years, Google has offered a convenient route-planning feature that lets you chart your own course on the map. Once those custom trails are created, you can download them locally for offline access, which is another useful facility, especially for hiking in areas where connectivity is scarce. But so far, that collective facility has eluded Apple Maps for daily commuters for daily commuters as well as outdoorsy folks, even though it has offered some neat interplay features connected to Google Maps.
Thankfully, with the arrival of iOS 18, and the respective 2024 upgrades for other Apple platforms, Maps is getting more friendly for hiking enthusiasts, complemented with the ability to create custom routes. At the moment, the facility is limited to the beta versions, but in the coming weeks, iOS 18 will bring it to all iPhone users via the stable public update.
Apple is adding a new "Plan a Hike" system that not only offers different trip presets, but also offers the flexibility of custom route planning and an automatic download system for offline access. Unfortunately, this facility is only available to users in the U.S. market, and there is no word if, and when, it will roll out for users in other countries.
What to know about custom routes in Apple Maps?

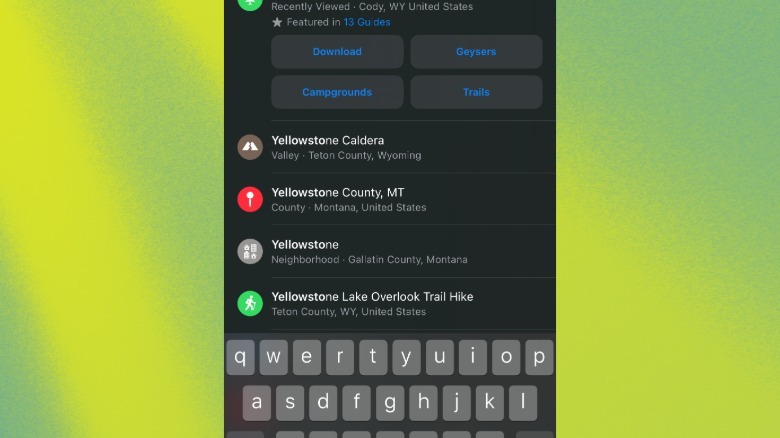
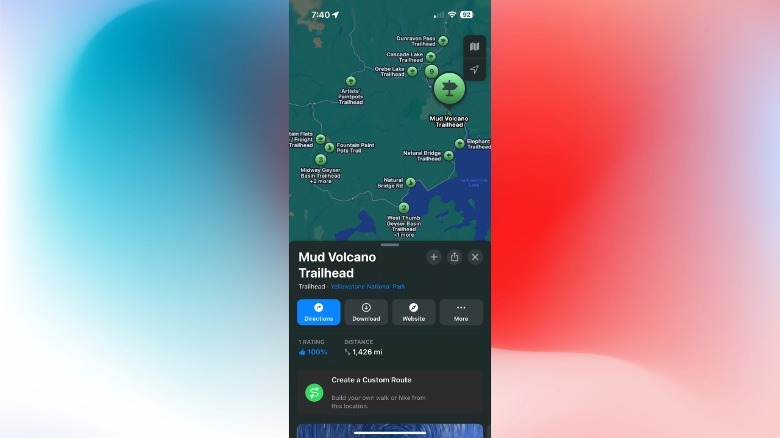
The process of creating custom hike routes in Apple Maps is fairly straightforward. In the search field, enter the preferred hiking spot and click on the right location that appears as a suggestion underneath the search field. The Map also shows a "Plan a Hike" option, which offers route options like Reverse and Close Loop. If you're picking up a well-known location, such as a national park, the Maps app will show you options like Download, Hill, Trailheads, and Trails right below the name.
Once you select the spot, scroll down on the knowledge panel until you see the "Popular Hikes" option. You will see a carousel of different hiking routes, complete with distance and elevation details underneath the route picture. Just pick any of the routes that you like, tap on the "Add to Library" button at the bottom, and set a name for it on the next page. Auto-download facility for offline access is enabled by default, so you don't have to worry about that.
Creating custom hiking routes

Now, the Maps app only shows the most popular trails and at the moment, it doles out automatic suggestions for well-known spots only. But if you want to hike on a route of your own choice, iOS 18 offers that facility. Here's how to do it:
1. Pick a location for your trip, tap on the "More" button on the right edge of the tray, and select "Create a Custom Route."
 Nadeem Sarwar / SlashGear
2. You will now see a small visual instruction page for making custom routes at the button of the screen.
 Nadeem Sarwar/SlashGear
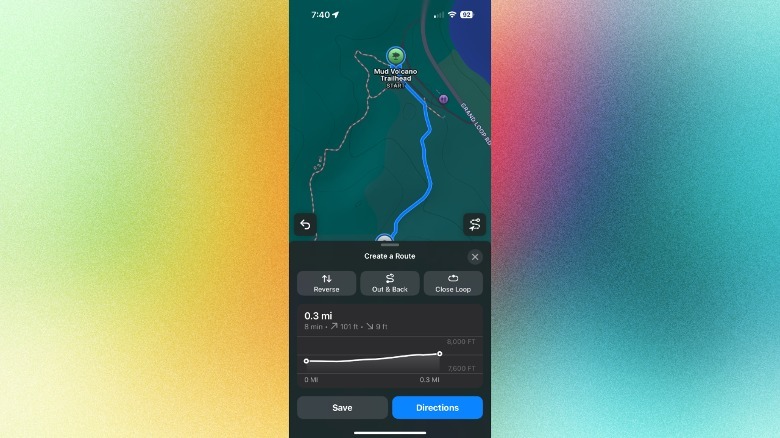
3. Next, all you have to do is click on the routes available for the location, drop a stop pin, and the Maps app will automatically create a trail map.
 Nadeem Sarwar/SlashGear
4. You can create on any of your location points in the app, and you will get four options: Reverse Route, Out & Back, Close Loop, and Remove Point.
 Nadeem Sarwar/SlashGear
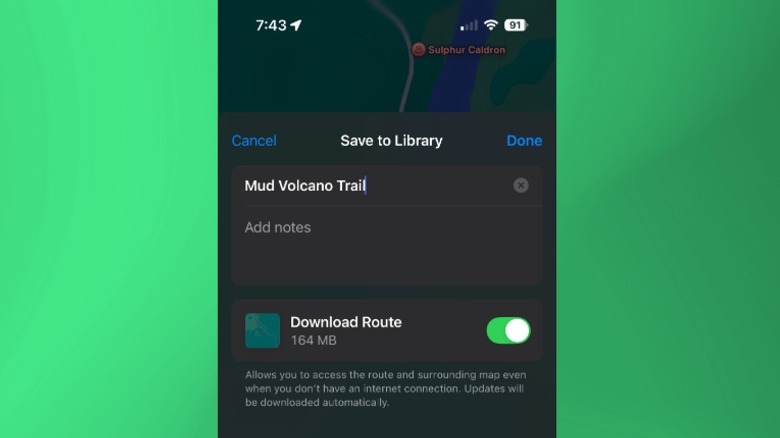
5. Once you're done creating your custom route, select the save button at the bottom of the screen.
 Nadeem Sarwar/SlashGear
6. On the next page, select a name for your custom route and tap "Done" in the top right corner of the window.