How To Install Raspberry Pi OS On An SD Card

There's no shortage of operating systems you can try on a Raspberry Pi. These include general-purpose distros like Ubuntu and Fedora that are ideal for desktop and server use, as well as more niche and specific offerings, such as RetroPie for gaming and LibreELEC for media.
But when it comes to the best operating system for the Pi, nothing can beat the official Raspberry Pi OS (previously known as Raspbian). It's the most compatible distro since it's specifically designed for running on a Raspberry Pi. This means you won't have to worry about encountering hardware and software issues. Plus, the fact that the latest Raspberry Pi OS is guaranteed to work with both the newest and oldest Raspberry Pi models makes project upgrades a lot smoother. If you're new to the Raspberry Pi, you'll also appreciate how easy it is to install the Raspberry Pi OS to a microSD card. We'll walk you through exactly how to do that.
How to install the latest Raspberry Pi OS to your microSD card
When working with later Raspberry Pi models like the Pi 5 and Pi 4, you'll likely go with the newer Raspberry Pi OS too. The best way to flash the latest Raspberry Pi OS to a microSD card is by using the Raspberry Pi Imager, the Pi's official image installer. Here's how to do so:
- Download and install the Raspberry Pi Imager to your computer. The app is available on Windows, Mac, Ubuntu, and Raspberry Pi OS.
- Insert the microSD card into your computer or card reader.
- Launch the Imager.
- On the home screen, click Choose Device.
- Select your Raspberry Pi model from the list.
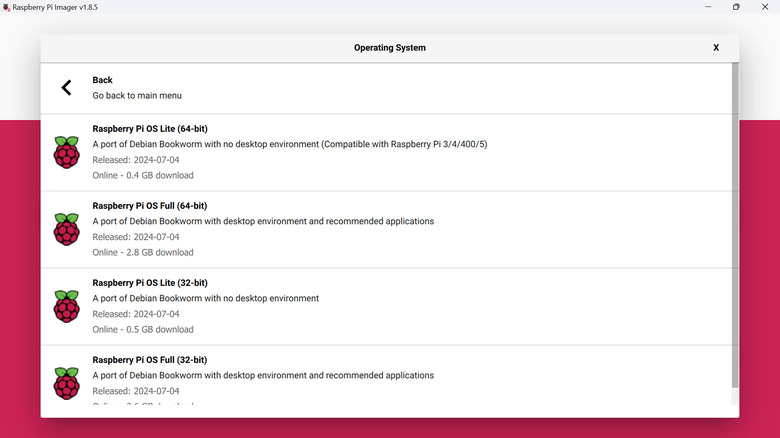
- Press Choose OS.
- To use the desktop version of the latest Raspberry Pi OS, click on the very top option. This typically comes with a "Recommended" label.
- To use the other versions of the latest Raspberry Pi OS, go to "Raspberry Pi OS (other)" and browse through the available options. In this section, you'll also find earlier recent versions of the OS.
- Hit the Choose Storage button.
- Click on your microSD card. Make sure to pick the correct one, as the data will be completely deleted.
- Press Next.
- (Optional) To configure your OS:
- Select Edit Settings in the Use OS customization popup.
- In the General tab, you can configure Wi-Fi, set the hostname, username, password, and locale settings.
- In the Services tab, enable SSH for remote connection.
- Click Save to save your settings.
- In the same Use OS customization popup, select Yes to apply your new settings.
- Hit Yes in the Warning popup to proceed with the flash process.
Once the writing process finishes, you can then eject the microSD card and pop it into your Pi.
How to install old Raspberry Pi OS versions to your microSD card
Although the latest Raspberry Pi OS is compatible with all the Pi boards down to the very first model, you might prefer using the older Raspberry Pi OS versions for compatibility. This is especially true if you're developing Raspberry Pi projects that use third-party apps or specific dependencies that only work on legacy Raspbian systems. To flash an older Raspberry Pi OS or Raspbian system to your microSD card, here's what you need to do:
- Download the image of your preferred OS from the Raspberry Pi downloads page. You can find the Raspbian OSes in the raspbian, raspbian_full, and raspbian_lite folders. Meanwhile, the Raspberry Pi OS versions are in the raspios folders.
- Extract the downloaded ZIP archive to access the IMG file.
- Get the Raspberry Pi Imager installed on your computer.
- Connect your microSD to the computer.
- Open the Raspberry Pi Imager.
- Pick your specific Raspberry Pi board by pressing Choose Device and selecting your Pi model.
- Import your downloaded OS:
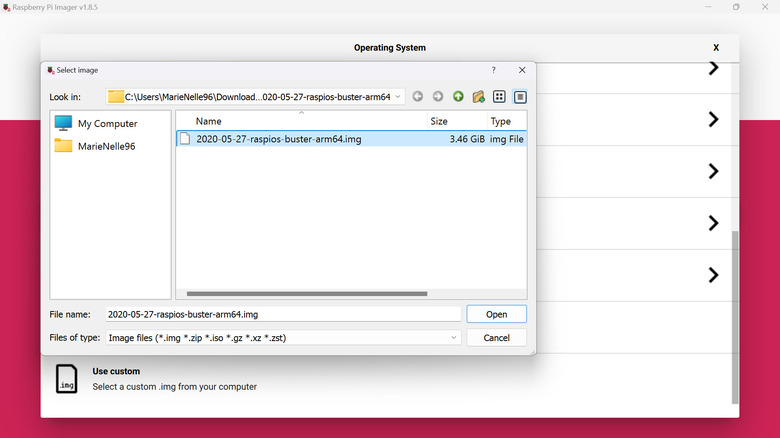
- Click Choose OS.
- Scroll to the very bottom of the page to "Use custom."
- Locate the IMG file.
- Press Open to use the image.
- Set your microSD card as the selected storage by going to Choose Storage and clicking on it from the list.
- Hit Next.
- If you want to configure your OS settings, press Edit Settings in the Use OS customization dialog box. Then, customize the settings as needed. Make sure to hit Save and Yes to save and apply your configuration.
- Proceed with the writing process by hitting Yes on the Warning popup.
Wait for several minutes until the flashing is done. Once you get the confirmation that the write is successful, you can safely remove your microSD card and use it on your board.