How To Move Your Steam Games To A Different Drive On Your Windows Computer

If you're a PC gamer, you're likely familiar with Steam. The games management software developed by Valve has become an industry standard, boasting a massive library of titles. Despite the efforts of companies like Epic Games to compete with their own launchers, Steam remains the storefront of choice for a large number of PC gamers. But if you've built up a library of games, there comes a time when storage restraints will necessitate moving your collection elsewhere on your PC. Can Steam accommodate that kind of game management?
There are plenty of reasons you might want to move your games. Maybe your boot drive is getting full, so you added a second drive for your games collection, or you're just reorganizing your file system. Whatever the case, you're looking for a no-fuss method to transfer your Steam games to that second drive. You might be worried that moving the games will cause Steam to lose track of them, and whatever else happens, you want to avoid waiting for games to redownload.
Thankfully, Steam is extremely customizable and makes the process of transferring your games to another location on your Windows PC relatively easy. You'll still want to back up your games before proceeding, just in case, but in this guide, you'll learn not only how to move your games, but how to do it safely. This process should work identically on any version of Windows, but for the best results, you'll want to be on Windows 10 or 11. So, here's how to safely and easily move your Steam games to a different folder or drive on your PC.
Creating a new path to install Steam games
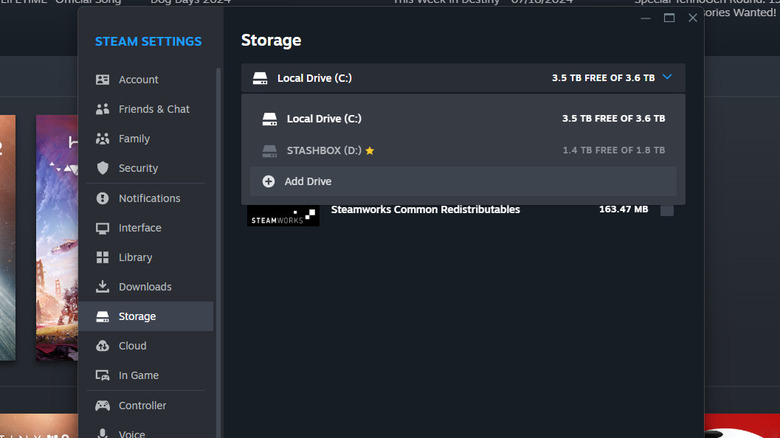
Before you can move your Steam games to a new location on your Windows system, you will need to create a new Steam library. You can have multiple Steam libraries on your computer. Steam does not require all your games be stored in one place, so you can store any number of games in any number of libraries. To create a new Steam games storage location:
- Open Steam.
- Click the Steam menu in the top left corner of the application window.
- Click on Storage from the lefthand Steam Settings menu.
- Click on the current drive from the box at the top of the menu, then click Add Drive.
- Choose the disk you'd like to create your new games library on.
- If you want your games installed on the root folder of the disk, skip to the next step. If not, click "Let me choose another location," then click Add. Navigate to the location in your file system where you'd like them to be installed. If no folder exists on the drive, or if you'd like to make one in a specific location, do so now. If you make a new folder, select that folder.
- Click Add.
You have now created a new Steam games library location on your PC where games can be stored, but you still haven't moved any of your games to that location.
Back up your games library before moving Steam games
Steam makes the process of moving your games to a different library path easy. However, despite the low risk of something going wrong, you should create a backup of the steamapps folder where your games are currently stored on before proceeding. If you don't have enough room on your PC to duplicate the folder, you should use an external drive. Additionally, this will take some time, since each game must be backed up individually. If your games are already backed up, you can skip ahead to the next section of this article. Otherwise, here's how to back up your Steam games:
- Open Steam
- Navigate to the Library tab.
You will need to back up each game individually. Repeat the following steps for each game you plan to move:
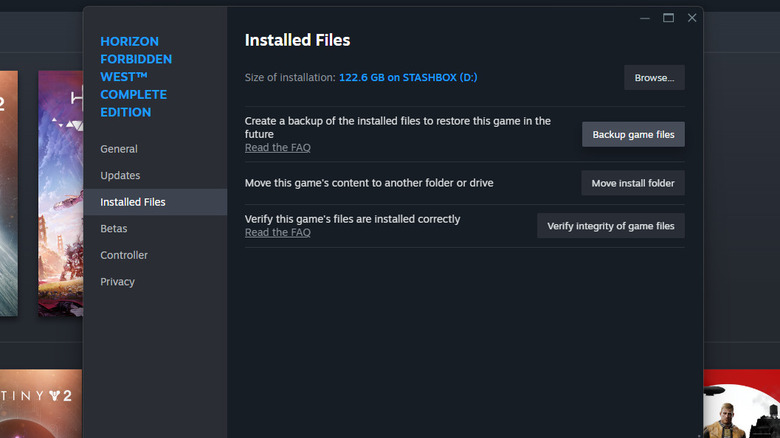
- Right click the title of the game from the lefthand library pane, then click Properties.
- From the lefthand side of the game's Properties window, click Installed Files.
- Click Backup game files.
- Using the file selector that pops up, browse your computer for the folder you'd like to store the backup in and select it.
- Click Create Backup. Steam may take a few minutes to back the game up.
Once you've backed up all the games you plan to move, you can go to the next step, where you'll finally relocate them. Be sure to account for any hidden Steam games in your library, as well as games with family sharing. If the backups are taking up too much space on your drive, you can delete them once you've moved the games and have verified that they run correctly and that their save files, if applicable, are intact.
Moving Steam games on your PC is easy
Now that you've created a new library, you can finally move your games there. Thankfully, Steam makes this an incredibly easy process. You won't even need to touch your PC's file system yourself. Here's how to move your Steam games to a different drive on your Windows PC using an existing Steam library path:
- Open Steam.
- Click the Steam menu in the top left corner of the application window.
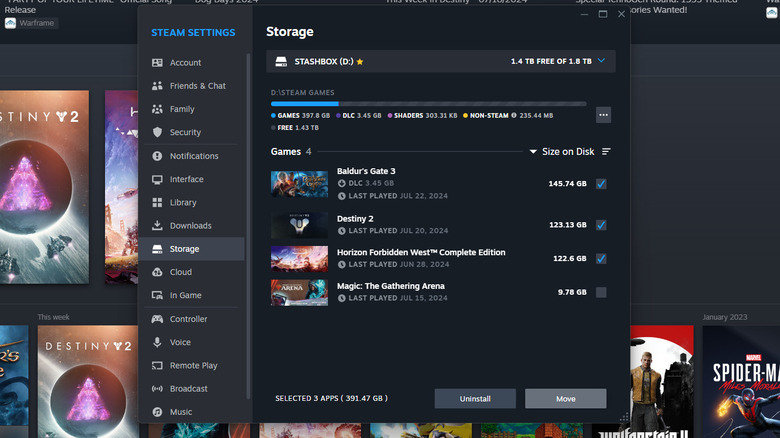
- Click on Storage from the lefthand Steam Settings menu.
- Click on the current drive from the box at the top of the menu, then select the drive where your games are currently located.
- From the list of games on that drive, check the boxes to the right of them for each game you want to move into a different drive.
- Click the Move button in the bottom right of the window.
- In the pop-up that appears, select the drive you want to move the games into from the drop-down menu, then click Move. Your games will now be moved into that drive.
All you need to do now is wait for the games to be moved over. This may take anywhere from a few seconds to many hours depending on how many games you have installed, how large their file sizes are, and how fast your computer's read/write speeds are. As a general rule of thumb, for the same game, those who have M.4 style SSD storage installed will see quicker results, whereas the longest transfer times will affect those using older HDD drives.
How to make a particular drive the default for Steam games
If you've gone through the trouble of creating a new Steam library on your Windows PC and moving your games there, there's a good chance you want that location to be the default for your Steam games going forward, so that every new game you download is automatically stored there. To make one of your existing Steam libraries the default one:
- Open Steam.
- Click the Steam menu in the top left corner of the application window.
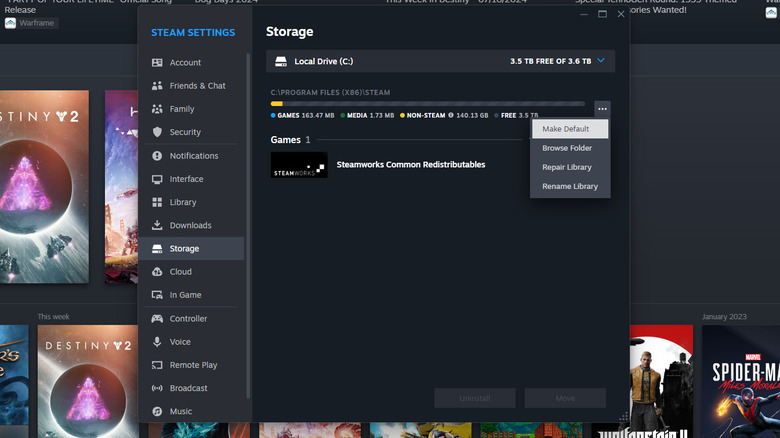
- Click on Storage from the lefthand Steam Settings menu.
- Click on the current drive from the box at the top of the menu, then select the drive you want to move your games into from the resulting drop-down menu.
- Click the box with the three dots to the right of the storage meter, then click Make Default.
Going forward, this will ensure that games you download in the future are downloaded to the selected disk. Of course, you can always move games between libraries at any point using the instructions from the previous section of this article.