5 Things You'll Need To Get Started On Your Raspberry Pi Smart Mirror
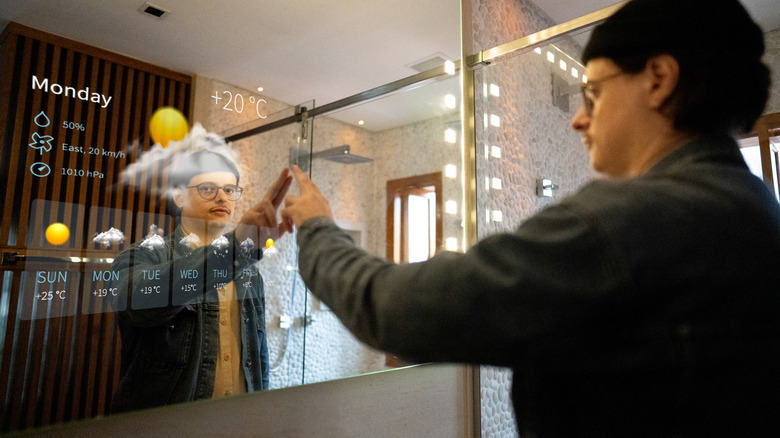
A smart mirror is a great project for anyone who wants to create a cool bit of tech that will liven up their home. You can buy a pre-made one, but there are a few building methods around, and going down the Raspberry Pi smart mirror path arguably yields the best results for most people. What advantages does a Raspberry Pi-based smart mirror have over a pre-built version or one assembled from some scavenged electronics? The Pi version seems a lot more customizable. If you're competent at coding, you can easily alter its functionality, and the Pi's compact form factor coupled with the fact it can interact with most displays means you're pretty free in terms of size and shape too.
In terms of basic software, Magic Mirror is a great, easy-to-use, modular option that will allow even inexperienced builders to put together a custom mirror that will meet their needs. As with other Pi projects, what you use can be adapted to your skill level and the amount of time you're prepared to put in. There are other options, and you could even code it yourself if you have the skillset.
You are also going to need a few fasteners, screws, bolts, or similar items to assemble the whole thing. These will be specific to the design you eventually choose, and you should refer to the specific instructions you get from that particular tutorial. This piece covers the basics, and you aren't going to assemble a Raspberry Pi smart mirror without these five items.
A Raspberry Pi
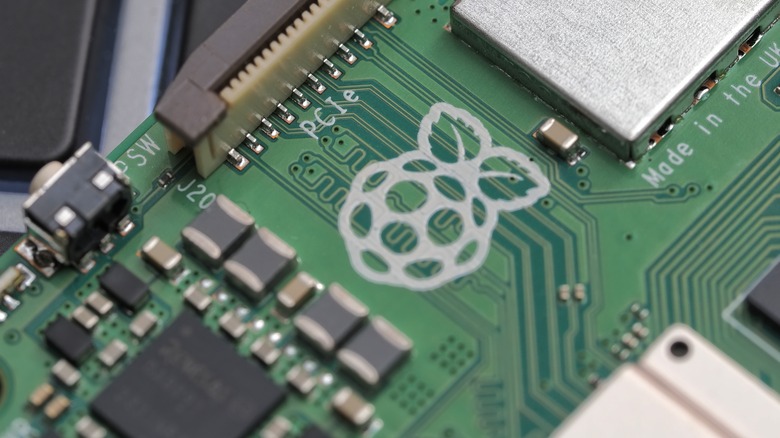
It may sound obvious, but you aren't going to assemble a Raspberry Pi smart mirror without some kind of Raspberry Pi. If you're pi-averse, there are other options — including an old tablet which can be used to create an Android-based smart mirror — but that's pretty different from the Pi-version.
There are a wide-range of Raspberry Pi devices on the market, with each varying in terms of price, availability, and functionality. You'll want to aim for something reasonably powerful for your smart mirror, with Raspberry Pi recommending a Raspberry Pi 3 Model A+ at the very least in its tutorial. If you have the budget, a Pi 4 or Pi 5 is an option. A newer model Pi could be overkill if you just want a standard smart mirror, and you're likely better off just sticking to the Pi 3 Model A+ and spending the price difference on other components. However, a more powerful Pi will increase your mirror's potential capabilities, and could provide a bit of future-proofing potential.
You can use older models of the Pi, especially if you're content with running older software. This kind of Pi project was around long before the third generation Pis hit the market. But unless there's another major shortage of Raspberry Pi hardware, there's no point in going for something underpowered. You should also avoid the Pi Pico, as the cheap little microcontroller may not have the capability you're looking for.
A piece of two-way mirror glass
If you're wondering what the magic behind the whole magic mirror thing is, the answer is the glass or acrylic being used. It's of a type commonly known as one-way mirror glass, two-way mirror glass, or half-silvered mirror. Basically, it's a piece of glass or plastic that appears mirrored from one side, but is transparent from the other. The glass will also allow light to shine through from the non-mirrored side, which is what allows the smart mirror to function. Pick the right stuff, and it will look like a normal mirror, aside from the bits of the display that you want showing through.
As for where to get it, it's pretty widely available. Websites like Amazon stock it, though the chances are everything you see there will come in pre-set sizes. A quick web search shows that there are specialist companies that will cut a piece of two-way mirror glass to your specifications and ship it out to you, so this is another possibility.
There's also the option of reflective film. You can put this over clear plastic or glass and create what is essentially a two-way mirror. As testing from bloggers like The Cyber Omelette has shown, the results aren't quite as good when using reflective film. However, the final product is pretty close, so if you need to go this route for budgetary reasons, or because sourcing a pre-made piece of two-way mirror is difficult, the project should still turn out okay.
A MicroSD card
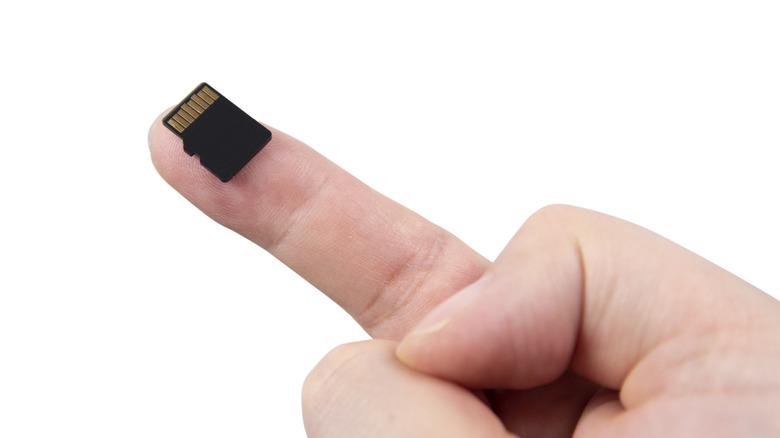
A Raspberry Pi doesn't have built in memory, so you're going to have to fix that if you're making a smart mirror. The software you're loading onto it has to live somewhere. The standard solution is a MicroSD card, this plugs straight into the Pi's MicroSD slot and everything should run smoothly from there. You should also make sure you have a way of connecting the card to the laptop or PC you'll be using for the initial setup. Said device may come with a MicroSD slot, though you'll likely need some kind of adapter. Adapters allow the MicroSD card to fit a full-sized SD card slot, or connect through a USB port. USB hubs tend to come with an SD or MicroSD port.
Theoretically, this doesn't have to be a MicroSD card. You'll be able to achieve the same results with any storage medium that your Pi can ultimately use, so an old external SSD or HDD might well do the trick. With that being said, a MicroSD card uses far less space, while an external drive has a good chance of being around the same size as, if not bigger than, the Pi itself. MicroSD cards are pretty affordable these days, and you don't need a lot of storage for the smart mirror's software. So you should probably just stump up and buy one if you don't already have one kicking around in a drawer somewhere.
It's also worth noting that quality varies between MicroSD cards. While an older card you pry out of a camera or something may be a cheap and easy option, it could affect the smart mirror's performance if its read/write speed isn't up to spec. It will still work, just not as well.
A display or monitor of some kind
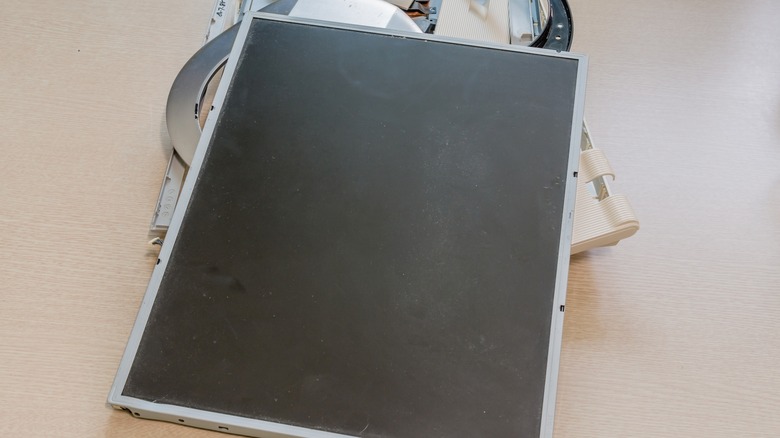
Your smart mirror won't be much good if it can't display anything. So you'll need some kind of visual output device, and you have a whole bunch of options. Raspberry Pi itself recommends a portable slim 15.6" HDMI USB-C-powered monitor. The "USB-C Powered" element could be handy, as you won't need to find room for a bulky power supply inside the mirror. Any functioning flat screen will likely do — though you will probably be limited by your own technical ability.
You can buy LED screens as components, though you may be better off just buying a whole display and breaking it down, as Raspberry Pi does in its own build. If you don't, a bit of wiring may be in order. This will result in a better final product, but is far more hands-on. As with many other elements, think about your skill level and budget when shopping for monitors. You should also think about the overall design of your mirror here. If you want something full-length or extra wide, then multiple monitors may be required.
An HDMI cable or a Mini HDMI to Standard HDMI cable will also be required to connect the monitor to the Pi. If you're using multiple monitors, getting something with DisplayPort might be worth considering, as these monitors can be daisy-chained together.
Some sort of power solution
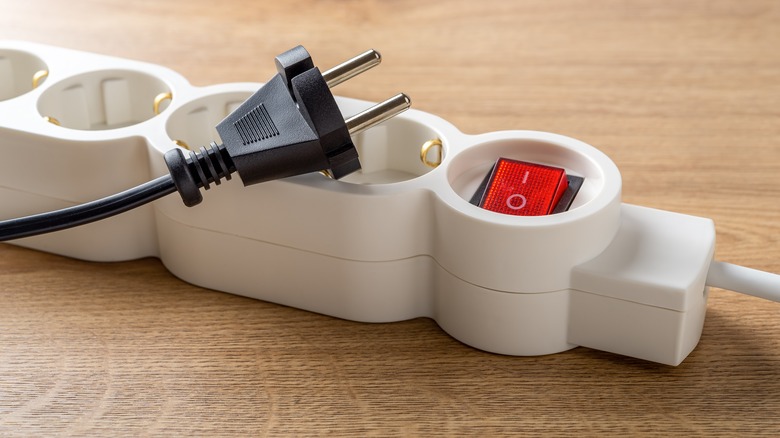
Your smart mirror is going to contain several components that require their own power source. If you want to keep the mirror as tidy as possible, then purchasing a surge-protected extension cord with multiple outlets is probably a smart idea. Exact placement of the cord will depend on your design, and you may want to go for something compact with the exact number of plug sockets you need. Plan it correctly, and you can retain a reasonable profile on your smart mirror, while only having a single cable trailing out from the device.
There are other ways to mount a power strip too, including on the side or bottom, where it can provide power for the mirror while also leaving a couple of outlets spare for other devices you may need to plug in. Some power strips also feature USB-A or USB-C ports and can be used as charging stations. A long cable on said power strip can also increase your options when it comes to placing the mirror. It needs power, and that longer wire means you can get further from an outlet while still keeping things tidy.
A good power strip, alongside a bit of planning, is an easy way to add an extra layer of functionality to your smart mirror. Many designs don't incorporate one, so it may be an area where you have to get creative and tweak things to your needs. In a worst-case scenario, it can still be something you plug the multiple wires exiting your mirror into, so get one anyway.