Want To Change The Taskbar Location In Windows 11? Here's How To Move It
Most of the time, you don't care about your taskbar's position in Windows 11. However, there are instances when you might prefer to have it in a different location on your screen. Perhaps you want more vertical space to write long codes or read multi-page PDFs. Or maybe you're using an ultrawide monitor, making your bottom taskbar look awkwardly longer than necessary. Or perhaps you just want the taskbar on the left or top for aesthetic purposes.
Unfortunately, changing the taskbar location in Windows 11 isn't the easiest task. While Windows 10 comes with a native feature that allows you to move your taskbar just from the Settings, the more recent Windows version lacks the same functionality. This may be one of the reasons you don't want to upgrade to Windows 11. There are, however, workarounds you can use to modify where your taskbar sits on your screen. We'll walk you to three simple methods, all of which we personally tested on the most recent Windows 11 23H2 release.
Method 1: Use ExplorerPatcher
A free way to move your taskbar in Windows 11 is with ExplorerPatcher. It switches your Windows 11 taskbar to the Windows 10 taskbar. Follow these steps to use ExplorerPatcher:
- Download the ExplorerPatcher setup from GitHub. It's found under the How to? section on the README page.
- Run the setup file to automatically change the taskbar.
- Right-click on any empty space on the taskbar.
- Uncheck the "Lock the taskbar" option.
- To move the taskbar to your preferred location, left-click on the taskbar to grab it then drag and drop it to the left, right, or top.
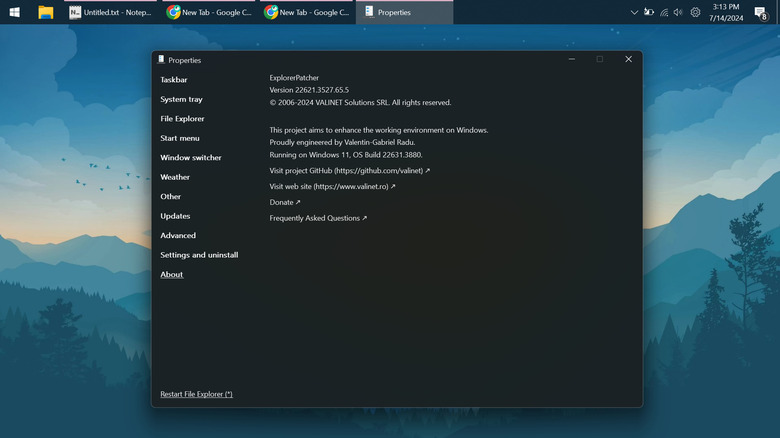
- Restart File Explorer to save your changes. To do so, right-click on the taskbar, open Properties, and press Restart File Explorer at the bottom of the Properties window.
- (Optional) Personalize your other taskbar settings:
- With the Properties window still open, navigate to Taskbar found on the left side panel.
- To add a search icon or bar to your taskbar, select Search and choose Show search icon or Show search box.
- To add the Task view button, click once on "Show Task view button."
- To make the taskbar hide automatically when not in use, hit "Automatically hide the taskbar."
- To modify the Start Menu icon, press Start button style and then Windows 11.
- To change how your taskbar apps align themselves, select Primary taskbar alignment and change it to Centered; Centered, at screen edge when full; Centered with Start button; Centered with Start button, at screen edge when full.
- To hide the active app labels, press "Combine taskbar icons on primary taskbar." Then, set it to Always combine.
- To shrink the taskbar icons, click on Taskbar icon size and pick Small.
After modifying the settings, make sure to save your changes by pressing Restart File Explorer at the bottom.
Method 2: Use StartAllBack
Another third-party app you can use to relocate the taskbar in Windows 11 is StartAllBack. It's designed to customize Windows 11 and its specific elements, such as the taskbar, Start Menu, and File Explorer. However, StartAllBack is a paid software. If you're unsure about buying the license key, you can try the 30-day trial period. Here's how to use StartAllBack to change the taskbar location to your preferred side:
- Download the StartAllBack installer from the website.
- Run the downloaded EXE file to proceed with the installation.
- On the installation window, click Install for me.
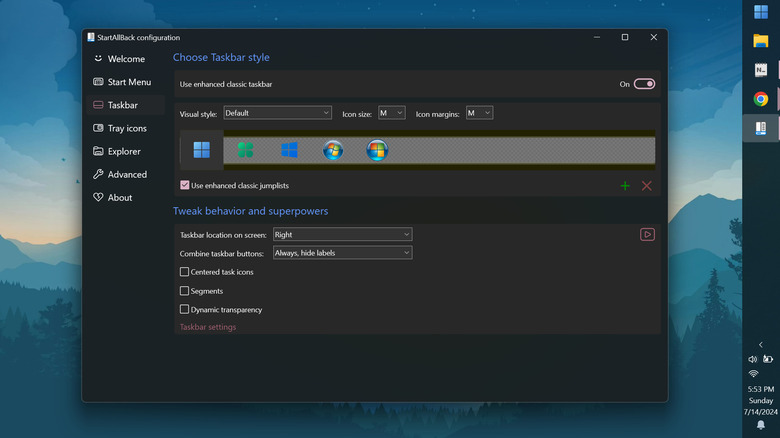
- On the configuration screen, select Taskbar from the left side panel.
- Go to "Taskbar location on screen."
- Change the value to your preferred location. Options include Left, Top, and Right. Your taskbar should automatically move to the chosen location.
- (Optional) Customize your taskbar further:
- In the same Taskbar tab, change the visual style, icon size, icon margins, and Start Menu icon to achieve your desired look.
- Under Tweak behavior and superpowers, check whether you want to hide the app labels, center the task icons, divide the taskbar into segments (one segment for the Start Menu and pinned apps and another segment for the system tray), or make the taskbar background transparent.
- Modify your system tray by going to the Tray icons option on the side panel. There, you can change the flyouts style and choose which system icons and app icons you want to keep on the tray.
Once you're happy with your modifications, simply close StartAllBack. All the settings you changed will be kept automatically. To revert to your original taskbar settings, launch StartAllBack and navigate to Taskbar. Then, turn off "Use enhanced classic taskbar." Press Restart now to restart Explorer and bring back the original taskbar.
Method 3: Install the Vertical Taskbar mod on Windhawk
Windhawk is a repository of Windows customization mods you can use to change several aspects of your computer. For instance, there's a mod for adding a dark mode for Notepad, preventing video games from hiding your cursor, and changing the color of your taskbar on Windows 11 with themes. You can also find a nifty mod in Windhawk that moves your taskbar to the left. It's called Vertical Taskbar and works on Windows 11 22H2 and 23H2. As long as you're running these versions, you're good to go. Here's a guide to using the Vertical Taskbar mod on Windhawk:
- Download Windhawk to your computer.
- Install Windhawk by double-clicking on the setup file and following the on-screen instructions.
- Launch Windhawk.
- On the homepage, select Browse for Mods.
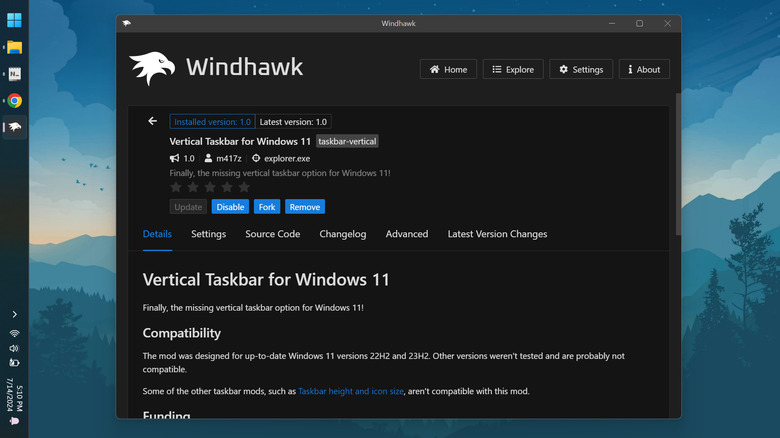
- Search for "Vertical Taskbar for Windows 11."
- Click on Details to open the mod's page.
- Press Install to get the mod.
- On the popup that appears, select Accept Risk and Install to proceed. Once the installation is done, your taskbar will automatically move to the left of your screen.
- (Optional) Change the width of your taskbar:
- On the Windhawk homepage, open the details page of the Vertical Taskbar mod.
- Select the Settings tab.
- Input your preferred width (in pixels). To make the taskbar slimmer, go with a lower number. If you prefer a wider taskbar, enter any number larger than the default.
- Press Save settings to keep your changes.
If you want to go back to the original bottom taskbar with its default width, you can just turn off the Vertical Taskbar mod without completely uninstalling it. Simply press Disable on the mod's details page on Windhawk to do so. Then, to turn it on again, select the Enable button.