Easy Image Overlays: A Step-By-Step Guide How To Put One Picture On Top Of Another On iPhone

When it comes to basic image editing, among the best iPhone photo editor apps you can use is the Photos app itself. Yes, it's more than just a gallery as it allows you to change the adjustment settings (e.g., brilliance, exposure, brightness), apply a filter, add drawings, and crop the pictures to achieve your desired look.
However, the problem with the Photos app is that its features are pretty limited, and one of the things it can't do is put a picture on top of another. So now what happens when you're creating a brochure and need to add your product on a fancy background? Or when you want to insert your pet cat into a family photo you already took without him? No, you actually don't need to rush to your computer to overlay your photos. You can still edit them right on your iPhone. We'll walk you through three simple methods on how to do so.
Method 1: Create an overlay shortcut with the Shortcuts app
One of the coolest ways you can use Shortcuts on your iPhone is to put two photos on top of each other. Here's how:
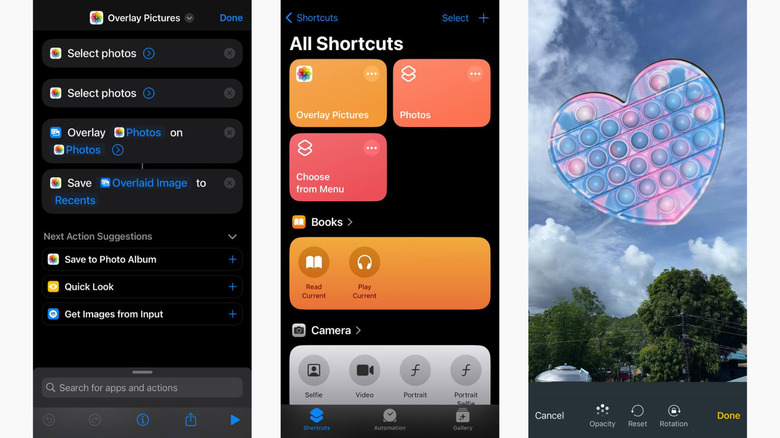
- Launch Shortcuts.
- Make a new shortcut by tapping the plus sign at the upper right corner.
- Hit the Add Action button.
- Scroll down to Photos.
- Choose Select Photos as your first action.
- Add another Select Photos action. Expand the Photos menu and tap on Select Photos.
- Close the Photos menu by pressing the X button.
- Add an Overlay Images action. Select the search bar at the bottom and navigate to Media > Overlay Image.
- Configure your Overlay Image action:
- Tap and hold on the blurred Image text next to the word "Overlay."
- Press Select Variable from the floating menu.
- Choose Photos under your first Select photos action.
- Press and hold on the second Photos text in the Overlay action.
- Go to Select Variable.
- Tap on Photos under the second Select photos action.
- Add a Save to Photo Album action by expanding the Media menu and selecting Save to Photo Album under the Photos options.
- Rename your shortcut by selecting Save to Photos Album at the very top, going to Rename, and typing your new name.
- Press Done to save your shortcut.
- Run your newly created shortcut by simply pressing on it.
- Select the image you want to overlay. This is the photo that goes at the top.
- Pick your second image. This serves as the bottom layer.
- Edit the overlaid photo as needed. You can resize it (just zoom in or out), drag it in place, change its opacity, and rotate it (or stop it from rotating).
- Once you're happy with the results, press Done.
You should now see your overlaid photos in the Photos app.
Method 2: Overlay multiple photos in Canva
If you want to put more than one photo on top of an image, you can use Canva. The app allows you to overlay as many photos as you need. Follow these steps to do so:
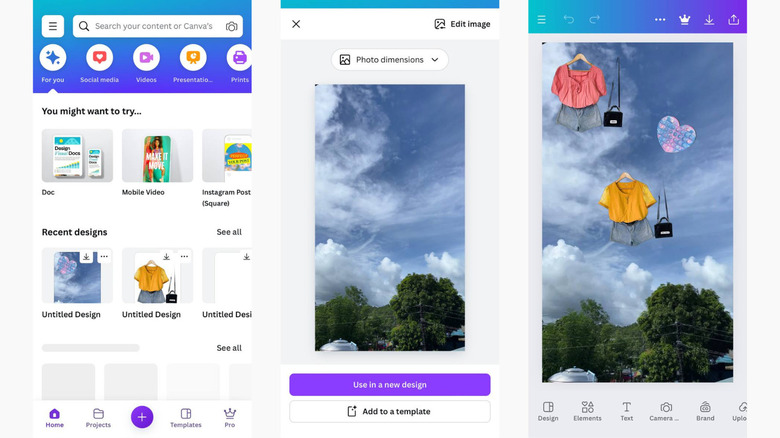
- Install and open Canva from the App Store.
- Sign in to your account or create one if you haven't already.
- Select the plus button at the bottom.
- Under Start creating from your media, tap Use your own photo.
- When prompted, give Canva full access to your images.
- Select your first photo. This will be used as the bottom image.
- Press Use in a new design.
- In the Uploads menu that appears, press Upload files > Photo Library.
- Choose all the images you want to overlay. If they don't have transparent backgrounds yet, you might want to remove the background of your photos with your iPhone first.
- Hit Add to upload your images.
- In the Uploads menu, tap one of the overlay photos to add it to your bottom image.
- Adjust the first photo. Move it to your desired position, drag the corners to resize it, drag the sides to crop, and grab the rotation icon at the bottom to rotate it.
- After you're done with the first image, close its editor menu by tapping the X icon at the bottom.
- Open the Upload menu again.
- Select your second image.
- Repeat Steps 12 to 15 until you have all your overlay photos on your bottom image.
- To save your image:
- Go to the Share icon at the top right.
- Select Download.
- (Optional) Change the file type to JPG, PDF, GIF, or SVG.
- Press the Download button.
Your edited photo will be saved directly to your Photos app.
Method 3: Use the Overlay feature on Fotor
If creating a shortcut is too much work, a photo editor app with an overlay feature like Fotor might just be what you need. Here's how to use the app to put a picture on another picture on iPhone:
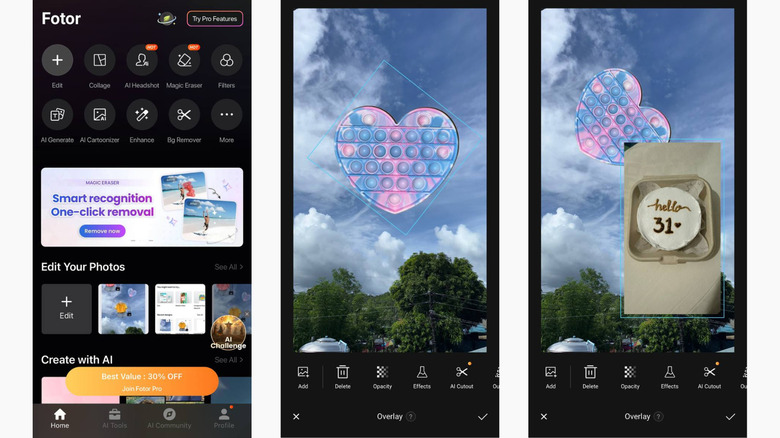
- Install and open Fotor from the App Store.
- Keep pressing Next on the welcome screens.
- When prompted, select Allow Full Access to give Fotor access to your images.
- Tap on the Edit icon at the top.
- Choose your bottom image from your library.
- (Optional) Edit your image as you please. Options include changing the focus, applying effects and filters, and adjusting the brightness, among other things.
- From the toolbar at the bottom, select Overlay.
- Press Add in the bottom left corner.
- Select your second picture. It will then be automatically added to the top of your first image.
- Drag your overlay image to where you want to place it.
- (Optional) Edit your overlay image using the available tools. You can crop it, rotate it, adjust its opacity, apply an effect, add an outline, and flip it vertically or horizontally. If you want to remove the background, you can also do so with the AI Cutout tool. This, however, is only available for Fotor Pro subscribers.
- (Optional) Overlay another image by tapping on Add and picking a new photo from your library.
- Once you're done, hit the check mark in the bottom right corner.
- Select Save.
Go to your Photos app and check your edited image.