How To Fix Windows Modules Installer Worker High CPU Usage

Windows users often encounter high CPU usage due to some background processes, which can cause the system to slow down or become unresponsive. One such process responsible for this is the Windows Modules Installer Worker.
This process, also known as TiWorker.exe, is essential for keeping your system updated with the latest Windows. It manages installing, modifying, and removing Windows updates and optional system components. It's certainly a legitimate and important Windows process responsible for the system's proper functioning. However, it can occasionally lead to high CPU usage for several reasons.
If the update files are corrupted, the process won't be able to execute updates. Still, it will continuously attempt to install them, causing high CPU usage. Similarly, misconfigured Windows update settings, and conflict with security programs, can also disrupt the normal functioning of the TiWorker.exe process.
If you are experiencing continuous high CPU usage due to the Windows Modules Installer Worker process, we'll provide you with a few solutions and step-by-step instructions for fixing it. The methods listed in this guide are performed on Windows 11 but will also work on Windows 10, with slight changes in the process.
Basic solutions to fix high CPU usage

Before applying advanced solutions, perform some basic checks that might solve Windows Modules Installer Worker's high CPU usage. It might sound absurd, but sometimes restarting the system is the simplest yet most effective solution to common Windows issues. It clears any temporary glitches and gives your system a fresh start.
As mentioned, the Windows Modules Installer Worker is essential for updating Windows, so sometimes it's better to let it run and, instead, end other resource-consuming processes to avoid high CPU usage. Press the "Ctrl + Alt + Delete" key combination to launch Task Manager. Look for processes other than TiWorker.exe that are using high CPU and end those.
Although Windows Modules Installer Worker is a legitimate Windows process, sometimes you need to be careful. Cybercriminals can release malware with a similar name to confuse users. If the process is abruptly using the system resources and you are sure that there's no update process going on, then it might be a malware program causing the high CPU usage. Thoroughly scan your system with a robust anti-virus program to catch malicious files on your PC. You can also reboot your system into Safe Mode to filter out fake processes and applications.
Finally, if you urgently need to use an application but TiWorker.exe isn't allowing you to, you can pause Windows Updates from Windows Settings and resume them when your system is free.
Run Windows Update Troubleshooter
Windows OS comes with in-built troubleshooters that scan and fix common system issues, including problems with updates. The Windows Modules Installer Worker is a Windows Update process, and if the update is facing issues, it can cause high CPU usage. It is best to run the Windows Update troubleshooter to diagnose the problem and apply the recommended steps.
Here's how to do that:
- Click the Start button and select Settings from the Start menu.
- Switch to the System tab on the left and select the Troubleshoot option on the right. On Windows 10, you can find the Troubleshooter option under Update & Security settings.
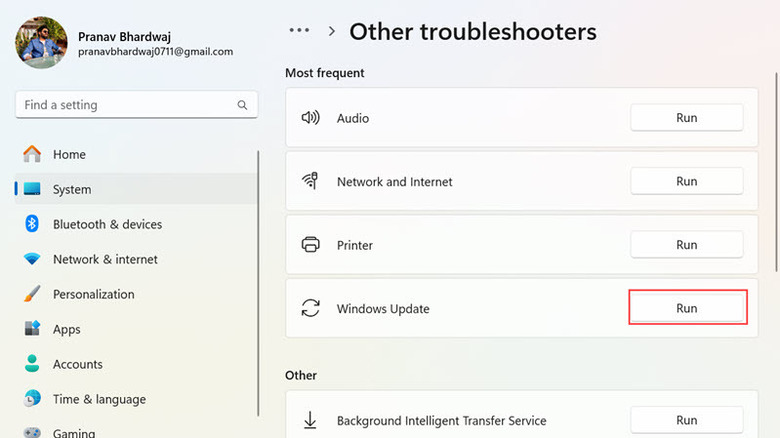
- Next, click the Other troubleshooters option.
- Look for the Windows Update troubleshooter and click the Run button next to it.
- Let the troubleshooter scan for the issues.
After the scanning is complete, apply the steps recommended by the troubleshooter to potentially fix the high CPU usage. Restart your system and check if the process is still unexpectedly using your system resources.
Restart Windows Modules Installer service
High CPU usage can also occur if the Windows Modules Installer service is stuck or becomes unresponsive. In such a case, restarting the service might refresh the process and solve the problem. Here's the process to do so:
- On your keyboard, press Windows + R to launch the Run Command window.
- Type services.msc and hit the enter key to launch the Windows Services window.
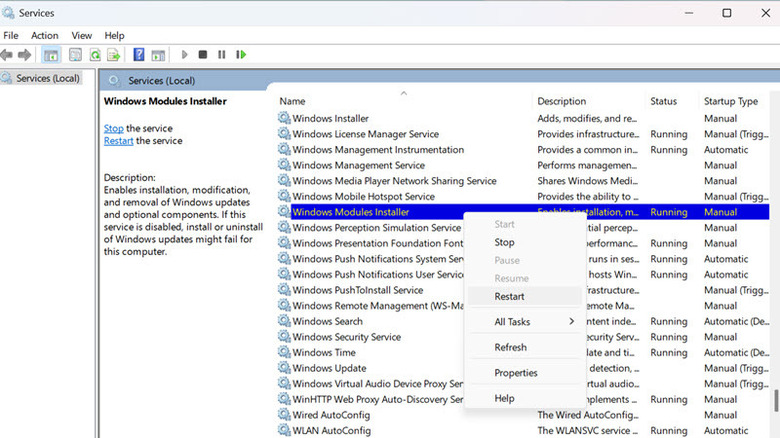
- Scroll down and search for the Windows Modules Installer service.
- Right-click on it and select the Restart option.
Check if the high CPU usage is fixed. If not, temporarily stop the Windows Modules Installer service. This will immediately stop the Windows Update process and all of its components, to free up the CPU for other tasks.
Here's how to stop the service:
- Launch the Windows Services window and again look for the Windows Modules Installer service.
- Double-click on it to open its options.
- Under the Service status section, click the Stop button to stop the service.
- Next, expand the drop-down menu next to Startup type and select Manual from the list. This will prevent the service from restarting automatically without your intervention.
Close the Services window and launch Task Manager to check the CPU usage status.
Run System File Checker command
Corrupted system files are another cause of the unusual CPU usage by the Windows Modules Installer Worker process. Fortunately, Windows comes with a built-in System File Checker (SFC) tool that scans for corrupt system files and repairs them. You can quickly run this tool using any command line program (Command Prompt or PowerShell) that you prefer.
Here are the steps to follow:
- Right-click on the Start button and open any of the command line tools with admin privilege.
- First run DISM by using this command: DISM.exe /Online /Cleanup-image /Restorehealth.
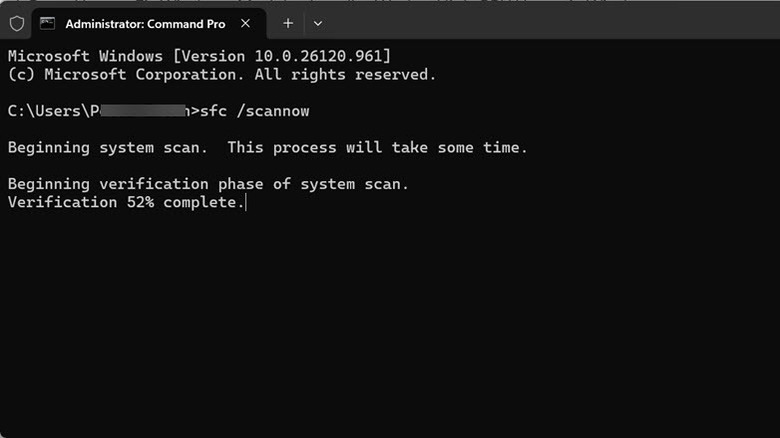
- Next, type or copy and paste this command on the command line window and hit enter: sfc /scannow.
- Let the tool run completely. The process will take some time to complete.
If you get the "Windows Resource Protection did not find any integrity violations" message after the SFC command is successfully executed, then the high CPU usage is not caused by corrupt system files. However, if the tool has performed some repairs, restart your system to make the changes effective. After the restart, check the CPU usage status from the Task Manager.
Clear the Windows Update cache
If the high CPU usage is caused by a stuck Windows update, you need to clear the Windows update cache and download and install the new update files freshly. Clearing the Windows update cache is not as straightforward. First, you must stop the Windows Update and Background Intelligent Transfer Service (BITS) to avoid any "file in use" conflicts. Then, clear the Download folder under the SoftwareDistribution folder. Finally, restart the services you stopped.
Here are the step-by-step instructions:
- Right-click on the Start button and select Terminal (Admin) from the Windows Power menu.
- One by one, type the following commands and hit enter to stop the update and BITS services:
- net stop wuauserv
- net stop bits
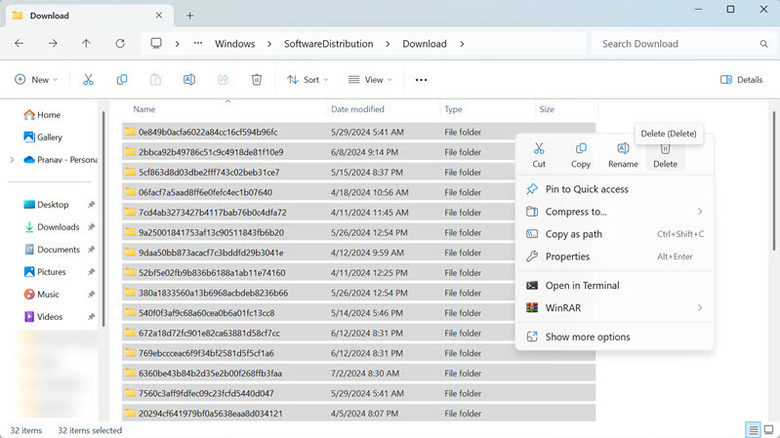
- Now right-click on the Start button, select the File Explorer, and go to the following address: C:\Windows\SoftwareDistribution\Download
- Use Ctrl + A to select all the content of the Download folder and select Delete. Ensure that you delete each file and folder. As the update services are stopped, you shouldn't have any trouble clearing this folder.
- Now, you need to restart the services you stopped. For that, launch the Terminal (Admin) again and use the following commands:
- net start wuauserv
- net start bits
Close the Terminal window and restart your PC. Check if the problem is solved.
Enable Metered Connection
The Windows Update process continuously works in the background to check for the latest updates. This continuous activity might cause high CPU usage and disturb your other work. To put a cap on the amount of data used for updates, you can enable the Metered Connection option on your Windows device. This option is available on both Windows 10 and 11.
Here are the steps to enable it:
- Press Windows + I on your keyboard to launch Windows Settings.
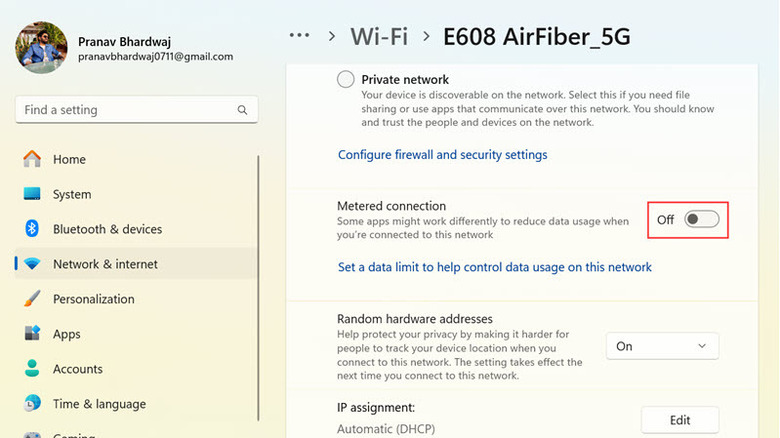
- Switch to the Network & Internet tab on the left pane and select the Wi-Fi option on the right. On Windows 10, select Network & Internet settings and then choose Wi-Fi from the left pane.
- Select the Wi-Fi network to which you are connected and want to put a limit on.
- Scroll down and look for the Metered Connection option. Toggle the button next to it on to enable it.
- Next, below it, you will find the option to set a data limit to control internet usage.
Enabling this option will limit the Windows Update service activity, thereby reducing the Windows Modules Installer Worker's high CPU usage.