How To Fix The 'Windows Was Unable To Complete The Format' Error

Formatting a drive is a routine task for Windows users when they need to erase and empty a whole partition or an external disk to free up space. However, this doesn't always go according to plan, and many Windows users get errors like "Windows Was Unable to Complete the Format."
Encountering such a problem can be really frustrating, especially when you urgently need to use the drive. This error message generally indicates that Windows is having trouble accessing and modifying the drive due to various reasons.
It might be possible that your external drive or SD card is write-protected through a physical switch or software, halting the formatting process. It's also possible that the drive you are trying to format is corrupted in some way. A physically damaged drive can also be the cause of the error.
If your computer is displaying this formatting error, we'll discuss some ways to fix it and help you format your drive successfully. Please note, these step-by-step instructions are for Microsoft's Windows 11 OS. However, they'll work on Windows 10, too, though some steps may be slightly different.
Preliminary checks to fix Windows Was Unable to Complete the Format error
Before you perform any of the complex procedures, it's a good idea to try simpler actions to rule out any basic issue that could be causing this error. Begin by checking your drive and computer for physical damage. A physically damaged drive typically has cracks, bends, or broken connectors that can interfere with Windows communications.
Next, ensure that the drive is properly connected to your PC. Check for broken cables or loose connections on both ends. If it's a USB drive, ensure it's correctly plugged into the USB port. It's possible that the USB port is the culprit, so try using a different USB port than the current one. If you are trying to format an SD card, use a card reader that is different from the one you are currently using.
Next, ensure that the write-protected physical switch of your SD card is switched off when attempting to format it. Some USB drives have physical switches too that are worth checking.
Use Windows Disk Management
If none of those simpler actions resolve your drive issues, Windows Disk Management is your next step. It's an app that's generally used for formatting, erasing or partitioning your storage drive. If you are getting formatting errors while trying to format a drive from File Explorer, it's possible that you need to use this app to resolve your problems.
Disk Management comes with Windows, so to use this app to fix this and format the drive, follow these steps:
- Press the Windows + R keys on your keyboard to open the Windows Run Command box.
- Type or copy and paste the following command and press the Enter key to open Disk Management: diskmgmt.msc.
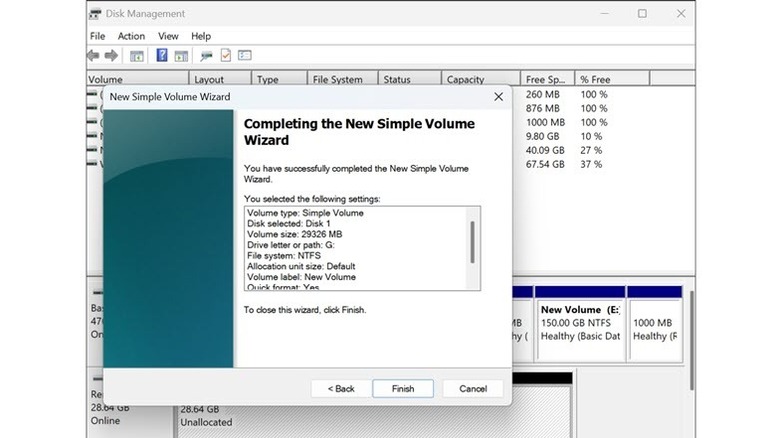
- Look for the drive that is having trouble formatting. Right-click on it and select New Simple Volume.
- A new window will be opened, directing you to create a new volume of this unallocated drive. Click Next and follow the on-screen instructions
- In the following steps, specify the volume size, assign the drive letter, select the file system (NTFS for larger and modern drives, FAT32 for broader compatibility, etc.), and assign a label to the volume.
- Finally, click the Finish button to create a New Simple Volume of the unallocated space and fix the formatting issues.
This process should format the drive, fixing any more formatting errors.
Using Command Prompt
If Disk Management doesn't work, you may need to move toward the command line interface. There, you can use the Command Prompt to potentially fix a formatting error. You need to have administrator rights to use this method.
In the Windows search box, type Command Prompt, right-click on its icon, and select Run as Administrator. On the command line window, type "diskpart" and hit Enter.
Then, follow these steps:
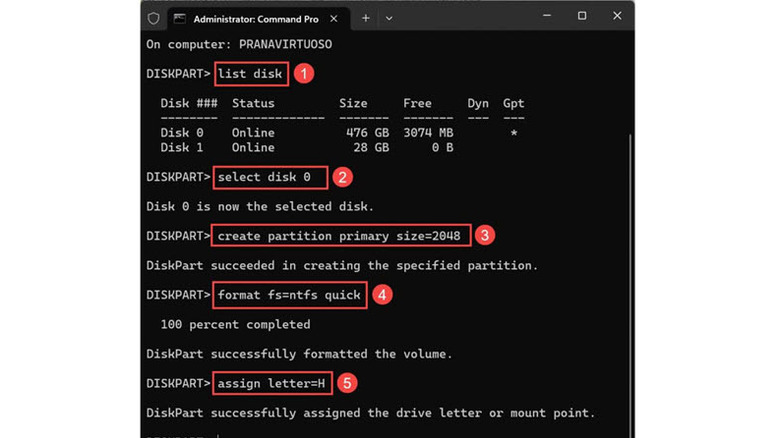
- To display the list of all the drives connected to your computer, type "list disk" command and press the enter key.
- Identify the disk in question by recalling its size. After that type "select disk N", where N is the number of your disk, such as 0, 1, or 2, and then press the enter key.
- Type "clean" to erase all the data from the selected disk. Now, you need to create a new partition for this drive. Type "create partition primary" and hit enter. You can also assign the size to the partition if you like to.
- Next, format the drive by typing "format fs=ntfs quick". If applicable, replace ntfs with fat32 or another file format.
- Finally, assign the drive letter by typing "assign letter=H" command and hitting enter. Replace H with your desired drive letter.
Using this method, the problematic drive will be wiped clean and won't cause any formatting error.
If your formatting errors persist, it's likely you are facing a hardware issue. In that case, you need to take your drive to the service center for repair, or potentially purchase a new one.