How Raspberry Pi's New AI Kit Actually Works
When you think of artificial intelligence (AI), the first things that likely come to mind are chatbots like ChatGPT and Google Gemini and image generators like Midjourney and Stable Diffusion. However, there's actually another application of AI that has been widely used in industrial settings and electronic enthusiasts communities even before AI took over most of the consumer devices and services you know. That AI application is computer vision. It's a subset of AI that's typically used to help recognize faces to unlock doors, identify defects in products, and analyze paper documents to extract data.
For electronic hobbyists and amateur developers, the Raspberry Pi is one of the easiest and least expensive ways to get into computer vision projects. But while it's cheap and user-friendly, it isn't the most powerful device to run AI models. You'll typically get low frame rates of about two to five, which means slow detection and even a laggy camera preview. Plus, there's the risk of overheating the Pi. The solution to this is to get an external device to help with the processing. Unfortunately, they're either too expensive or too low-performance. But now, after years of relying on third-party devices, users can start building AI-powered Raspberry Pi projects with the newly released official AI accelerator, the Raspberry Pi AI Kit. Here's a rundown of what this kit is and how it works.
What is the Raspberry Pi AI Kit?
The Raspberry Pi AI Kit is a newly released accessory for the Raspberry Pi 5, costing almost as much as the Pi 5 at $70. True to its name, it's designed to make the single-board computer better equipped to run projects involving artificial intelligence, especially those projects using Raspberry Pi and a camera.
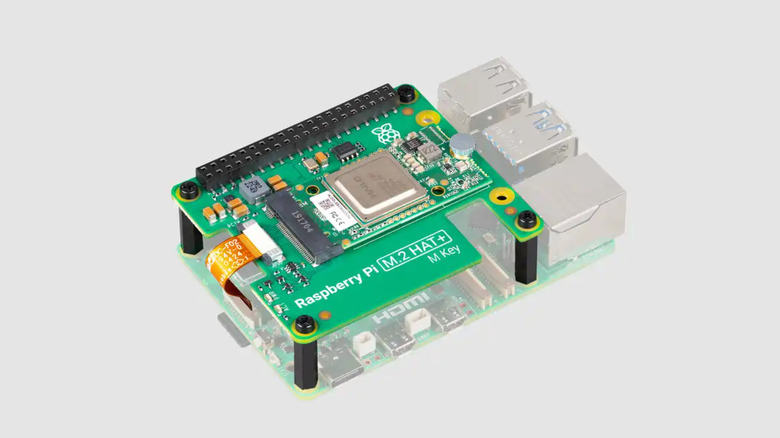
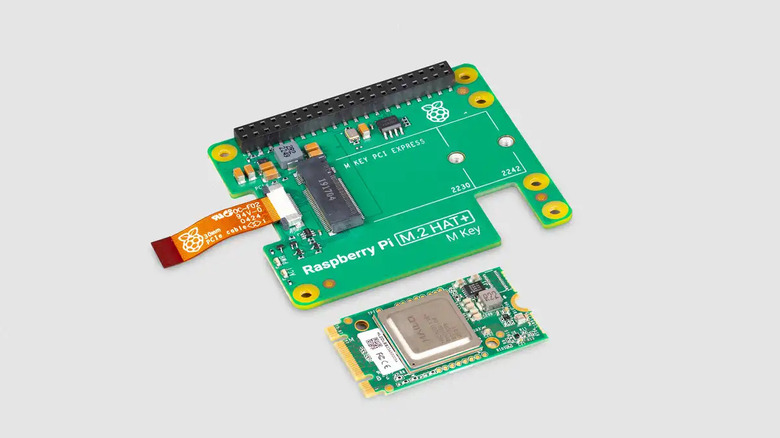
Two primary components make up the AI kit. First, you have an AI acceleration module, which is powered by the edge AI processor Hailo-8L. It features an inferencing performance of 13 Tera Operations Per Second (TOPS), minimal power usage, and an industry M.2 2242 form factor for easy interfacing. The AI module is responsible for running the neural networks you'll be using in your project, eliminating the strain on the Pi and making it more available for other functions.
Unfortunately, you can't connect the AI module directly to the Pi as the board doesn't have a built-in M.2 socket. That's where the second component of the kit comes in: the Raspberry Pi M.2 HAT+. This Hardware Attached on Top is equipped with an M.2 slot, where the AI module is inserted (the HAT+ and the module comes pre-assembled. So you won't need to attach them yourself). The HAT+ with the module is then connected to the Raspberry Pi 5 via a PCIe 2.0 cable. Also included in the AI kit are some mounting essentials (e.g., spacers, screw) to attach the HAT+ onto the Pi board and a 16mm GPIO header to make the Pi's GPIO pins accessible from the HAT+. For convenience, the HAT+ is designed to be mounted even when there's an Active Cooler fan connected to the board.
How to set up the AI Kit with the Raspberry Pi 5
Before connecting the AI kit to your Pi, you need to update your board. Run sudo apt update && sudo apt full-upgrade in the terminal to update and upgrade your software. Then, run sudo rpi-eeprom-update to check whether you're using a 6 December 2023 firmware version. If it's older, open the Raspberry Pi Configuration tool (sudo raspi-config on the terminal) and go to Advanced Options > Bootloader Version > Latest. Then, run sudo rpi-eeprom-update -a to get the latest firmware version. Finally, reboot to apply the changes.
After updating your board, it's ready for the AI Kit. Here's how to set it up:
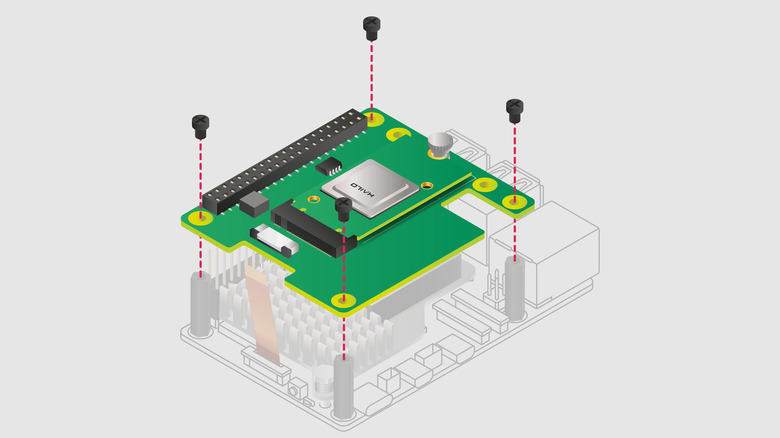
- Connect your components together:
- Place the Active Cooler on the Raspberry Pi. This prevents your board from heating up excessively.
- Connect a Raspberry Pi-supported camera module to the board.
- Attach the stacking header and ribbon cable from the AI kit to the Pi's GPIO pins and PCIe port, respectively.
- Secure the AI Kit on top of the Pi board with the spacers and screws.
- Connect the PCIe cable to the AI Kit.
- Power up your Pi. It should recognize the AI Kit automatically.
- Turn on PCIe Gen 3.0 by going to the Raspberry Pi Configuration CLI and navigating to Advanced Options > PCIe Speed > Yes.
- Reboot the Pi to finish the activation.
- Install the AI Kit dependencies by running the CLI command sudo apt install hailo-all.
- After installation, reboot the Pi again.
- Verify the installation by typing hailortcli fw-control identify into the CLI. It should output a message saying "Executing on device."
- Test the camera with CLI command rpicam-hello -t 10s. You should see a camera preview for ten seconds.
Now, you have the AI Kit up and running with your Raspberry Pi 5.
How to test out your AI Kit with some example programs
Two sets of example programs you can use to try out your newly set up AI Kit are the official Raspberry Pi examples and the demos from Hailo. The official Pi examples use the rpicam-apps CLI applications, which you've already installed along with the other AI Kit dependencies. To run the Pi's example programs, follow these steps:
- Clone the rpicam-apps GitHub repo to your Pi by running git clone –depth 1 https://github.com/raspberrypi/rpicam-apps.git ~/rpicam-apps.
- Test out the examples:
- Object Detection which frames the detected objects with bounding boxes: rpicam-hello -t 0 –post-process-file ~/rpicam-apps/assets/hailo_yolov6_inference.json –lores-width 640 –lores-height 640. You can also replace yolov6_inference with yolov8_inference, yolox_inference, or yolov5_personface just to see which object detection model you prefer using.
- Pose Estimation which essentially draws a 17-point stick figure over the human bodies: rpicam-hello -t 0 –post-process-file ~/rpicam-apps/assets/hailo_yolov8_pose.json –lores-width 640 –lores-height 640
- Image Segmentation which overlays a colored mask over the detected objects: rpicam-hello -t 0 –post-process-file ~/rpicam-apps/assets/hailo_yolov5_segmentation.json –lores-width 640 –lores-height 640 –framerate 20
Hailo's examples also feature object detection, pose estimation, and instance segmentation. It allows you to apply the AI models on a file, the stream from a USB camera, or the stream from an official Raspberry Pi camera. The instructions for Hailo's demos are on their GitHub repo. After trying out the demos, you can move on to testing the AI models Hailo made, which you can access from their model zoo. Here, you can find models for various applications, such as face recognition, depth estimation, and single-person pose estimation.