How To Remove Start Menu Ads In Windows 11 (And Other Annoying Settings To Fix While You're At It)
In 2016, Microsoft made a decision everyone had been dreading – serving ads directly to your Windows 10 operating system. At first, it was only a lockscreen advertisement for "Rise of the Tomb Raider" on the Window Store, and only appeared on free versions of the operating system. Still, skeptics argued it set a worrying precedent, and they were right. File Explorer later got ads, and Edge nags started appearing in the Start Menu.
These decisions and more made Windows 10 what Slate called a "privacy nightmare." If users thought Windows 11 would flip this paradigm, they were wrong. Microsoft upped the ante with even more intrusive, privacy-disrespecting decisions like putting Start Menu ads right alongside your recent files. Thankfully, there's some good news: you can disable that — among other annoyances — in just a few minutes.
Some of the settings to disable annoyances can be changed right from the Settings app. Others — like Start Menu ads — may require installing third-party software or digging into the registry editor, both of which can be done safely. We've tested these tips, but SlashGear takes no responsibility for anything that happens to your device as a result of trying them. If none of that puts you off, then let's take a look at how you can remove Windows 11 Start Menu ads and many, many other invasive features.
Remove Start Menu ads
Windows 11 Start Menu ads consist of suggested apps from the Microsoft Store in the Recommended section, the area where you usually see recently accessed programs and files. They aren't full-on ads, to be fair, but it is annoying to see a program you don't have wasting space in your Start Menu. If you want that space back — or would simply rather not make your Start Menu into a digital Microsoft roadside billboard — then disabling it is easy. Head to Settings > Personalization > Start and switch off "Show recommendations for tips, app promotions, and more."
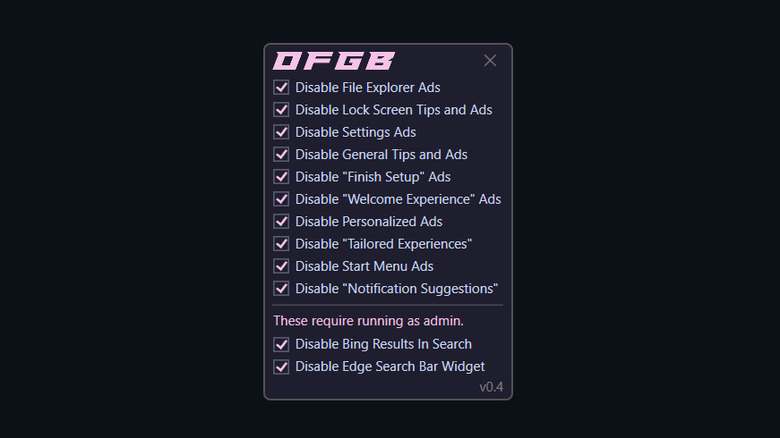
Another option is using OFGB, short for "Oh Frick Go Back." This is a free, open-source program available on GitHub that disables a plethora of Windows settings with one click each. Head to the main GitHub page, scroll down to the Downloads section, and find the Click Here link. Conversely, you can download the latest release from the Releases tab. We recommend the first file named OFGB-Deps.exe, which includes all the necessary dependencies to run it out of the box.
Launch the program (right-click and launch as administrator if you want access to all the settings) and you'll be presented with a list of checkmark boxes. That's all OFGB is — no extra frills or dialogue boxes. Check everything you want to disable. You can remove File Explorer ads, Lockscreen Tips and Ads, Welcome Experience ads, and more. In addition, some options on OFGB can be disabled in other ways, which we'll show you later on. Once you've checked the boxes that suit your fancy, restart to apply the changes.
Remove bloat with Bulk Crap Uninstaller

A fresh copy of Windows 11 comes with a ton of pre-installed bloat. Programs like WhatsApp, the LinkedIn app, Microsoft ClipChamp (what even is that?), Solitaire, and vendor-specific third-party programs like McAfee Antivirus. Bloatware clutters your device, wastes storage space, and sometimes consumes background resources – all good reason to remove it. There are tricks you can use to avoid this bloat during the install, but after the fact, the next best thing is Bulk Crap Uninstaller. BCU lets you mass-uninstall programs in fewer clicks — with the addition of many other advanced options — rather than doing so manually from the Settings menu.
After selecting the apps you want to remove, we recommend creating a System Restore point and killing any processes that are interfering, both of which BCU can perform for you. Once started, BCU will execute each uninstallation one at a time (or multiple at a time, if you allow it) and let you know at the end if any failed. BCU's uninstallation process will automatically push through uninstall prompts on your behalf so you can just sit back and relax. The great thing about BCU is it's as simple or as complex as you like, so power users won't be left wanting for granular control.
At the end, use the leftover removal window to clean up any stranded program files like registry entries and leftover app settings. BCU will give you a confidence rating on how safe it is to remove a particular leftover, so think twice about giving the boot to anything that sits at questionable or lower. An alternative to BCU, if you weren't a fan, is Win11Debloat.
Remove the News Feed widget
Raise your hand if you get your news from the Windows 11 News Feed widget. We get the feeling no one did, and if you do, you no doubt feel like you're perusing a lot of unnecessary tabloid news every time you use said widget — one fed directly into your personal computer's private space, no less. If you aren't going to miss it and don't want it wasting system resources, here is how to remove it.
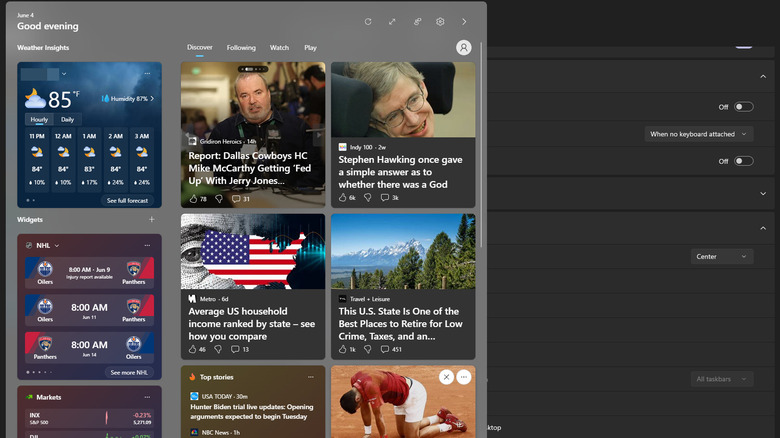
Summon your widgets by clicking on the weather forecast on the bottom left-hand side of your screen. On the top right of the window that pops up, find the gear icon. This is where we see Microsoft's reprehensible tendency of obfuscating settings it doesn't want you to disable, as there's no News Widget toggle. Instead, News can be disabled within the Show or hide feeds option. Toggle off Microsoft Start and Windows 11's built-in tabloid is as good as gone.
Now, return to your widgets and you should only see the ones you have currently allowed. Rejoice. While you are here, take the time to remove any widgets you don't use and add the ones you do. Some widgets can actually be useful, and adding the right ones can change how you use your PC.
Disable unwanted startup apps
Does your computer feel like it's struggling to start up, taking several long minutes before you can use it without a glacial slowdown? There's a good chance that you simply have too many startup programs. Newly-installed software loves to automatically add itself to the startup queue — even if you don't give it permission — and then hog precious system resources like CPU and RAM. This might be software you never even use such as iTunes Helper or Skype, and these are just a few of the many apps the average person can forbid without damaging their experience.
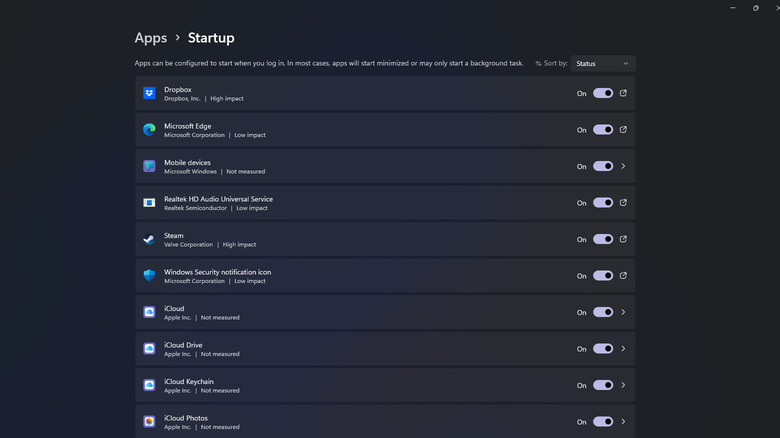
The easiest way to disable startup apps is to head to Settings > Apps > Startup. You'll see a list of apps with a toggle next to each. Simply disable any you don't need, but do be careful. Some unfamiliar names may actually be necessary programs; check to make sure you aren't disabling a background service for another app you use.
Startup programs can be disabled from the Task Manager, too. Pro tip — the fastest way to open task manager is with the shortcut Ctrl + Shift + Esc, rather than right-clicking the Start Menu or searching for it. Go to the Startup tab, which looks like a speedometer. You'll see the same list of startup apps, but instead of a toggle, you will have to enable or disable them one at a time. Sort the list according to enabled or disabled to make it easier to view.
Streamline Microsoft Edge
Hot take incoming — Microsoft Edge browser is way better than Chrome, feature-wise. It has an excellent Immersive Reader mode, customizable Vertical Tabs, resource-saving Sleeping Tabs, and even a Split Tabs mode and a built-in VPN — though we wouldn't necessarily trust the latter over our recommended top VPNs. Still, people hate the browser for good reason, particularly with how aggressively it shoves things in your face that you don't want. Most of those things, luckily, are easy enough to disable with a few clicks.
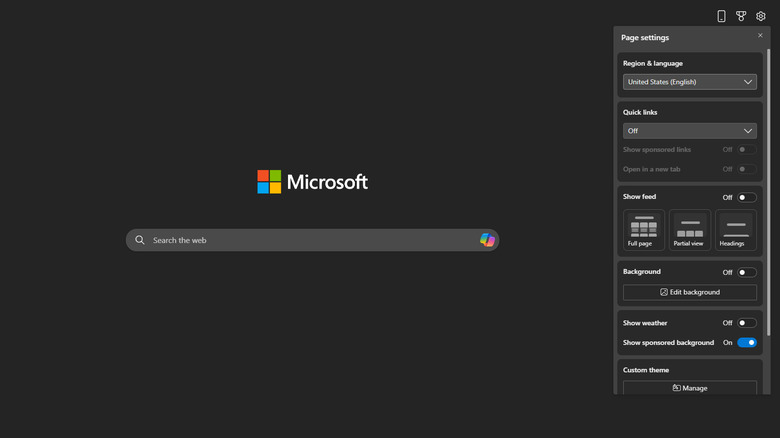
First, start with the New Tab Page. Open a new tab and click the gear icon on the top right to disable all of the toggles that don't interest you. Change from the Inspirational to Focused Layout, remove the Quick links unless you use them, disable Show feed, and, if you like, turn the Background to Off for a more minimalist experience. Your new tab will probably load a pinch faster and have no distracting Microsoft extras.
Next, we recommend getting rid of that new Copilot sidebar. In Settings > Sidebar > and disable Show Copilot at the top. This also conveniently disables all the other options, such as the default setting to automatically open Copilot. In Settings > Privacy, search, and services disable the toggles Save time and money with Shopping in Microsoft Edge and the data collection option under Personalization & advertising. Finally, disable any other nags you don't want. Lastly, under Address bar and search, change from Microsoft's Bing to Google — unless you prefer the new GPT-4 powered search engine.
Disable Bing search results in Start Menu
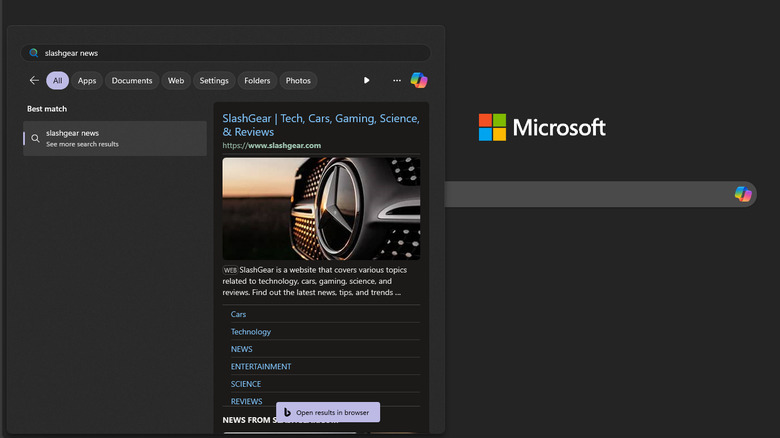
There's nothing more annoying than searching for a program or file in the Start Menu and accidentally hitting enter on a Bing search query rather than your intended program. Not many people are actually using this feature and most have their browser open and ready to search anyway, so go ahead and disable it if you like.
To disable this, you'll need to dive into the registry — a harmless procedure, if you follow instructions. Either search for regedit in the Start Menu, or right-click the Start Menu, select Run, type regedit, and hit enter. On the left-side panel, find the path Computer\HKEY_CURRENT_USER\SOFTWARE\Policies\Microsoft\Windows. Right-click the Windows folder, then New > Key. Name it Explorer and press Enter, unless you already have an Explorer folder. Right-click your new Explorer folder, then New > DWORD (32-bit) Value. Give this new value the name DisableSearchBoxSuggestions and change the parameter Value data to 1. Finally, click OK.
Either restart your PC, or restart Windows Explorer for this change to take effect. Open Task Manager with Ctrl + Shift + Esc. Find Windows Explorer and use the Restart button. Be patient, as it will take a second for your interface to reload. Type something in the Start Menu and you should get no more Bing hits. If you run into problems — or you want those search results back — you can revert things by changing Value data back to 0 in the Registry Editor.
Disable Recall
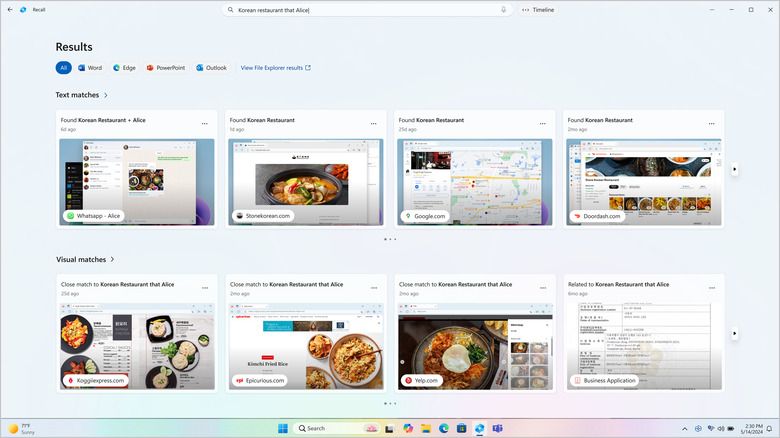
Windows Recall is a search engine for your PC, a background tool that records everything you've ever done on your computer. Controversial is definitely a word for it. Some find it Orwellian, but others think it may revolutionize the Windows experience. That's up for debate since it's not yet widespread, requiring a Copilot+ PC, which is a Windows device with a special neural processing unit. Despite this, users have found a way to enable it on any Windows 11 device that's running the 24H2 Preview build. As such, this section will only apply to someone who has a brand-new Snapdragon Copilot+ PC or has manually enabled it on a Preview build.
To Microsoft's credit, they don't try to hide the off switch for this feature. At any time, you can go to Settings > Privacy & security > Recall & snapshots and disable recall temporarily or for good. Recall presents more than just privacy concerns – three-months' worth of activity takes up a not-insignificant 25GB of storage space, and Recall by default earmarks a sizable portion of hard drive space for itself. Disabling Recall (or deleting its saved data) may be a quick fix if you're running low on storage. This is still a feature in active development, so we recommend keeping it off until it's proven to be reliable and sufficiently privacy-respecting.
Make the Taskbar better
For years, the taskbar has been cluttered with Microsoft bloat like the People app and Cortana. We didn't think Windows 11 could make it worse, but it somehow managed to beat our expectations, especially with the bizarre decision to put the icon smack in the middle by default. The good news is you can change the Start Menu icon back to its years-old left-hand orientation, among other things.
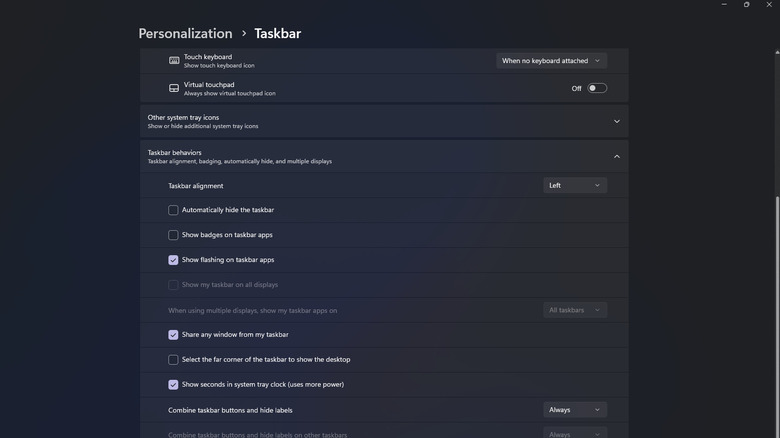
Open Settings and go to Personalization > Taskbar > Taskbar behaviors > and change Taskbar alignment to Left. Or, jump straight to these settings by right-clicking your Taskbar. Easy as that, your Start Menu now sits at the bottom left corner of the screen where it should have been in the first place. Be advised that you have to make this change in the Windows Registry if your copy of Windows 11 isn't activated. For any unwanted items, right-click on the taskbar. Use the pop up menu to remove anything you aren't using.
If you want an even easier solution — one that reverts all other taskbar settings from Windows' glory days — you can try the program StartAllBack. It returns icon labels, the ability to reposition the taskbar, dragging-and-dropping, and much more. StartAllBack isn't free, but at $4.99 we wager it's worth the money for how much it fixes without you having to open the hood.
Restore the Windows 10 right-click menu
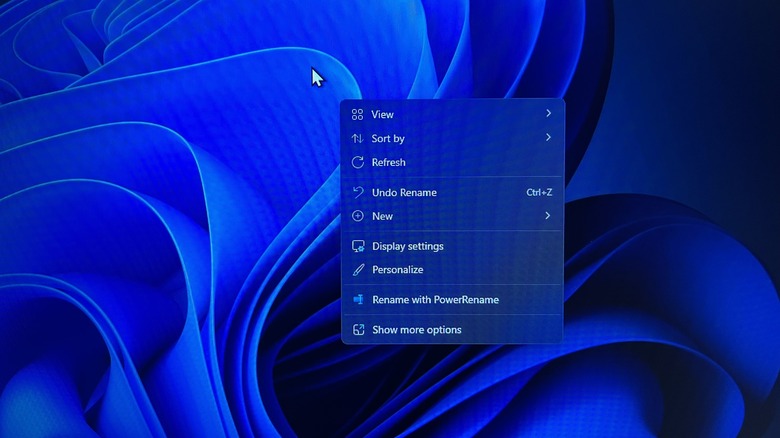
The right-click menu (also known as the context menu) was another major L for Windows 11, if you ask the power users. Microsoft truncated it to de-clutter and simplify it, hiding many much-used features behind "Show more options" at the bottom. Granted, you can hold down shift while right-clicking to get it back, but many would rather have it be the default.
Jump back into the Registry Editor with the same steps as before; either Run regedit or search for it in Start Menu. Navigate to the path HKEY_CURRENT_USER\Software\Classes\CLSID and right-click CLSID to create a new key with the name {86ca1aa0-34aa-4e8b-a509-50c905bae2a2} (make sure to include the curly brackets). Right-click the key you just created, create another new key, and call it, InprocServer32 and open the (Default) item. You'll leave the Set Value as (Default) and leave the value field blank. Hit OK. Once you restart your device, the change will take effect.
Get back your Windows 10 File Explorer ribbon

Another casualty in Windows 11 was the ribbon at the top of File Explorer, which included a denser spread of options to copy, paste, and create a new folder without right-clicking. Another simple registry tweak is all it takes to return it. Just one caveat here: you will need to have Windows 11 21H2 or earlier; 22H2 and later editions, for some reason, don't let you make this change.
Right-click the Start Menu and Run regedit or search for it in the Start Menu. Go to Computer\HKEY_LOCAL_MACHINE\SOFTWARE\Microsoft\Windows\CurrentVersion\Shell Extensions. Once you've found that, look for a Blocked key and right-click it to create a new string value with the input {e2bf9676-5f8f-435c-97eb-11607a5bedf7}. If you don't see Blocked, create a new key under Shell Extensions with that name and add the string value mentioned previously.
Just as before, you will need to restart File Explorer for it to take effect – open Task Manager with Ctrl + Shift + Esc, click Windows Explore, then Restart. Tada! Your ribbon should be back.
Disable targeted ads
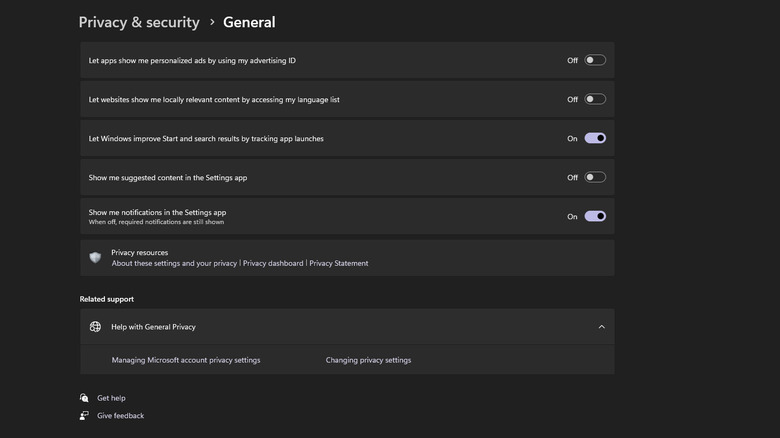
Nothing's worse than the feeling of getting a targeted ad that shows a disconcerting level of familiarity with your private life. So what's going on when that ad is appearing in an app, rather than your browser? The likely culprit is Microsoft's Advertiser ID. You can disable it and see only generic ads instead. In Settings > Privacy & security > General, disable the first two options — or all of them, if you're especially concerned for privacy.
While you're at it, you might as well disable all of Windows 11's creepy data and telemetry gathering practices. In Privacy & security > Diagnostics & feedback, disable Send optional diagnostic data, which also conveniently disables Improve inking and typing. If you want to go even further, you can toggle off Let Microsoft provide more tailored experiences under Tailored experiences.
Microsoft does retain the data it has already gathered, so you can ask to delete it by clicking the delete button next to Delete diagnostic data. You will see a notification telling you when your data will be gone from Microsoft servers. The options we've mentioned aren't comprehensive; you can take a deeper dive and disable even more diagnostics and telemetry, but these settings have the broadest impact.
Disable Copilot
Copilot has Windows users a little underwhelmed, since it's effectively ChatGPT with access to the internet and your personal data. If you use ChatGPT on a regular basis, then you probably have a browser bookmark or tab open with it ready to go anyway, making Copilot (until improved) superfluous. There are two options for removal: deleting the Copilot icon from the taskbar to de-clutter and avoid any accidental misfires, or permanently removing Copilot via Group policy.
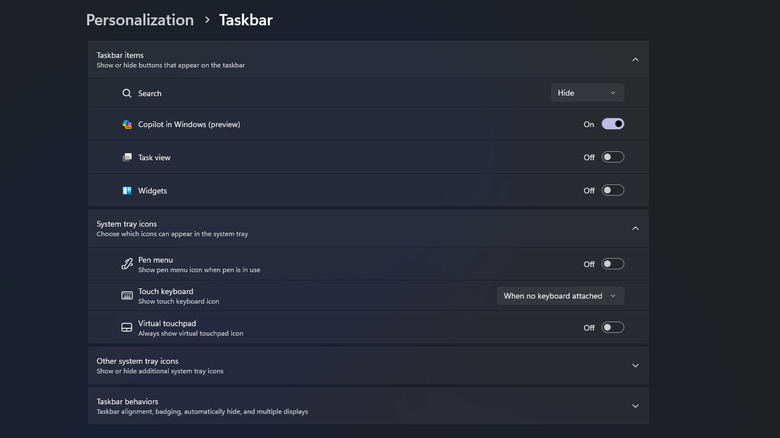
In Settings > Personalization > Taskbar you can simply hit the toggle next to Copilot. The icon should now disappear from the taskbar. Windows has a tendency to roll back settings with each update, though, so there's no telling if a Windows update will reset it — or if it's still using system resources in the background.
For permanent deletion on Windows 11 Pro, search for gpedit in the Start Menu and select Edit group policy. In User configuration > Administrative templates > Windows components > Windows Copilot, double-click Turn off Windows Copilot. A new window will pop up. Make sure Enabled is ticked, then apply the settings and hit OK. Unfortunately, these steps may not work in Windows 11 Home, but Pro users can enjoy your a Copilot-free experience. If you change your mind and want to give Copilot a second go later on, pop back into the Group Policy Editor and change the Enabled tick box to Not configured or Disabled.