Here's How Much It'll Cost To Build A DIY Raspberry Pi DAKboard
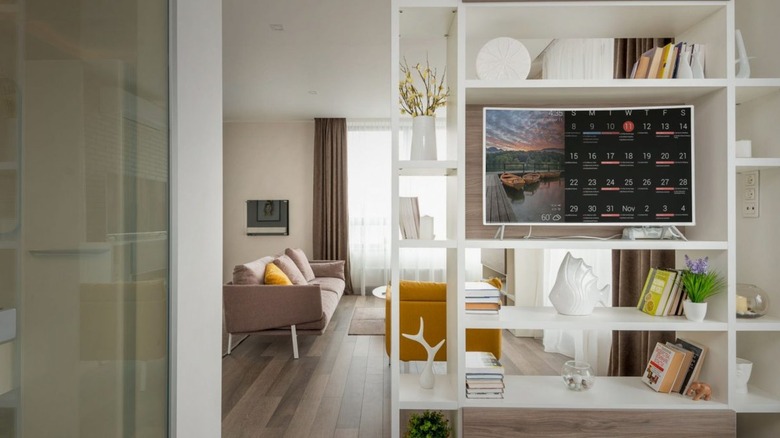
Have you ever wanted a smart display in your home capable of displaying the weather, news, and a calendar? Thanks to a product named the DAKboard, smart home displays are no longer science fiction. The company offers a range of digital displays powered by its own software that you can find in the DAKboard shop. But why pay the full price when you can build your own?
The Raspberry Pi is an incredibly versatile device capable of running several operating systems. With its small size and recent models showcasing some impressive specs, there are many cool projects you can do with a Raspberry Pi and a display. By installing DAKboard OS with the Raspberry Pi imager tool, you can now create a custom DAKboard with your Raspberry Pi. It's cheaper and relatively simple to set up, plus you can customize the system by using different displays.
Before getting started, it's worth considering the specific hardware required to calculate your budget, as some Raspberry Pi models aren't powerful enough for the project. Besides functionality, you may want a high-quality monitor for a better visual experience, which will also affect your budget. No matter what hardware you pick, there is both a budget-friendly and a more expensive option — depending on how polished you want your DAKboard to be. Let's look at the hardware and costs of building your own DAKboard with a Raspberry Pi.
What components do you need?
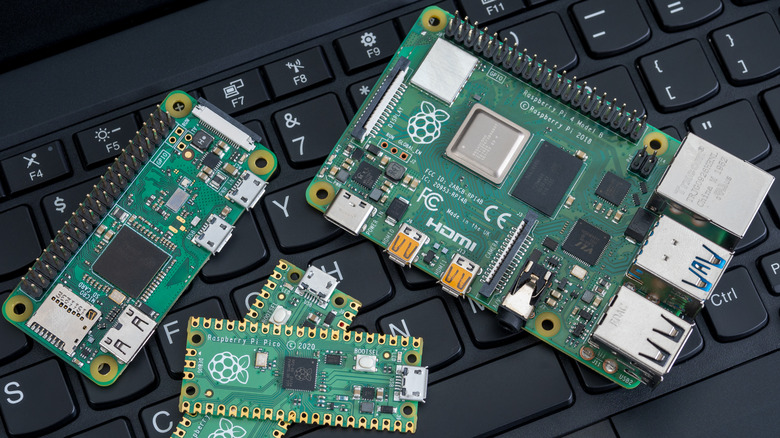
To build your Raspberry Pi DAKboard, you'll need a few cheap hardware components to get everything connected. The first is a Micro-HDMI to HDMI cable, as the Raspberry Pi models you need don't have a regular-sized HDMI port. You'll also need a MicroSD card (8 GB minimum) for the operating system and software.
Next, you're going to need a suitable Raspberry Pi for your DAKboard. While you can get away with not using the latest models, it's important to pick a model that's powerful enough and has the correct port specifications for your display. As a minimum guideline, two recommended models are the Raspberry Pi 3B+ and the Raspberry Pi 4B (with 2 GB of RAM or more). Choosing earlier models is likely to present issues with video output due to low onboard memory.
The final, and likely most expensive, item on the list is the monitor. The make and resolution of the display is up to you. However, be aware that earlier Raspberry Pi models like the 3B+ don't support 2K or 4K output, so it's important to pick a Raspberry Pi that's compatible with your display's features. One desirable aspect to look out for is an IPS display, which provides a clear picture from angles other than 90 degrees.
What is the total cost of the hardware?

With a good idea of the hardware required to build your DIY DAKboard, how much will it cost? Focusing on the cheaper components first, you can pick up a Micro-HDMI to HDMI adapter for around $5, and a Micro SD card with enough storage for $5 to $10 more.
A Raspberry Pi 4B (supporting 2K and 4K video output) costs around $45 with sufficient onboard RAM. Or, if you want to use the most powerful Raspberry Pi, you can pick up the latest Raspberry Pi 5 for just over $60. For the monitor, you can buy an affordable gaming monitor that offers 1440p (2K) or 4K resolution for upwards of $200.
According to DAKboard, the minimum Raspberry Pi model that offers full functionality is the Raspberry Pi 3B+ model, which costs $35. The Raspberry Pi 3B+ supports 1080p resolution, and you can pick up a 1080p monitor for around $100 less than a 2K or 4K one. What's important to bear in mind is that with every additional feature, such as IPS, you add to your monitor, your budget will increase.
How much does the software cost?
DAKboard OS is free to download, however, there are several different pricing tiers for basic and additional features. Both free and paid plans can be edited on the web under your DAKboard account. The good news is that you don't need programming knowledge to design cool interfaces — you can edit your smart display easily using DAKboard's drag-and-drop-style editor.
First on the tier list is the Free account, which gives you access to basic tools such as photos, news, and the weather. You can get two calendar views synced with Google Calendar and other popular calendar apps. But the refresh rate is limited to 60 minutes, which may be annoying if you have a constantly changing schedule.
The Essential plan goes beyond seeing the DAKboard in plain action, offering the ability to design custom-made screen layouts as well as use a range of integrations, and community-developed layouts. The plan is priced at $5 per month for two screens, with an extra $4 per month for each additional screen.
If you want to see everything DAKboard can do and you're not a business, consider the Plus plan for $8 per month. This plan is quite an upgrade from the cheaper options, offering a media library with 250 MB of storage space, screen scheduling, and instant display refresh. You also have access to a feature called Screen Loops, which transitions between multiple displays over a set time.
There are alternatives to DAKboard OS
If you don't fancy paying a subscription and aren't impressed with the free plan, there are many open-source alternatives to DAKboard on the market for creating a sleek smart display.
MagicMirror² is a community-driven platform, offering endless options to customize your smart display. From online wallpapers to temperature displays to vocabulary trainers, there's modules for anything imaginable, making the MagicMirror a truly smart display. There's no cost, and it involves the roughly same hardware requirements to get going. Don't be put off by the name — you don't actually need to usea mirror, and can drive the display on a naked monitor. For a premium, subscription-based option, consider Screenly, capable of casting 4K videos and live web content to any monitor. You can also build custom apps using Screenly Edge Apps. This is a more expensive option, with pricing starting at $11 per month.
Overall, building a DIY Raspberry Pi DAKboard is a fun, high-tech project that you can build without needing a ridiculously expensive budget. You can build a DAKboard just to see the system working, or upgrade your specs and software for a premium gadget in the comfort of your home.