7 Samsung Galaxy Photo Editing Tricks Every User Should Know By Now
We may receive a commission on purchases made from links.
Owning a Samsung Galaxy product is like exploring a never-ending museum of useful tools. The Korean tech giant is even known for including hidden Samsung Galaxy features on its devices. The company often throws everything but the kitchen sink into its flagship phones and tablets, and would probably find a way to include the sink if it could. The options are especially rich when it comes to photos. Not only are there a laundry list of Galaxy camera tricks to try, but after you've snapped your shot there are an equally extensive number of photo editing tools.
It's a lot to keep track of all the different photo editing features on Samsung Galaxy devices, so we're rounding up some of the best tricks here, to take your photo editing game to the next level. Each of these features are guaranteed to work on Samsung Galaxy phones and tablets running One UI 6.1 or later, but with the exception of generative AI features, most should also work on devices running One UI 5.0 or later. From easy shortcuts that can save you hours in Photoshop, to AI features that will make your photos look the way you wish they did in your head, there's a lot to delve into. Your Instagram is about to get a major glow-up, so let's dive in.
Hold down on a subject or text to extract it with Image Clipper
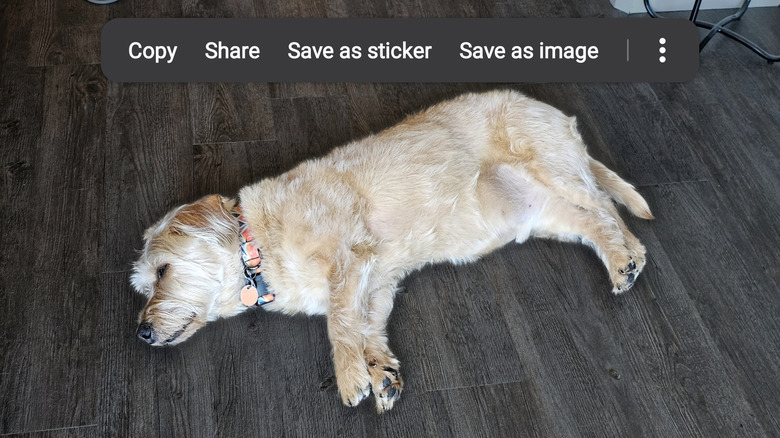
Samsung Galaxy's One UI software includes some functionality that makes it easy to do things that used to take hours in Photoshop. One of the most useful — not to mention the most fun — is the Image Clipper, which lets you hold down on a photo to extract either the subject or a bit of text. Not only can you clip people, pets, and objects out of your photos with a single tap, but you can even copy them into other apps, save them as stickers, or keep them as separate images. This feature is supported on One UI 5.1 and up.
The process is as simple as it sounds. Just open the Gallery app on your Samsung Galaxy phone or tablet, navigate to a photo, open that photo, then hold your finger over the object or text you want to extract. If it's a person, pet, or clearly defined object, it will pop out of the photo and pin to your finger. While continuing to hold down, you can drag it into another app, but if you lift your finger as soon as the object is extracted, you'll be presented with options to copy it, share it, save it as a sticker, or bring it into the editor by itself. If you save it as a sticker, you'll get a chance to edit it by adding outlines and filters before it goes to your sticker collection. Alternatively, if you hold your finger down over clearly visible text, the text will become highlightable just like any cleartext you'd find online. Only a few years ago, you'd have had to painstakingly outline an object in Photoshop to extract it like this, which shows how far mobile tech has come.
Fix facial blemishes with Face Effects
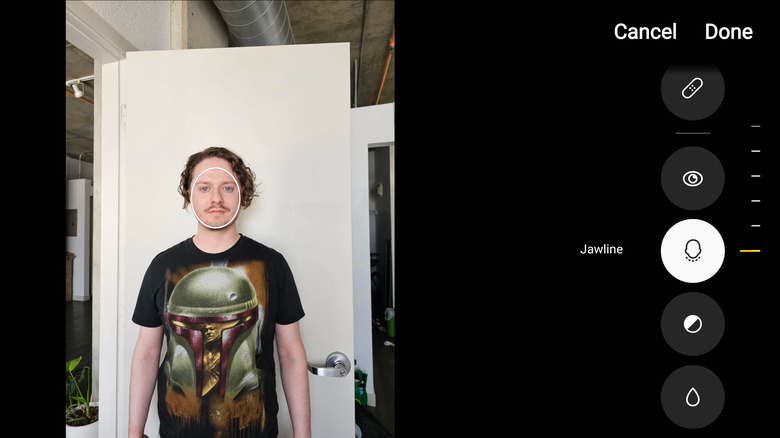
We've all had our photos taken when we weren't looking our best. Maybe it was the camera's fault, blasting a flash into your eyes and giving you red eye, or maybe you just didn't have time to do your makeup that day. Whatever the case, Samsung Galaxy phones and tablets have a feature called Face Effects that lets you edit the faces in your photos to fix red eye, blemishes like acne or red spots, adjust your skin tone, and more. Note that this will only work on photos where faces are detected.
To access these face editing features:
- Navigate to the photo you want to adjust inside of the Gallery app.
- Press the edit button, which looks like a pencil. It will either be at the top or bottom of the screen, depending on your device.
- Press the Tools button, which looks like four dots arranged in a square.
- Tap on Face effects.
- Navigate to the effect you want to apply. For example, to fix blemishes, scroll over to Fix blemishes.
- Most use a simple percentage slider at the bottom of the screen to adjust the strength of the effect. The fix blemishes and red eye tools require you to tap the parts of the photo you want adjusted.
- Once you're satisfied with your edits, press the Done button. Then, if you're done editing the photo entirely, press the Save button. Otherwise, continue editing with other tools.
Erase or move objects with Generative Edit
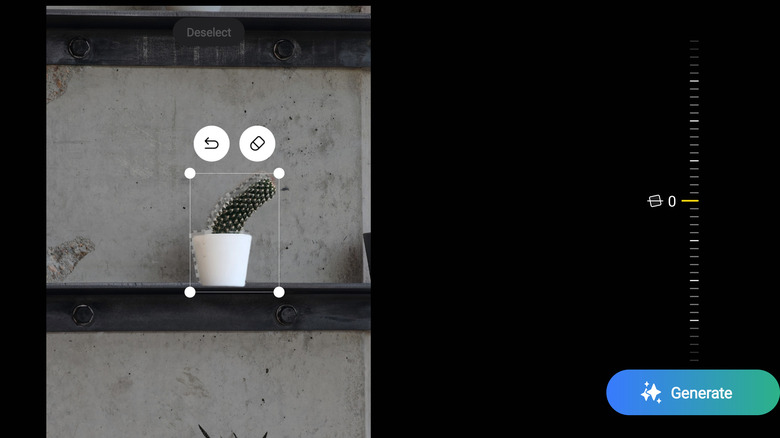
Did someone walk into the background of your picture right as you pressed the shutter button? Is there a piece of furniture ruining things? Is your subject just a bit too far away, or off center? Well, for those with Samsung Galaxy phones capable of running new Galaxy AI features, you can fix all of those problems easily with a Galaxy AI feature called Generative Edit. This can remove or manipulate objects in a photo, similar to Photoshop's Generative Fill tool. These features work on One UI 6.1 devices including the Galaxy S24, S23, and Tab S9 series, as well as the S23 FE, Z Fold5, and Z Flip5.
To use Generative Edit:
- In the Gallery app, navigate to the photo you'd like to edit and open it.
- Press the edit button, which looks like a pencil. It may be located at the top or bottom of your screen depending on your device.
- Press the Generative Edit button, which looks like a greenish-blue circle with white stars in it.
- In the Generative Edit interface, tap on objects you'd like to move, shrink, enlarge, or erase. The software will take a guess at what you're trying to highlight, but if it gets things wrong, tap in the same spot again to deselect and repeat the process.
- Once the desired element is highlighted correctly, hold down on it to bring up the editing tools. You can drag the object around, shrink and enlarge it, or press the eraser button above the selection to delete it.
- Repeat steps 4 and 5 for each object you want to adjust, then press the Generate button at the bottom of the screen. It may take a few moments to finish working.
- Press Save or continue to edit from there.
Make things selectively colorful with Spot Color
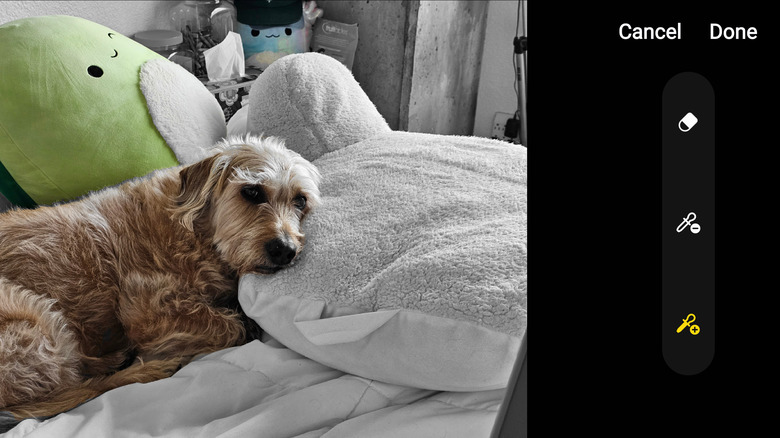
You can apply a lot of different effects to your photos in the Samsung Galaxy Gallery app, but one of the most fun is Spot Color. This effect turns photos black-and-white, then lets you selectively add color back to them. It works best on photos with clear subjects, or those that contain striking colors. You can use it to highlight objects within your photo, make a portrait photo even more striking, or get creative in your own way.
To use Spot Color:
- Navigate to the photo you want to adjust inside of the Gallery app.
- Press the edit button, which looks like a pencil. It will either be at the top or bottom of the screen, depending on your device.
- Press the Tools button, which looks like four dots arranged in a square.
- Tap on Spot Color.
- You'll see three tools below the image. By default, the add color tool is enabled. Tap anywhere on the image to add color back to an object or area of the image. To remove color again, tap the remove color tool, then tap the area you want to remove color from. You can also undo your last edit by tapping the eraser button, then tapping the back arrow that appears next to it.
- Once you're satisfied with your color edits, tap Done. If you're finished editing entirely, press Save. Otherwise, continue editing the recolored photo.
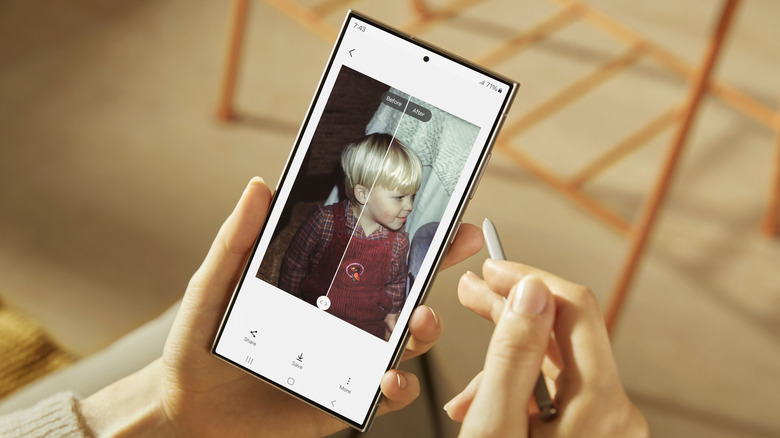
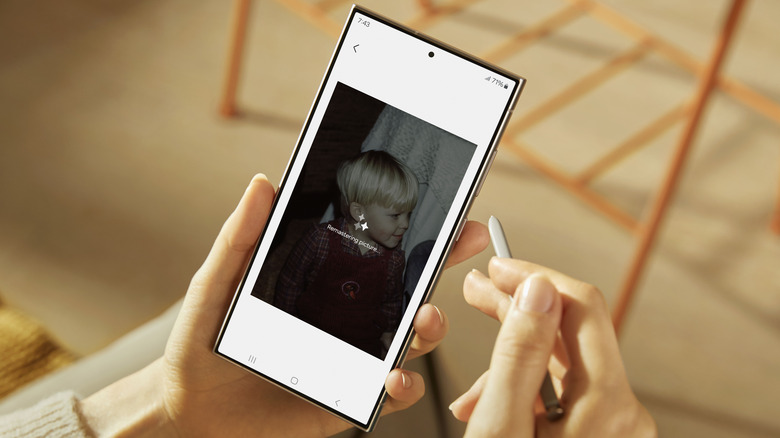
Enhance old photos with Remaster

An AI feature that was around before it was a buzzword is the Remaster function, built into the Samsung Galaxy Gallery app. If you've lived a long life in the digital world, you're likely to have a large collection of photos taken on old phones with cameras far worse than the modern devices. Photos might be grainy, full of digital artifacting, or low-resolution, but they're memories you cherish. Samsung's Remaster feature can clean them up and make them presentable, like a makeover for your pictures.
Using Remaster is incredibly simple:
- Open the Gallery app on your Galaxy phone or tablet, locate the photo you want to remaster, and tap to open it.
- Once the image is open in Gallery, swipe up on it to reveal the associated metadata. If Remaster is able to be applied, the Remaster button will show up.
- Tap the Remaster button. After a few moments of processing, you'll be presented with a preview of the remastered image along with a slider to look at the before and after.
- If you're satisfied with the results, you can tap Save at the bottom middle of the screen to write over the original version of the photo, or tap the three dots next to it and then tap Save as copy to save it as a separate image.
Easily crop photos by zooming in with Quick Crop
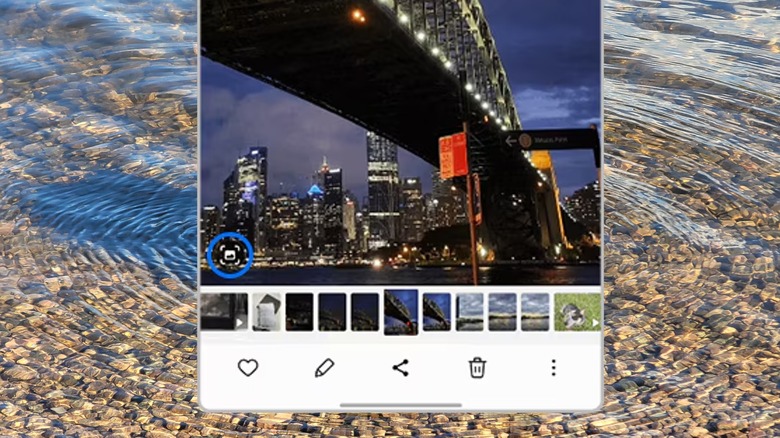
By now, you've probably noticed that Samsung loves to add multiple ways to perform photo editing tasks, and they've done the same when it comes to cropping photos, implementing a feature called Quick Crop. You might expect that in order to crop a photo you'd need to open the photo editor, go to the crop tool, and adjust it from there, but in fact you can crop a photo without ever touching the editor. All you need to do is zoom in on a photo and crop it as-is. Here's how to crop a photo on a Samsung Galaxy phone or tablet right from the Gallery:
- Open the Gallery app, navigate to the photo you want to crop, and open it.
- Using two fingers, zoom in on the photo by spreading your fingers apart. Stop once the portion of the photo you'd like to remain is positioned on the screen.
- A small button will appear in the bottom left of the screen. Tap it, and the zoomed in portion of the photo will be saved as its own image.
This method does limit your crop to the aspect ratio of your screen, so it won't always be the best way to crop photos, but if you're just doing a quick crop-in before posting to Instagram or Facebook, it's the most convenient way to do so.
Get even more AI editing features with Galaxy Enhance-X
Galaxy phones and tablets wouldn't be Samsung products if they weren't bursting with so many extra features that there's nowhere left to put them in the regular app. As a way of showcasing some more experimental AI photo editing features, Samsung created the Galaxy Enhance-X app, which you can download from the Galaxy Store. It includes features like fixing blurry photos, removing shadows, turning motion photos into highlight videos or Instagram boomerang clips, upscaling and increasing resolution, and can even remove artifacts like moire that occur when you take a photo of a digital display. It's more than is included with Google Photos' AI features.
The best thing about Enhance-X is that you don't need any photo repair or restoration skills to use it. Just import a photo into the program, select the effect you want applied, and Samsung's AI will do the rest. There's even a button that just says, "Magic." When you press it, it tells you, "Magic applied." This appears to be a combination of detail enhancement and color correction, not actual magic.
Once you import a photo into Galaxy Enhance-X, you can browse the available tools, which include color and light adjustments, quick fixes for removing reflections and other defects, face tools, options for photos of the night sky, and the expected cropping tools. The app examines each photo as it's imported, to determine which tools can be applied to the image. Those that cannot, appear grayed out, so don't waste your time trying to make them work. As with all AI, the results from Galaxy Enhance-X are hit and miss, but can occasionally work wonders to enhance your photos or restore and repair those taken on older cameras and phones.