6 Quick Tips Every Google Drive User Should Know
The era of keeping paper files and printed photos seems like a distant memory now. These days, digital documents and images are the norm. And it's not just you who prefer them; practically everyone with a smartphone or computer is leaning towards digital files. This might be for something as professional as a client report or as personal as a photo album to share with friends and family.
This widespread shift to digital has paved the way for cloud storage services to become a staple in our daily lives, with Google Drive being one of the most popular options. If you're someone who works with digital files day in and day out, chances are Drive is a tool you find yourself using quite often. However, you might not be using it to its full potential. Sure, you've already mastered how to create a new Slides presentation or transfer ownership of a Google Drive file, but there are some other essential features that can significantly streamline your experience. Here are six must-know Google Drive tricks.
Extract or search text from uploaded pictures
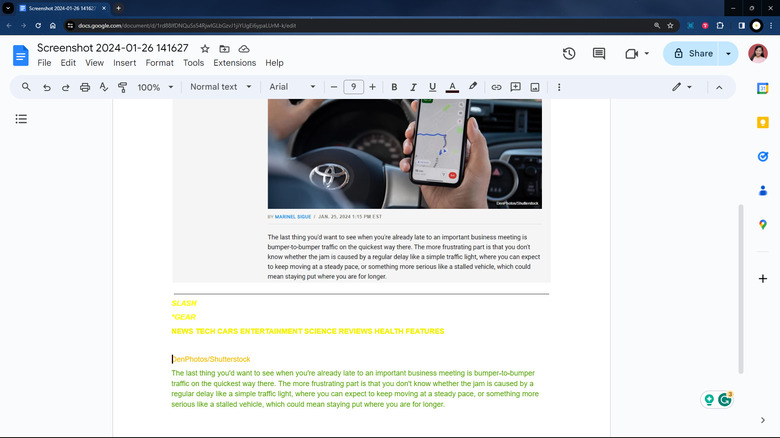
So you're working with a photo with text, say an order form or a screenshot of a web article, and you need to copy the text. Normally, you'd resort to manually typing the content or uploading the image to a photo-to-text converter. While these methods are viable, they can often be cumbersome and time-consuming, especially with larger images. A simple workaround is to upload the image to Google Drive instead.
Google Drive comes complete with a nifty feature that converts your photo files to text with a few clicks. It supports at least 200 languages, including widely spoken ones like French, Spanish, and Chinese, and regional languages such as Pangasinan in the Philippines, Lozi in Zambia, and Assamese in India. Here's how to use this feature:
- Upload your image file (JPEG, GIF, or PNG only) to Google Drive if you haven't already. Make sure it's in an upright position and sharp enough to be read.
- Once uploaded, right-click on the file.
- Go to Open with.
- Select Google Docs.
Your file will then open in a separate Google Docs tab. You'll find your image pasted at the top and the converted text below it. An added bonus to uploading your photos to Google Drive is the search functionality. You can search for any word or phrase contained in your uploaded image, and the file will pop up in the search results. This makes finding your images based on their text content straightforward.
Prevent viewers and commenters from downloading shared files
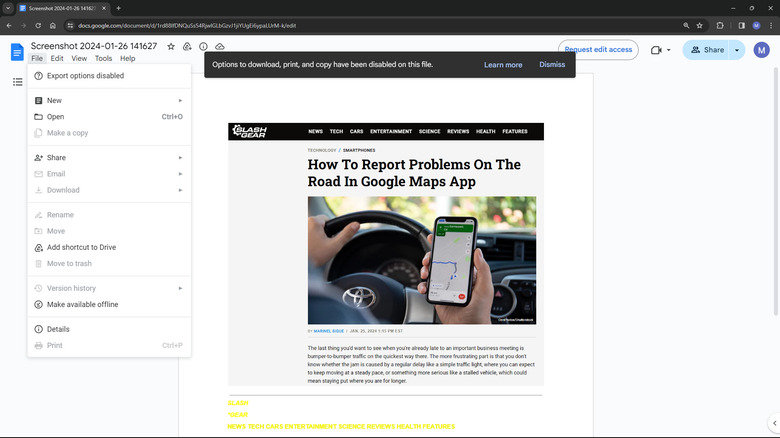
As Google Drive is one of the best apps for sharing large files, one of its most commonly used features is naturally the share functionality. But while it's generally not a big concern how others use the files you share with them, there are instances when you don't want them to download, copy, or print your file, perhaps to safeguard sensitive information or simply restrict the distribution of the said document. In such cases, you can change your Google Drive share settings to prevent others from doing so. Follow these steps to set this up:
- Right-click on the file you wish to share.
- Navigate to Share > Share.
- Type in the name or email address of the people you want to share the file with.
- Assign them the access level of either Viewer or Commenter (this feature doesn't apply to users with Editor access).
- Click on the gear icon at the upper right corner of the Share dialog box.
- Uncheck the option for "Viewers and commenters can see the option to download, print, and copy."
- Press the back arrow to return to the main Share dialog box.
- (Optional) Add a message for the recipient(s) or uncheck the "Notify people" box if you prefer not to send a notification.
- Hit the Send button.
When the viewer or commenter opens the file and clicks on the File tab, the Make a copy, Download, and Print options will be grayed out.
Navigate easier with keyboard shortcuts
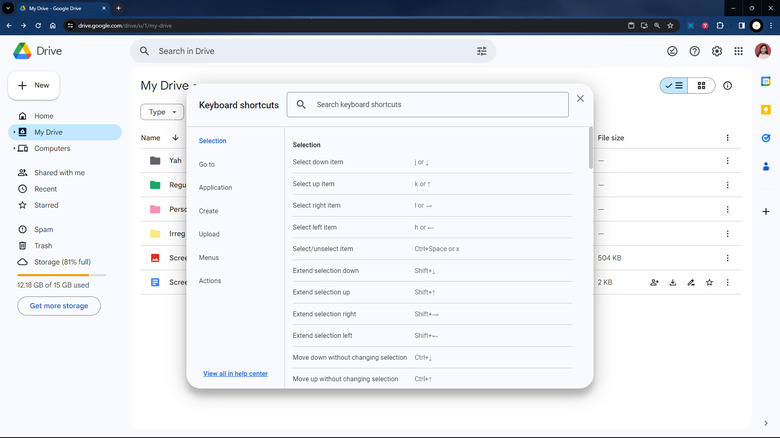
To use Google Drive more efficiently, you need to familiarize yourself with its keyboard shortcuts. Among the most useful ones is "?" which shows a cheat sheet of all the relevant Drive keyboard shortcuts. This means you don't have to waste time searching online for the shortcuts you need. Just hit "?" and search the cheat sheet for the specific action you're after. Here are some of the other time-saving shortcuts to streamline your Drive usage:
- Shift + F: Adds a new folder in the current location.
- Shift + T: Opens a new Google Docs file in another tab.
- Shift + P: Generates a new Google Slides file.
- Shift + S: Creates a new Google Sheets file.
- Ctrl + Enter (Cmd + Return on Mac): Open the selected file in another tab.
- c: Brings up the New menu as if you pressed the +New button.
- d: Toggles the details pane for the selected file or folder.
- m: Shows the most recent message or notification that you might have missed.
- n: Lets you rename whatever item you've selected.
- o: Open the chosen item.
- p: Provides a preview of the selected item.
- q + q: Changes the row height and spacing of items in the list view.
- r: Accesses the sort menu.
- s: Stars or unstars the current item.
- t: Opens the settings menu.
- v: Alternates between grid and list views.
- x: Selects or deselects the item(s).
- z: Moves item/s to a different folder.
- /: Jumps to the search bar.
- .: Shares the selected items.
Edit files even without an internet connection
With Google Drive and its associated products (Docs, Sheets, Slides, etc.) being primarily online tools, you probably get frustrated when you're working on a file and the internet connection drops. If you often find yourself in this situation, consider using Google Drive's offline mode. This enables you to continue editing your files while disconnected from the internet. To enable this feature, here's what you need to do:
- Install the Google Docs Offline extension to your Chrome browser.
- Log into Google Drive.
- On your Drive homepage, select the gear icon in the upper-right corner.
- Go to Settings.
- In the General tab, scroll down to the Offline section.
- Enable the option "Create, open and edit your recent Google Docs, Sheets, and Slides files on this device while offline."
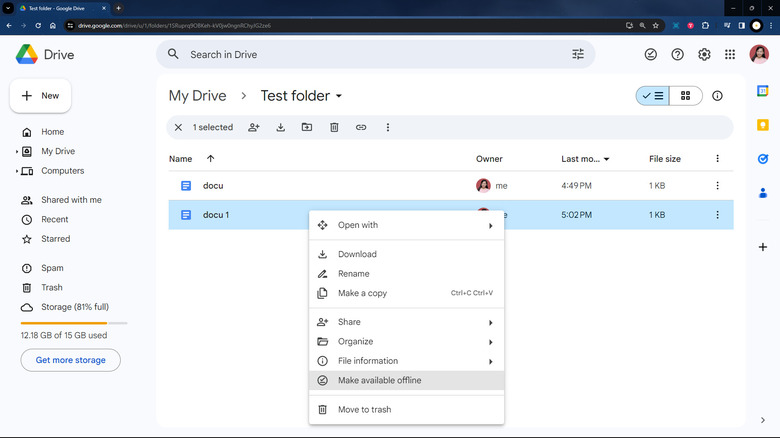
- Locate the Docs, Sheets, or Slides file(s) you want to access while you're offline.
- Right-click on your chosen file.
- Select Make available offline.
This will add a gray checkmark next to the file. To view your offline-ready files, click the "Ready for offline" icon (a checkmark inside a circle) at the top of the page and choose Offline preview. This will show you all the files accessible offline, with the unavailable ones grayed out. Do note that the offline mode is limited to one Google account per computer or Chrome profile. If you have multiple accounts, you'll need to create separate Chrome profiles to use offline mode for each account.
Switch your start page from Home to My Drive
In late 2023, Google released an update to its Drive layout to add a new Home view. This is where you can find the files you've recently interacted with, such as those you've opened, modified, shared, or uploaded, as well as the ones you frequently access. It's pretty much an evolved version of the old Suggestions panel found at the top of your Drive folders before. But more than just suggesting files based on your distinct usage, Home also comes complete with useful filters like To do that lets you filter files needing your action, including those with pending approvals, comments assigned to you, and ownership transfer requests.
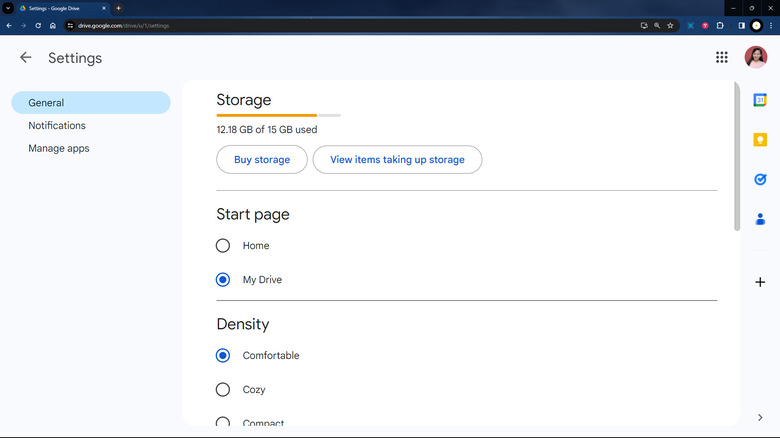
While the Home page is undeniably handy for certain situations, you might prefer sticking with your My Drive tab which has all your files and folders organized the way you like them. However, by default, whenever you visit the Google Drive site, it will automatically open up on the Home page, not My Drive. If you prefer to switch your landing page to My Drive instead, follow these steps:
- On your Drive homepage, select the Settings icon at the top right of the screen.
- Click on Settings from the menu.
- Under the Start page option, select My Drive.
- Close the settings menu, and you're all set.
Now, whenever you open Drive, you'll land directly in My Drive instead of Home.
Save web files to Google Drive faster

When you come across something interesting online that you want to save for later use, your first instinct is to download it or save it as a screenshot to your local drive. But this eats up space and makes the file inaccessible when you're away from your computer. Instead of keeping them all in your local storage, use Google Drive instead. There's a nifty Google Chrome trick that will save you time when downloading files: the Save to Google Drive extension. Let's walk through how to use it:
- Get Save to Google Drive from the Chrome Web Store.
- Pin the extension to the top of the browser by clicking on the Extensions icon in the upper right and selecting the pin next to Save to Google Drive.
- To save a blog post in Drive:
- Visit the blog post you're interested in.
- Click on the Save to Drive extension at the top-right corner.
- Wait for the extension to finish converting the page to PNG. If you prefer, you can change the file format to HTML, MHT, or Google Docs in the extension's options.
- (Optional) In the Save to Google Drive window, select Rename to change the file name or Trash to delete the file from your Drive.
- To save a photo directly to Drive:
- Right-click on the photo you found online.
- Select Save Image to Google Drive.
Anything you save using the extension will show up in the Google Drive of the account that's currently logged into your Chrome.