5 Ways To Fix The Out Of Memory Error On Google Chrome
Google Chrome, being one of the major web browsers, is undoubtedly a household name. However, like any popular browser, it's not immune to challenges. The users of Chrome occasionally encounter the frustrating "out of memory" error, signaling that the browser has run out of available system memory, leading to performance hiccups or even crashes. When this happens, Chrome struggles to allocate enough memory for its tasks, resulting in slow responsiveness, unresponsive tabs, or sudden browser shutdowns.
Multiple factors could be triggering this memory error for you. Accumulated cached data, cookies, and numerous open tabs might be consuming a significant chunk of your RAM. Resource-intensive websites, particularly those with multimedia content or poorly optimized scripts, can worsen the problem. Additionally, poorly coded browser extensions in your setup might be causing memory leaks or excessive resource usage.
Your go-to initial strategy may involve refreshing the problematic tab and closing all other unnecessary tabs. However, if that doesn't resolve the issue, there are several advanced solutions you can explore.
Clear browser cache and cookies
When you visit websites, your browser stores elements like images and scripts in the cache for quicker access. Similarly, cookies store information about your browsing sessions. Over time, if you have a large number of open tabs or haven't cleared your browsing data, the accumulation of cached files and cookies can consume significant memory.
This increased memory usage may lead to performance issues and, in extreme cases, trigger the "out of memory" error, especially on systems with limited RAM. To address this issue, you try clearing the browser cache and cookies, which free up memory resources and, hopefully, fix the issue. However, it is important to note that clearing cookies may sign you out of websites, and you may lose some saved preferences on websites.
To clear browser cache and cookies:
- In Chrome, click on the three vertical dots in the top-right corner to open the menu.
- Select Settings.
- Scroll down and click on Privacy and security in the left sidebar.
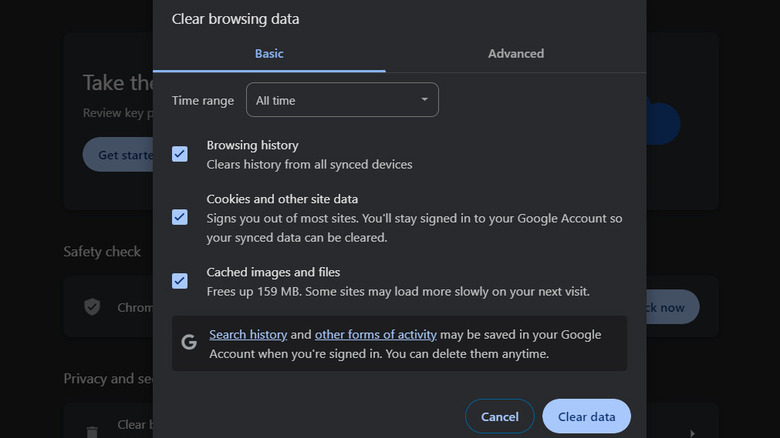
- Click on Clear browsing data.
- In the popup window, select the "Cached images and files" and the "Cookies and other site data" options.
- You can also choose the time range for which you want to clear the cache. If you want to clear all, select All time.
- Click Clear data.
Once done, try loading a website to check if the memory error is fixed. You can also turn off third-party cookies in Chrome to prevent such issues in the future.
Disable unnecessary extensions
You might also encounter a memory error due to too many browser extensions. These extensions run processes in the background, and if they are poorly optimized, they can increase memory usage. If you've added multiple extensions, especially those designed to run continuously or perform complex tasks, they could be collectively straining your system's memory, resulting in the "out of memory" error.
To mitigate this, consider disabling or removing unnecessary extensions, as this will allow your browser to operate more efficiently with reduced memory consumption. You can check which extensions are consuming more resources using the built-in Task Manager in Chrome:
- Press Shift + Esc or click on the menu icon (three dots) at the top-left and choose Tools > Task Manager.
- In the Task Manager, you will see a list of all active processes and their resource usage, including extensions. Look for entries with the label Extension in the Process ID or Memory Footprint columns. This indicates the resource usage of individual extensions.
- Identify the extension(s) with higher memory usage that you may want to investigate.
Once you have identified the resource-intensive extensions, disable them by following these steps:
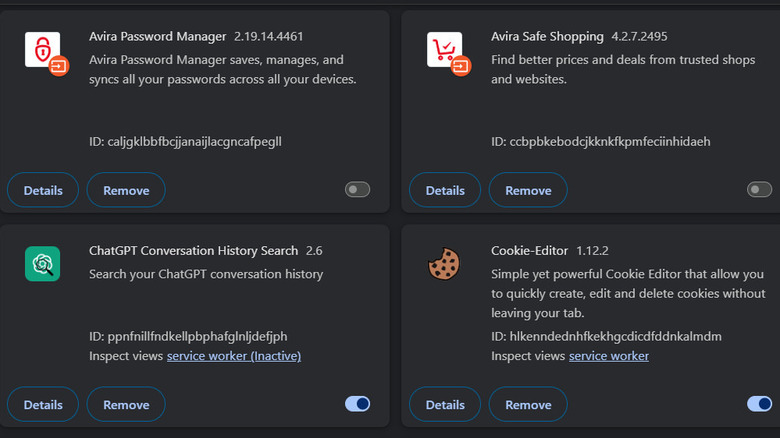
- Click on the menu icon in Chrome and choose Extensions > Manage Extensions.
- You should now see a list of all the installed extensions. To disable an extension, toggle the switch next to its name to the off position.
- If you no longer want an extension, click Remove.
Disable hardware acceleration in Chrome
The hardware acceleration feature works by shifting the processing of graphics and multimedia content from the CPU to the GPU. While this can enhance performance in many cases, certain graphics drivers or hardware configurations may not handle it well. This can result in increased memory usage or instability, which can contribute to the memory error at hand.
To disable hardware acceleration in Chrome:
- Click on the three vertical dots in the top-right corner and choose Settings.
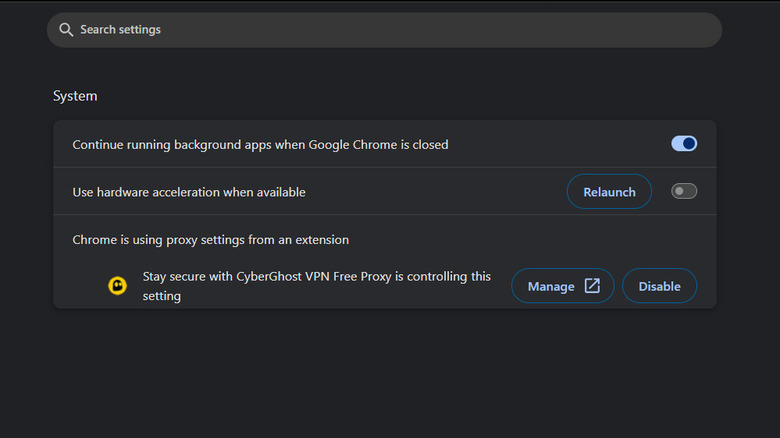
- Scroll down the left pane and click on System to reveal additional settings.
- Locate the Use hardware acceleration when available option. Toggle the switch to the off position.
After turning off hardware acceleration, you may need to restart Chrome for the changes to take effect. Upon relaunch, check if the memory error is resolved. In case hardware acceleration wasn't contributing to the issue, you may want to re-enable it for a better overall browsing experience.
Update Chrome
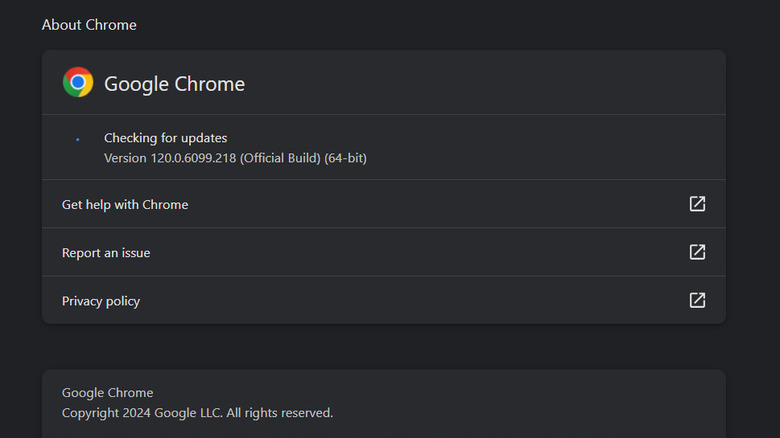
Are you using an outdated version of Chrome? Older versions may expose you to issues such as memory leaks or inefficient resource utilization, which are causing the problem. To address this, update Chrome to its latest version available. Newer versions often include optimizations and bug fixes that enhance the browser's performance and memory management.
To update Chrome:
- Click on the three dots in the top-right corner of your Chrome window.
- Choose Help > About Chrome.
- Chrome will automatically check for updates. If an update is available, it will start downloading.
- Once the update is downloaded, you'll see a button that says Relaunch. Click it to restart Chrome with the latest version.
While you are at it, we recommend undoing any major changes you may have made recently and checking if that makes any difference. You also have the option to reset Chrome to its default settings by clicking Reset settings in the Settings window.
Increase virtual memory
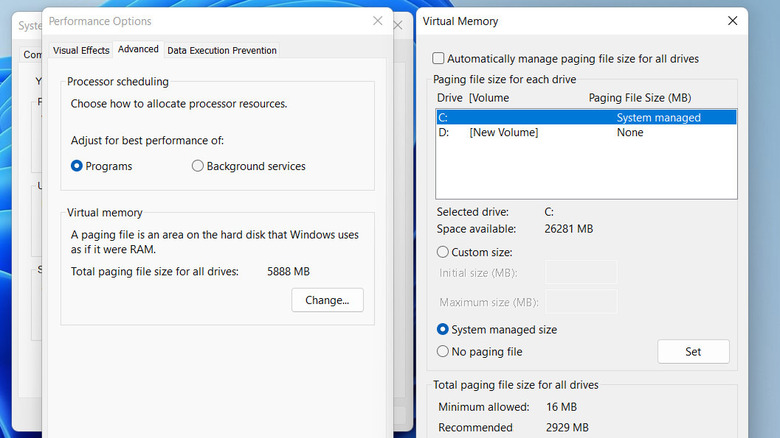
When your physical RAM is fully utilized, the operating system uses the virtual memory to store less critical data that is not actively in use. In case your physical RAM is running low, you can try expanding the virtual memory to create more room for Chrome and other applications to store temporary data.
To do this on a Windows PC:
- Click on the File Explorer icon on your taskbar.
- Right-click on This PC and choose Properties.
- Click on Advanced system settings.
- In the following dialog, go to the Advanced tab, and under the Performance section, click on Settings.
- Head over to the Advanced tab again, and under the Virtual Memory section, click on Change.
- Uncheck the option at the top of the window.
- Select your system drive (usually C:).
- Choose either Custom size and enter a new initial and maximum size or select System managed size.
- Click Set and then OK to apply the changes.
- Finally, restart your computer.
Remember that while increasing virtual memory can help in some situations, it's not a substitute for having sufficient physical RAM. If you frequently encounter memory-related issues, consider upgrading your RAM for a more comprehensive solution.
