How To Troubleshoot Wi-Fi Doesn't Have A Valid IP Configuration
A smooth and uninterrupted Wi-Fi connection is more crucial than ever, whether it is for work, leisure, or staying connected with loved ones. While encountering Wi-Fi issues on Windows devices is not uncommon, the operating system is equipped with a range of built-in tools to promptly address such problems, with the network troubleshooter being a noteworthy example.
However, here's the catch — not all issues are the same, and the troubleshooter might not always do the trick. The "Wi-Fi doesn't have a valid IP configuration" error is one of those tougher problems. It indicates that your device is struggling to obtain a proper IP address from the Wi-Fi network. One of many problems can be behind this, such as incorrect network configurations, IP address conflicts, network adapter problems, and system glitches.
Below are the different troubleshooting methods that can help you identify the cause of the problem and fix it for good.
Restart your router
Before you delve into the advanced troubleshooting methods, start with some basic fixes that can do the job more often than you think. Begin by restarting your device. This might seem like a simple task, but it can be effective in clearing out temporary glitches causing the connectivity hiccup. Simply shut down your computer, wait for about 10 seconds, and then power it back on. As it reboots, it refreshes network settings and often resolves any minor issues.
Next, address the router. This networking powerhouse can sometimes encounter hiccups that a quick restart can fix. Locate the power source of your router, unplug it, and wait for at least 30 seconds. This brief hiatus allows the router to discharge any lingering electrical charge and reset its internal components. After the short wait, plug the router back in and give it some time to fully restart. You can now try reconnecting to Wi-Fi and check if the issue pops up again.
Update network drivers
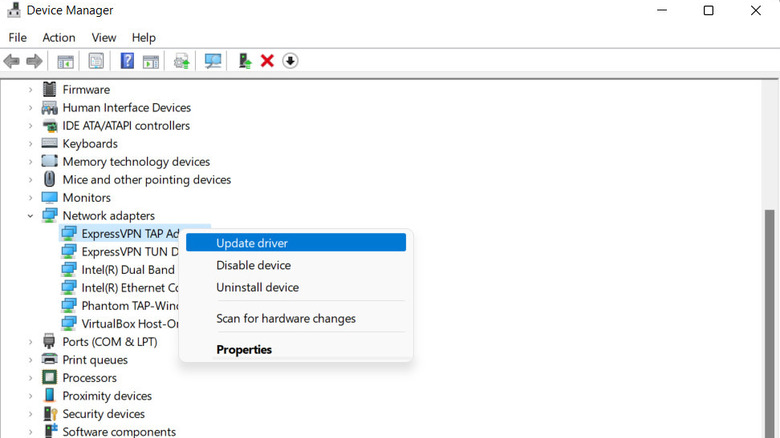
Drivers connect your operating system and the hardware. In this case, network drivers enable seamless communication between your device and the Wi-Fi network. If these drivers are outdated or corrupted, it can lead to miscommunication, resulting in IP configuration errors. To tackle this, ensure your network drivers are up-to-date. To update the network drivers:
- Press the Win + S keys to open Windows Search.
- Type Device Manager in the text field and click Open.
- Locate and expand the Network Adapters section.
- Right-click on your Wi-Fi adapter, and choose Update driver.
- Select Search automatically for updated driver software.
- If an updated version of the driver is found, follow the on-screen instructions to complete the update. Otherwise, click on the Search for updated drivers on the Windows Update option and check if any updates are available.
- After the update is complete, restart your computer to apply the changes.
If updating the driver doesn't help, you have the option to reinstall your network driver as well. For this, you first need to identify your Wi-Fi adapter's model and manufacturer. In the Device Manager, right-click on your Wi-Fi adapter and navigate to the Properties > Driver tab. Make a note of the adapter's model and manufacturer information.
After pinpointing your Wi-Fi adapter details, head to the official website of the device's manufacturer. Look for a Support or Drivers section on the website, and then find your specific device model. Download the latest driver available for your operating system and install it.
Adjust the network settings of your computer
There is also a chance that the network settings of your computer have changed, which is causing the problem. To address this, you can either reset Windows network settings or consider adjusting the network settings of your device manually. For the latter, follow these steps:
- Press the Win + R keys together to open Run.
- Type control in Run and click Enter.
- Navigate to Network and Internet > Network and Sharing Center.
- Select Change Adapter Settings in the left pane.
- Look for your Wi-Fi network adapter and right-click on it.
- Choose Properties.
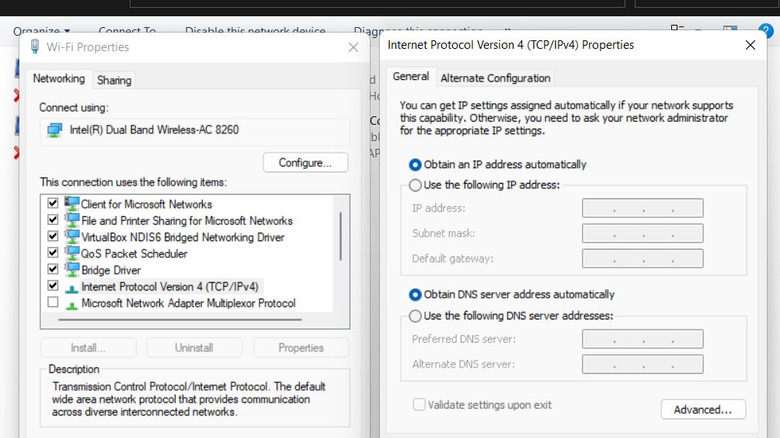
- In the Networking tab, select Internet Protocol Version 4 and click on the Properties button.
- Enable the Obtain an IP Address Automatically option and click OK.
- Return to the Networking tab and look for Internet Protocol Version 6. Perform the same steps for this protocol as well.
You can now close the Control Panel and check if the problem is fixed.
Refresh your IP address
Most routers use the DHCP (Dynamic Host Configuration Protocol) to automatically assign IP addresses to devices on a network. These IP addresses aren't permanent; instead, they are leased to devices for a specific duration. Sometimes, this lease can expire or encounter issues, leading to the error. To refresh your IP address on Windows:
- Type Powershell in Windows Search and click on the Run as administrator option.
- Click Yes in the User Account Control prompt.
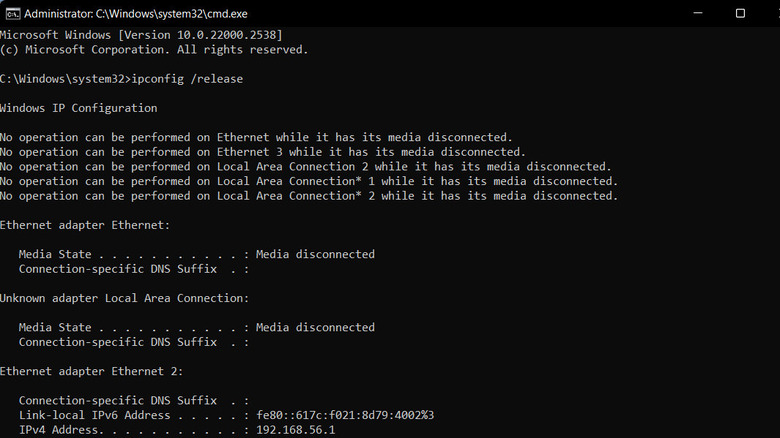
- Once Powershell launches, type ipconfig /release in it and click Enter. This command releases the current IP configuration.
- Wait for the command to execute. Then, type ipconfig /renew and hit Enter to request a new IP address lease.
After executing these commands, wait for the process to complete, as it might take a few moments. Then, check if your device can reconnect to the Wi-Fi network without encountering an IP configuration error.
Modify the configuration of relevant services
Your computer relies on various services to manage network connections, and there are times when a misconfiguration in the settings of these services can prevent them from working properly, leading to errors. To ensure the relevant network services are functioning as they should:
- Open Run by pressing the Win + R keys.
- Type services.msc in Run and click Enter.
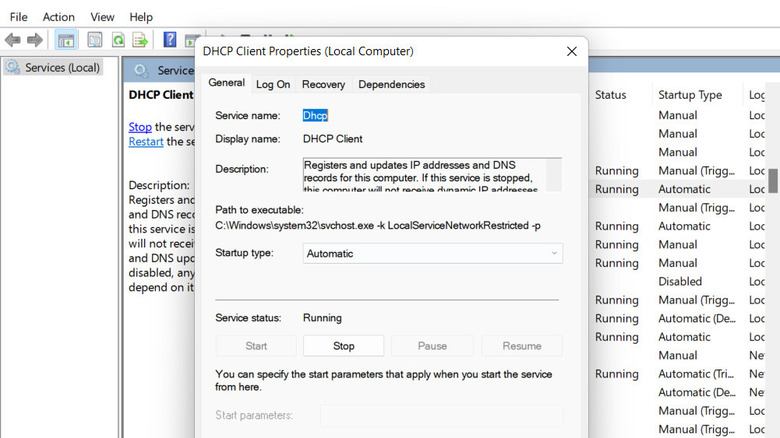
- Look for the DHCP Client service and right-click on it.
- Choose Properties from the context menu and ensure the service is running.
- Expand the dropdown for Startup type and choose Automatic.
- Click Apply > OK to save the changes.
- Set the startup type of the WLAN AutoConfig service to automatic in the same way.
You can now exit the Services window and restart your computer. If the relevant services were contributing to the issue, changing their startup settings should fix the problem after you reboot your system.
Try some advanced solutions
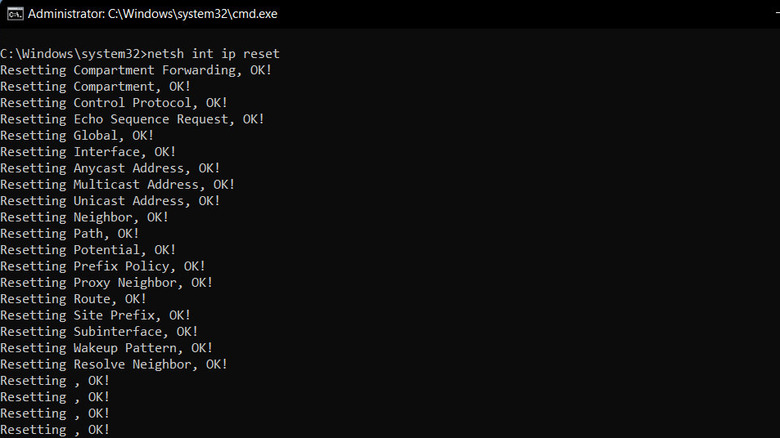
If you have exhausted all the other troubleshooting methods, it is time to move to some advanced fixes. Firstly, resetting the TCP/IP stack can be helpful. Over time, the TCP/IP stack, responsible for network communication, may encounter corruption. Resetting it will clear out potential glitches and pave the way for a smoother connection. To do this, open Command Prompt as an administrator, type "netsh int ip reset," and hit Enter.
Next, consider changing your router's SSID and password. Sometimes, issues can stem from conflicts in the wireless network configuration. Altering the SSID (network name) and password essentially creates a new identity for your network, potentially bypassing any persistent connection problems.
To achieve this, access your router's settings through a web browser, typically by entering the router's IP address in the address bar. Navigate to the wireless settings section, update the SSID and password, and save the changes.
Lastly, a complete router reset might be in order. This step wipes all customized settings and reverts the router to its default state. While more drastic, it can eliminate any complex issues within the router's configuration. Locate the reset button on your router, usually a small hole, and press it using a paperclip or similar tool. If you think a reset won't help the router, you can also consider switching to any of the best Wi-Fi routers available for better performance.
