How To Crop In Photoshop: A Step-By-Step Guide

Adobe Photoshop has long been one of the most commonly-used pieces of image editing software around. You can do a lot with Photoshop, from well known tasks like image resizing and color adjustments to things you probably didn't know you could do, like using it to identify fonts or handle basic math to save on time. Having dozens of ways to perform various tasks means there are some big common mistakes that can be made when using it. But as long as you know what you're doing, Photoshop can be just as useful as many of the alternative options out there.
Cropping or trimming the edges of an image to re-frame the composition, excise unwanted elements, fit visuals into a specific aspect ratio format, etc. — is about as basic as an image editing task can be. Performing the action in Photoshop is essentially the same as it would be in any other image editor, but this is Photoshop we're talking about. So while you can still simply crop an image and be done with it, you can use a multitude of other options and features to do a fair bit more than that. If you want to. But let's start with the fundamentals.
Basic cropping
If all you want to do is crop an image to fit a specific size or frame the subject in a particular way, it's a very simple process.
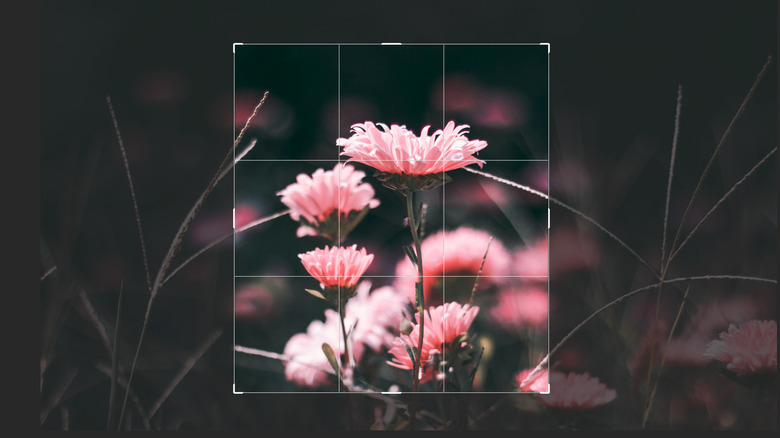
- Open an image in Photoshop and select the Crop tool (two crisscrossing Ls with a diagonal line between them, shown above).
- Click and drag the Crop tool over the image. Press Enter or Return on the keyboard to crop using your selection.
- You can click and drag the handles (small squares) on the corners or edges of the cropping area window to adjust things to your liking. Clicking and dragging from inside the cropping window also lets you move it around.
- Use the Crop details in the Control Bar at the top of the screen for finer adjustments like setting a specific aspect ratio, swapping width and height values, or manually entering the desired width and height numbers in their associated text fields.
- Click the Overlay Options button (it looks like a grid) to choose from a variety of cropping guide overlays like Grid, Golden Ratio, etc. You can also press "O" on the keyboard to cycle between options.
Though if you want to do a bit more with your cropping, or prefer even more nuanced control, you can start digging into the Crop Options.
More cropping options
Using Crop Options isn't all that necessary for basic image reframing, but it can be useful in certain situations.
- Click the Crop Options button (the gear) in the Control Bar at the top of the screen to choose more options for your crop.
- Auto Center Preview will display a crop preview in the middle of the image canvas.
- Classic Mode reverts the Crop tool to its Photoshop CS5 (and older) self.
- Delete cropped pixels is typically on by default and will delete the parts of the image outside of the cropped area. Turning the option off will still crop the image (i.e., resize the canvas) but the rest of it will still exist outside the canvas window.
- Enable Crop Shield will cover the areas of the image outside of the crop window with a tint that can be made lighter, darker, or recolored.
- Show Cropped Area keeps the cropped out portions of the image visible after cropping.
Photoshop being Photoshop, though, means that there are even more tricks available to you when you decide it's time to crop an image.
Additional cropping features
As with regular Crop Options, these features won't be useful every time you crop, but they can come in handy or save you time in some projects.
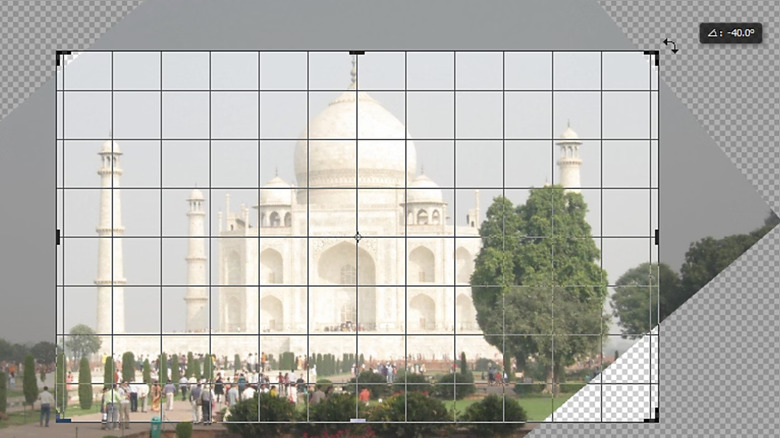
- The Perspective Crop tool lets you crop an image while also straightening out angles for a more head-on perspective. It's hidden beneath the regular Crop tool and can be accessed by clicking and holding the Crop icon until the Perspective Crop icon (it looks like a slanted grid) appears and selecting it.
- Once selected, adjust the edges of the crop border similar to the regular Crop tool. Make sure to try to line up the edges of the crop window with the edges of the parts of the image you want to adjust the perspective of. The narrower and wider edges will be balanced out once cropping finishes, effectively stretching the image based on what you choose to create a different perspective.
- Content-Aware can be used with cropping (in Photoshop CC 2015.5 or later) to generate details and fill in any possible image gaps left behind when cropping, a bit like a simpler Generative Fill. Click the checkbox in the Control Bar at the top of the screen to turn it on or off — note that Content-Aware will not work in Classic Mode.
- When turned on, adjust the crop window as usual — including rotation, extending borders beyond the image, etc. Click the Check icon in the right-hand side of the Control Bar to confirm and crop.
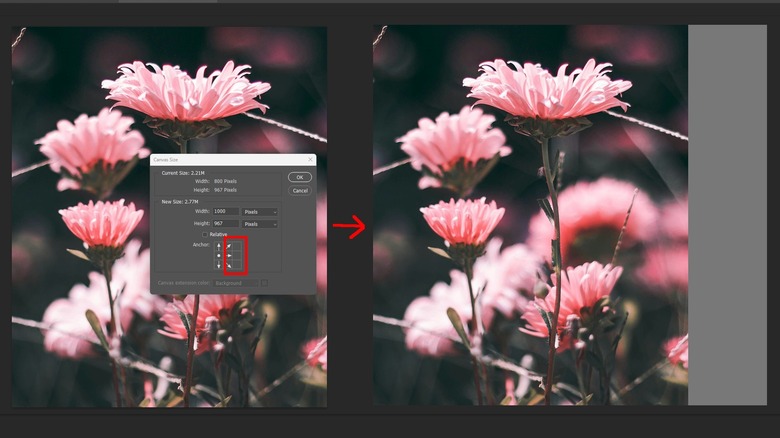
Cropping can also be used to increase the size of the canvas by expanding the crop window beyond the edges of the image. Without Content-Aware turned on, this will result in blank space outside the original image.